In times past, CI/CD Pipeline software releases were scheduled in terms of weeks or even years before they were released to production. Subsequently, with the transformation agenda of DevOps, it is easier for software teams to release features in smaller batches that are often scheduled in days or weeks. However, some teams even deliver software updates continuously and sometimes with multiple releases within the same day. In this article, we shall discuss “CI/CD Pipeline: Your First in Azure DevOps with ASP.Net Core”. Here is an exciting article: Azure DevOps: Docker and Kubernetes Deployment with GitHub.
Before I delve into Azure DevOps CI/CD Pipeline, let me briefly look at what DevOps itself is all about.
In the meantime, check these related guides out: How to Archive, Unarchive or Delete a GitLab Project, Azure DevOps and GitHub integration for Docker and Kubernetes deployment, and how to configure email notifications for Azure CI/CD build Pipeline on Azure DevOps Project.
What is DevOps?
The DevOps concept has been around for a while now with many particularly those from non-tech backgrounds not really understanding the idea behind it. Accordingly, the concept is the combination of “Dev” which means “Development” and “Ops” meaning “Operations”.
Furthermore, any software development process must involve people, and goes through a process to produce a software product that will be delivered to end-users continuously CI/CD Pipeline.
Using SonarCloud: How to Integrate SonarCloud with Azure DevOps Pipeline, and how to unregister a GitLab Runner.
Essential DevOps practices include agile planning, continuous integration, continuous delivery, and monitoring of applications. DevOps is a continuous journey.
Having looked at what DevOps is, let me now take a look at Azure DevOps CI/CD Pipeline

Azure DevOps is a Software as a Service (SaaS) platform from Microsoft that provides an end-to-end DevOps toolchain for developing and deploying software.
What can Azure DevOps do?
Azure DevOps comprises a range of services covering the full development life cycle.
- Azure Boards: agile planning, work item tracking, visualization, and reporting tool.
- Azure Pipelines: a language, platform, and cloud-agnostic CI/CD platform with support for containers or Kubernetes.
- Azure Repos: provides cloud-hosted private git repos.
- Azure Artifacts: provides integrated package management with support for Maven, npm, Python and NuGet package feeds from public or private sources.
- Azure Test Plans: provides an integrated planned and exploratory testing solution.
Azure DevOps Continuous Integration/Continuous Deployment (CI/CD) Pipeline
Next is to look at what Azure DevOps CI/CD Pipeline is all about. Azure Pipelines is used to automatically build and test your software projects to make them available to others.
In addition, it works with just about any language (ASP.Net Core, Python, Java, name it) or project type. Software Development Life-Cycle (SDLC).
Continuous Integration (CI) is the practice used by development teams in automating, merging, and testing code. Thus, implementing CI helps to catch bugs early in the development cycle, which makes them less expensive to fix.
Moreover, Pipeline is a runnable specification of steps that reduce developers’ manual work by delivering a new version of software productively to save time.
I am building my Azure CI/CD Pipeline from a simple static web code of ASP.Net Core project initiated within my local system. Building Azure CI/CD Pipeline is not only limited to an ASP.Net Core project, you can also build it from a Docker Image or any other language with your code being hosted remotely on GitHub.
Prerequisites for creating Azure CI/CD Pipeline
To create Azure CI Pipeline on Azure DevOps, the following things must be carried out:
- An Azure subscription. Besides, you can get one free through Visual Studio Dev Essentials.
- After setting up your subscription, visit the Azure DevOps portal to create your first Azure DevOps organization. Moreover, the steps to create Azure DevOps organizations is in the next session of this article.
- You must create Azure DevOps Project
- Access to a GitHub or external Git repo that contains .NET, Java, PHP, Node.js, Python, or static web code.
Some important concepts to know about when it comes to Azure DevOps:
- Azure DevOps Organization – An Organization in Azure DevOps is a tool for organizing and connecting groups of related projects. For this purpose, learn more about Azure DevOps Organization
- Azure DevOps Project – Azure DevOps Project helps in simplifying the setup of an entire continuous integration (CI) and continuous delivery CI/CD Pipeline to Azure with Azure DevOps. What’s more, it provides a repository for source code and a place for users to plan, track progress, and collaborate on building software solutions.
What we get with free Azure DevOps Organization:
- Five free users with Basic access
- Unlimited Visual Studio subscribers and Stakeholders
- Free monthly amounts of additional services such as build and deployment
Prerequisite for creating an Azure DevOps organization or project collection:
- Read and understand how to Plan your organizational structure.
- Setup an Azure AD. Meanwhile, without Azure AD, you’re solely responsible for controlling organization access.
- Organization names must start with a letter or number, followed by letters, numbers or hyphens, and must end with a letter or number.
Prerequisite for creating Azure DevOps Project:
You need an organization before you can create a project. Then, you must be a member of the Project Collection Administrators group or have the Create New Projects permission set to Allow.
Please see How To Use Azure Key Vault Secrets in Azure Pipelines, Azure CI/CD: Configuring Email Notifications in Azure DevOps.
Steps to Create Azure DevOps Organization
Sign in to Azure DevOps, and select New Organization. Confirm the information, and then select Continue.
Congratulations, you're now an organization owner!Sign in to your organization at any time through the organization’s unique URL. In addition, this will appear like this https://dev.azure.com/{yourorganization}.

As you can see from the screenshot above I have already had an existing organization and the name of my organization is “imohetuk”. Therefore, my organization’s URL will be
https://dev.azure.com/imohetuk Creating Azure DevOps Project
Select your desired Azure DevOps organization to open the project creation page. Then, select New project
Afterwards, enter information into the form provided and decide if you want to make your project public or private. Under the “Advanced” tab, select either Git or Team Foundation type of version control).
Click Create. Then, the welcome page appears

In the screenshot shown above, I named my project “demoproject”. I made it a private project and selected Git as my preferred Version Control.
Adding Users to Azure DevOps Project
– You can add users to a project or team, add projects to organizations, and add teams to projects
- You must have an organization and project
- To add users to an organization, you must be a member of the Project Collection Administrators group
- To add users to a team, you must be a Team Administrator, or you must be a member of one of the administrative groups. To this end, select Create.
Building your First Azure CI/CD Pipeline on Azure DevOps
Having created my project and set to build my first Azure CI/CD Pipeline on Azure DevOps, I would like to show you what the Azure DevOps Repository looks like before pushing the code project into it. Therefore, see the screenshot below:

From the above, Azure DevOps provides you with several options on how you can get your code into your Azure DevOps repository.
- The first option is if you want to clone an already existing code into Visual Studio Code (VSCode) IDE and start working on your project and then push it back to Azure repo.
- While the second option is if you have an existing repository in your command line just as the method I am using here you can easily push it to the remote origin from your local system and have the code stored on Azure Repo.
- Moreover, if you want to import your code hosted remotely in GitHub you can use the “Import” option.
So, it's time to get to work!As stated in the previous section, I built my Azure CI/CD Pipeline from my local system using an ASP.Net Core Project.
Create a folder on the desktop of your local system and name it whatever name you desired. From the screenshot below, I named mine “Azure DevOps DemoProject”. As you can see the folder is empty.

Now, let’s get started by running the.Net code project.
Accessing Command Prompt: Project Folder Method
First, launch the Command Prompt in your local system. To do this, open the project folder and type “cmd”. See the below screenshot and type cmd where the arrow is directly pointing to.

Typing cmd will open up the command prompt interface within the project folder as shown below:

Then, proceed to run the code below to create the ASP.Net Core project as shown in the screenshot below:
dotnet new mvc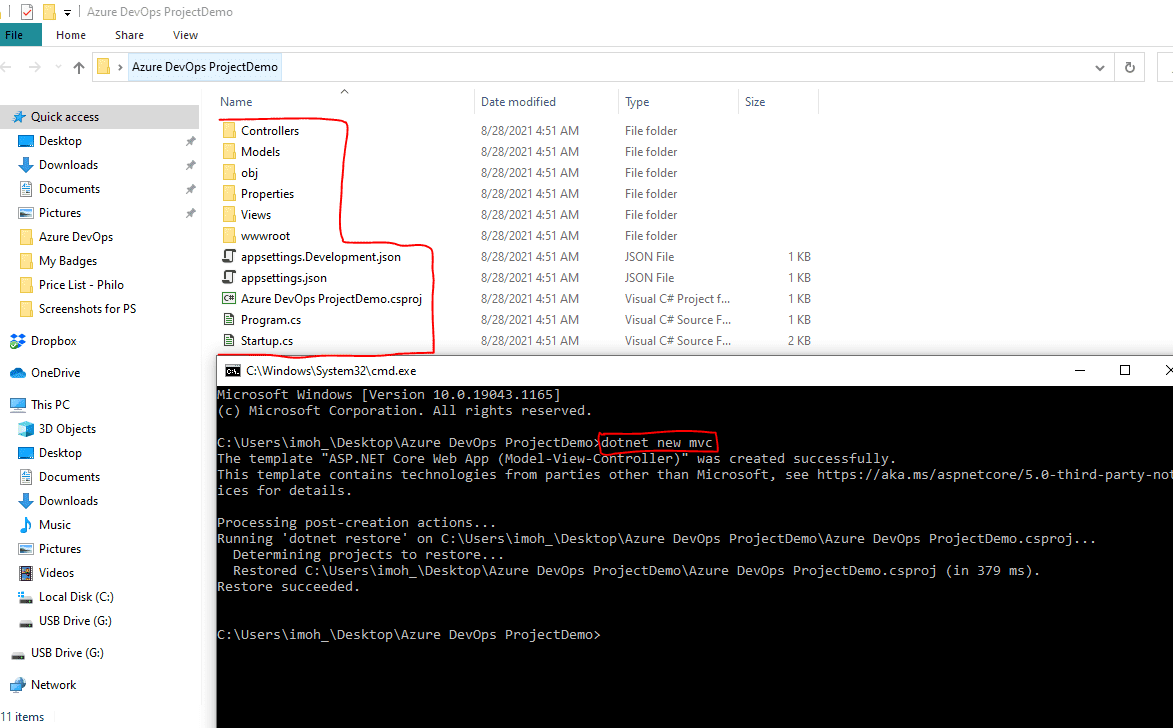
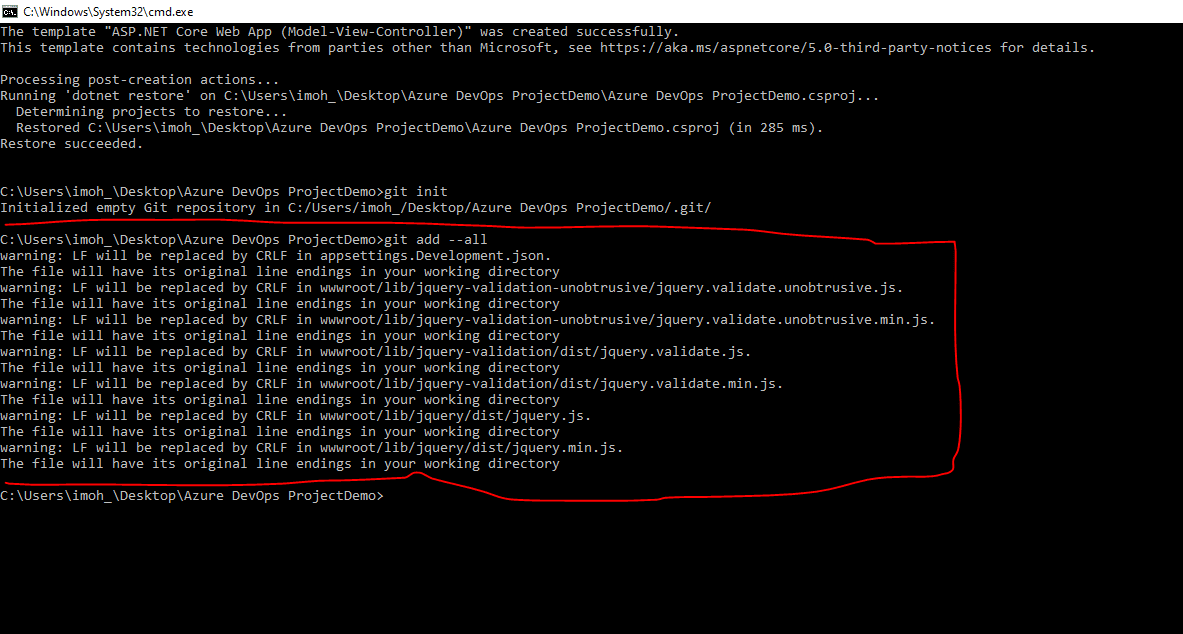
From the screenshot above, you can see that the project files have been created successfully. Now, you will need to initialize the local repository by running the git init command in your command prompt.
Adding Files to Repository: Initializing Version Control
Having initialized the code project, the next thing to do is to add all the files to my repo by running the git add –all command. See the below screenshot to see that all the files have been added.
The next thing is to commit all the project files. Subsequently, I do this by running the git commit -m followed by a commit message. So, having committed the files, it’s time to push it to the remote origin by running the git remote add origin followed by the Azure Repo URL.
Then, head to the CI/CD Pipeline project and locate the Repo tab and copy the repo URL and paste the same in your command prompt. Doing this will automatically issue the git push -u origin --allcommand. Afterward, just press the Enter key on your keyboard to push the code to the Azure repo.
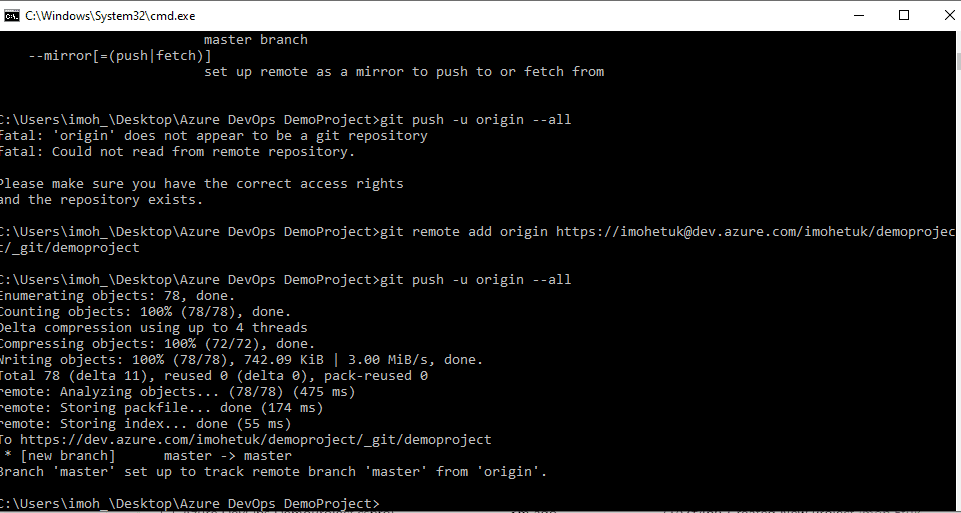
From the above screenshot, all the project files have been successfully pushed to the master branch of the Azure Repository.
Thus, after pushing the codes, head to the Azure DevOps Repository to inspect if your codes have been pushed there. Meanwhile, mine has been pushed, see the screenshot below:

Now click on the Pipeline tab and click on “Create Pipeline”

The next phase is for you to locate the appropriate location that you have your code hosted CI/CD Pipeline. Following this, Azure DevOps will ask you boldly ” Where is your code?” See the screenshot below:

Selecting Project Type and Repository Source
So, it’s about time I select my type of project.

I will configure my Pipeline. I have done that through the following screenshot:

This stage will take me to my Pipeline review stage as shown in the screenshot below:

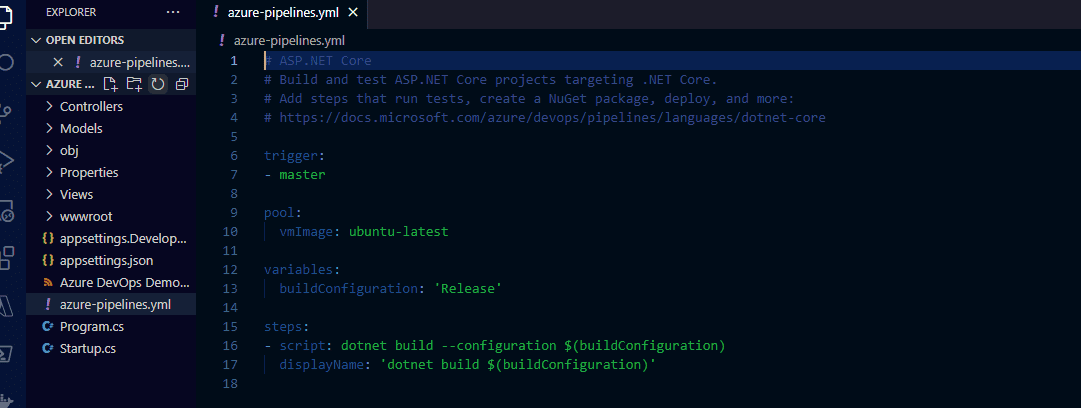
From the screenshot above, take your time to study the YAML file. In my YAML file, the comments are well stated in green color and the build will trigger from the master branch.
In addition, the pool option simply identifies the type of Virtual Machine image which is ubuntu-latest. Meanwhile, the lastest added to it means that the vmImage is up to date CI/CD Pipeline.
The build variable is marked as “Release” which defines the stage where the pipeline is delivered to the repository. From this stage, go ahead and click on the “save and run” button. Doing so will take you the screenshot shown below:
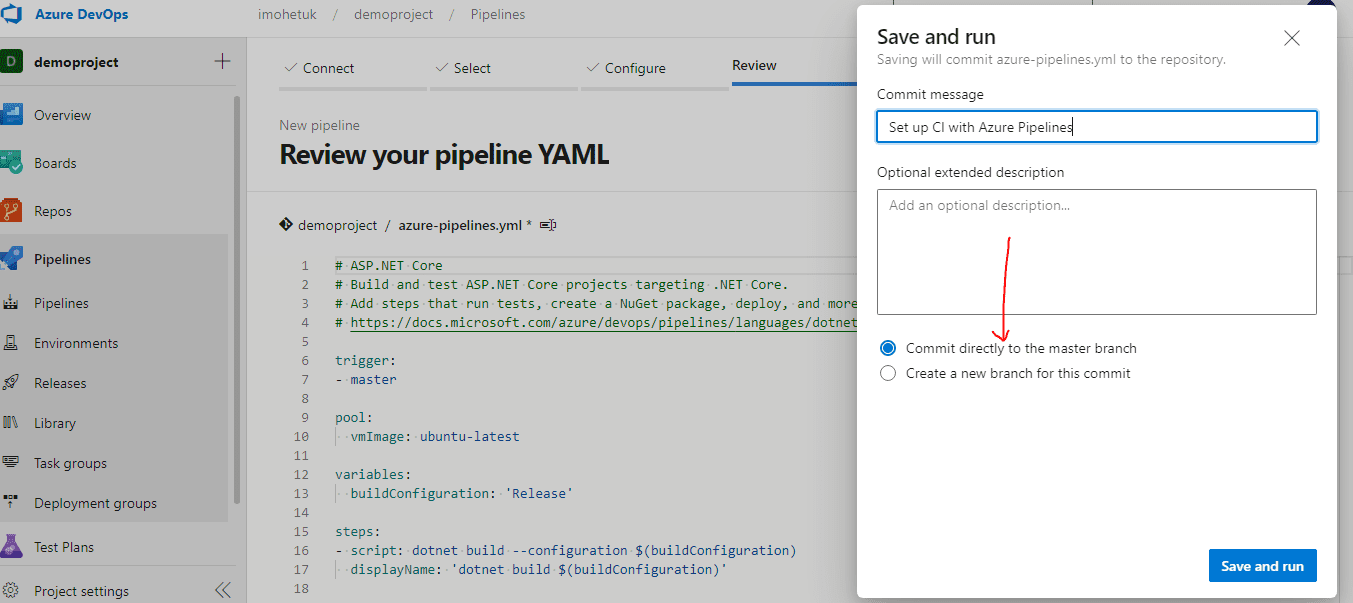
Initiating CI/CD Pipeline in Azure Pipelines for Master Branch
For instance, I supplied my commit message as “Set up CI with Azure Pipelines. Then, I left the optional extended description column blank and committed it directly to the master branch and click on save and run.
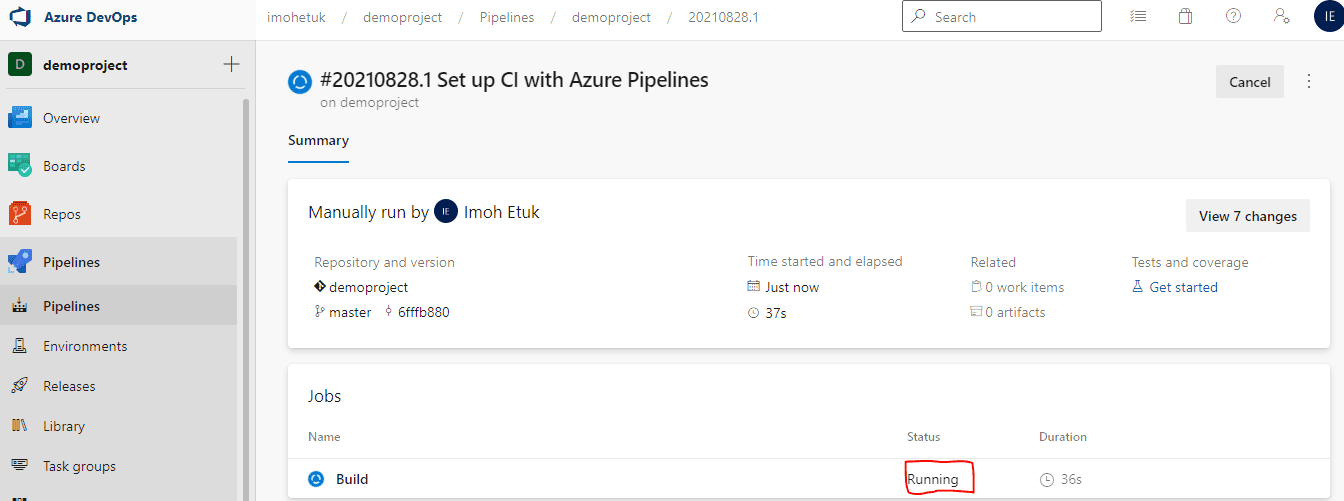
My Pipeline is on queue getting ready to start running and give me a successful email notification.

The next screenshot shows the build status has changed from the queue status to the running status. Hence, take a look at it;
Wow! the build status finally changed to “success”. Thus, see the screenshot below CI/CD Pipeline:
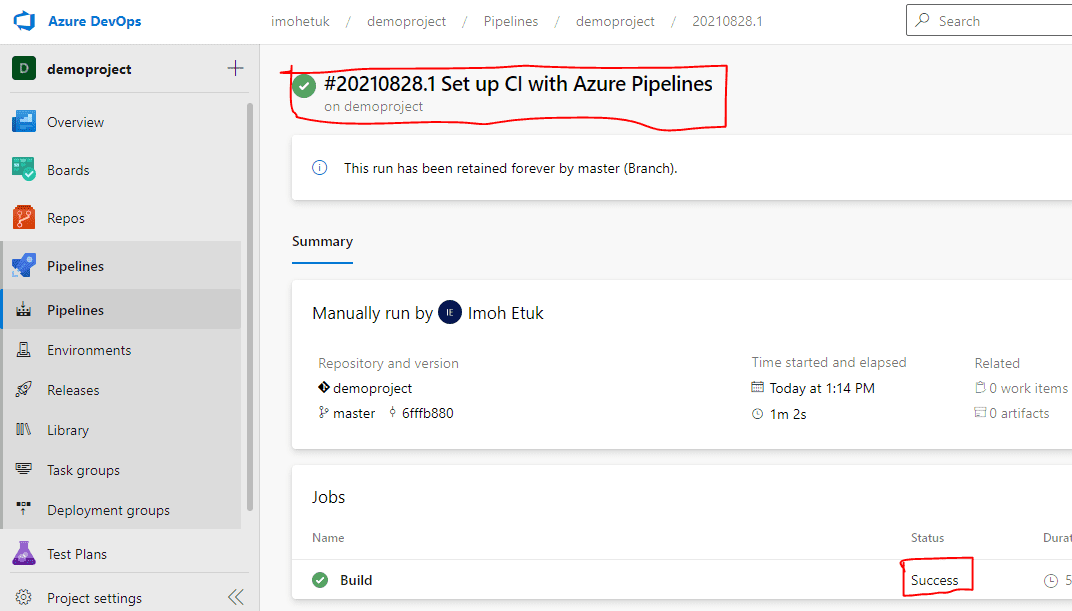
Afterwards, I will go to the Repo section to confirm that my build is successful. See my screen below:

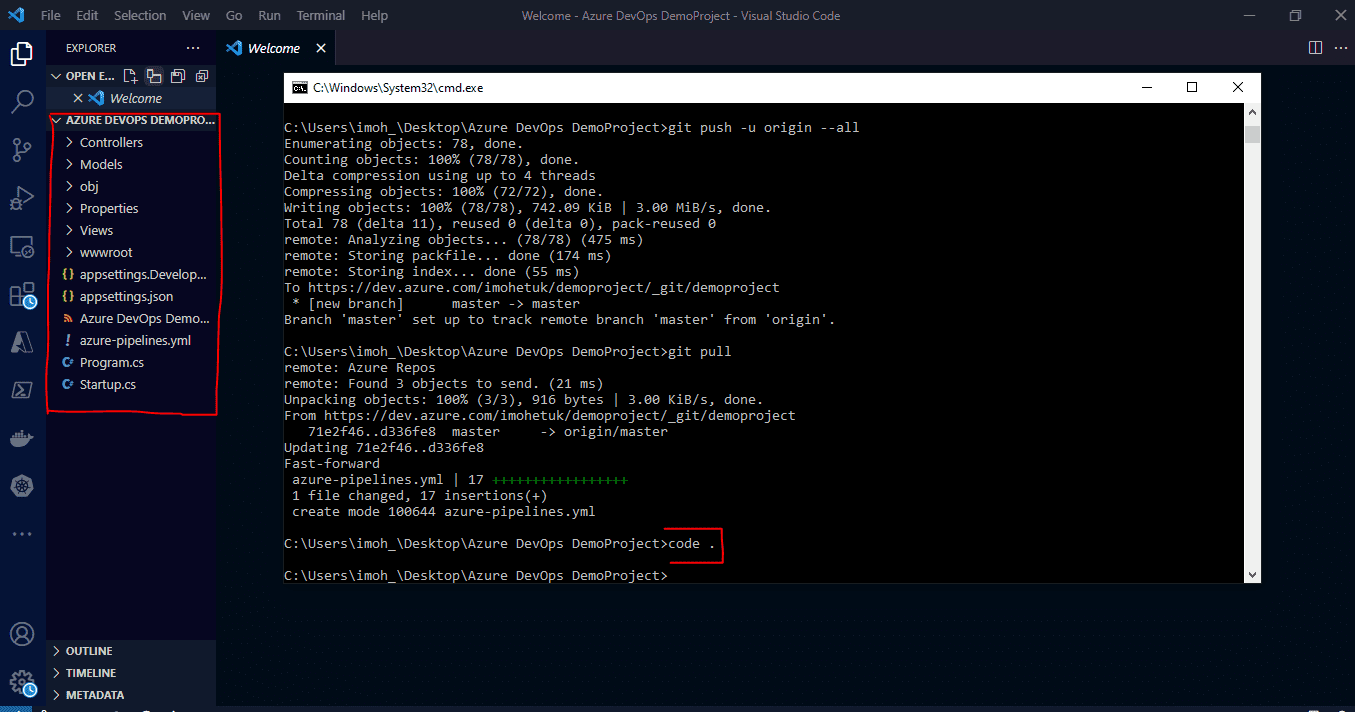
The next thing to do is to pull the YAML file to the local repository in our local system. Then, run the git pull command on your command prompt.

The YAML file has been pulled to the local repo in the local machine. Nonetheless, there is no limit to the number of times you can run your build Pipeline from your code.
How to fix a bug in a failed build Pipelin
For instance you’re working in a real production environment and your build pipeline failed to run. What will you do, give up on it? Now run code . within the command prompt in your local machine to open up VSCode. Thus, see the screenshot below:
Now take time to observe the YAML files to see that it’s the same as what you have in Azure Repo. So, see the screen below:
Testing Pipeline Failure: Introducing deliberate code error
Now make any erroneous alteration to any code within the project files and commit the same to the Azure Repo and watch the pipeline failed to build.
Moreover, I am altering the HomeController.cs files by deleting one of the curly braces. Therefore, see the screenshot below:

Now I’ll add a commit message “Updated controller” and push it to the Azure Repo to automatically build my pipeline.
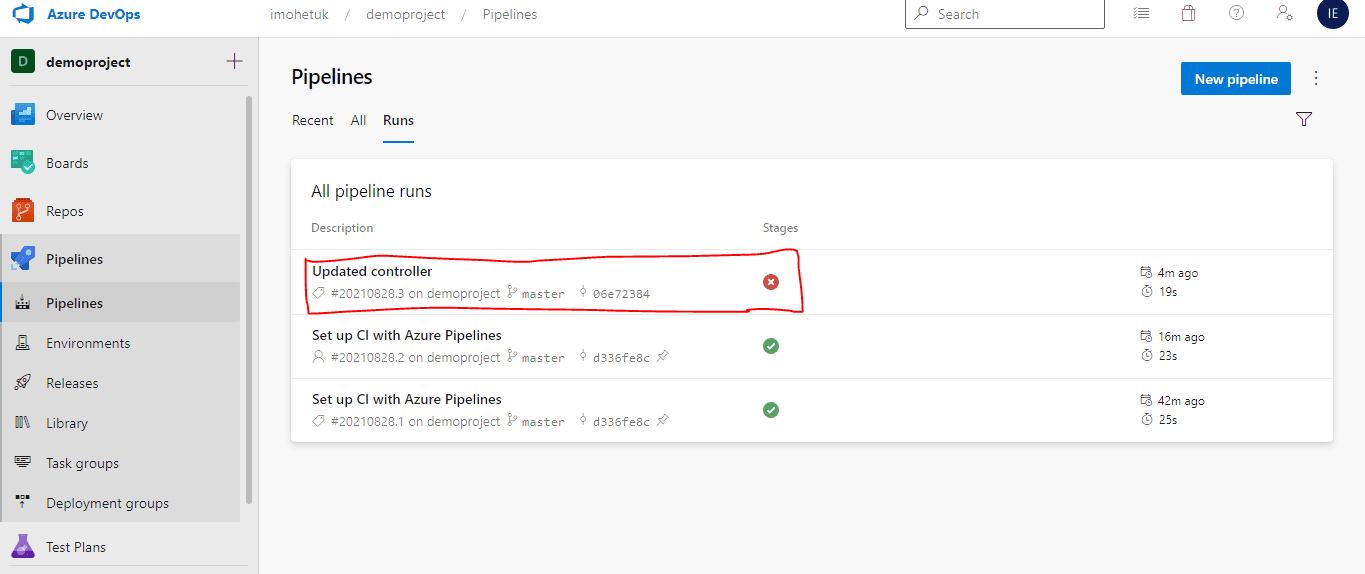
The above screen shows that the pipeline has failed to build and run successfully because of the error.
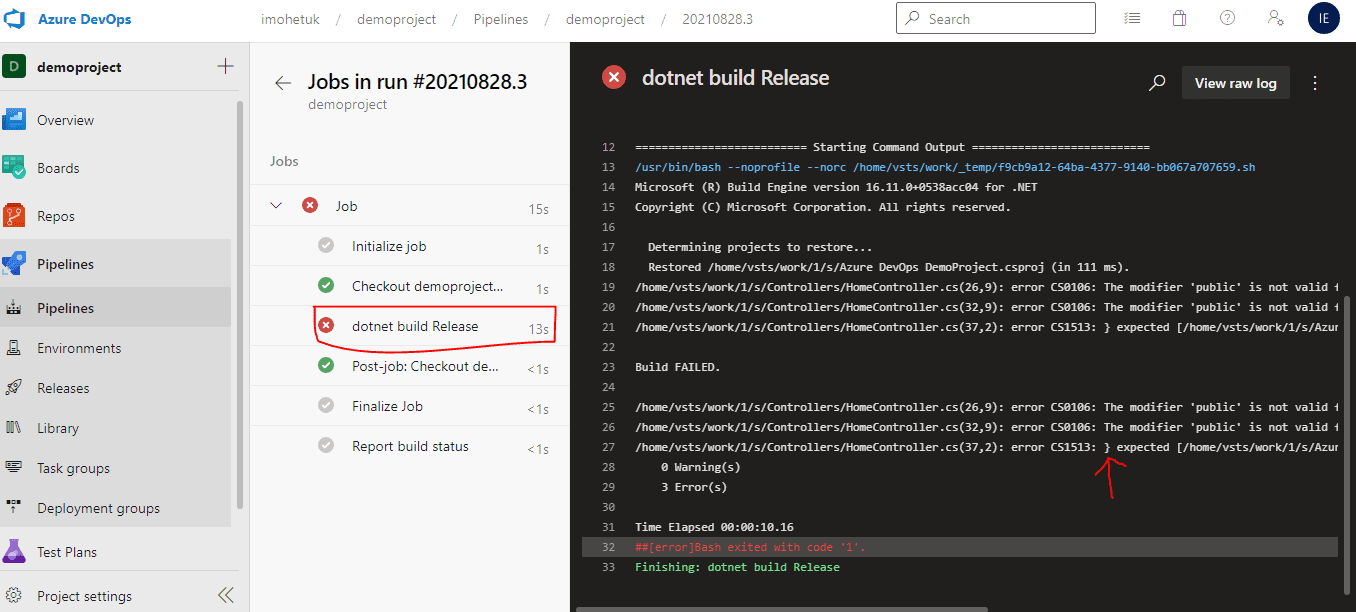
The next screenshot shows us what the problem is. Nonetheless, the error can be fixed by clicking on the “troubleshooting failed runs” button as indicated on the screen.

After this, troubleshoot the error. To do so, click on the failed pipeline to locate the error. Meanwhile, CI/CD Pipeline has indicated the error by pointing to the curly brace that was deleted from the below screen.
Resolving the Error and Updating the CI/CD Pipeline
Now, I will return to my VSCode screen to fix the error, commit and push it back to the CI/CD Pipeline. To demonstrate this, see the screen below:
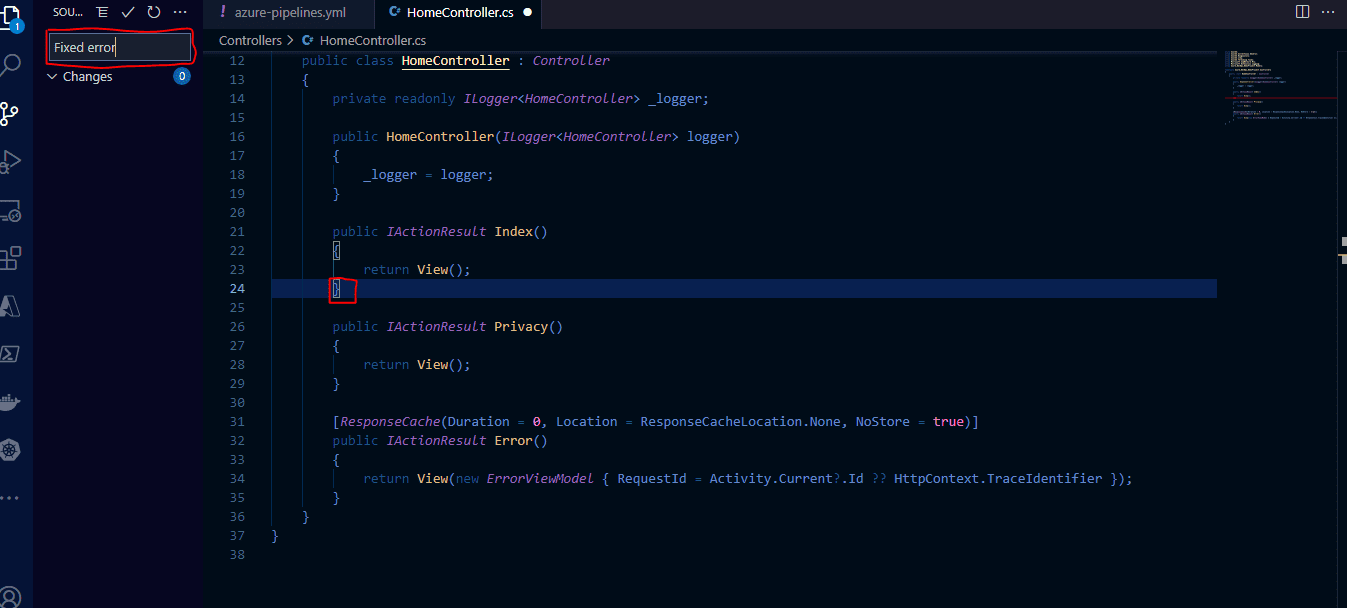
Following this, the commit message which will serve as the title of the build pipeline is “Fixed error”.

As you can see from the screenshot, the error has been fixed and the build is successful.

The above screen simply compares the error and the fix side-by-side to give you more insights into how it is easy to fix any error in CI/CD Pipeline.
The last thing I will do is to view our project on a web browser. Run dotnet run command in your command prompt or your VSCode terminal within the project directory to view the web page of your build project.

From the screenshot, the URL to access the app on a web browser is provided as CI/CD Pipeline URL:5000, where 5000 is the port number that the application will run through in my localhost. Running this URL, gives me the web page below:

Cleaning up your Azure DevOps Environment
This is very essential as it will help to control spending on your Azure Subscription. To do so, follow these steps:
- From project settings, scroll to the bottom of the page
- Then, locate the delete button in “Red“
- After that, you will be asked to type the name of the project you wish to delete, supply the project name
- Click delete and you’re done.
Conclusion on CI/CD Pipeline: Your First in Azure DevOps with ASP.Net Core
Congratulations!! You have successfully built your first Azure CI/CD Pipeline on Azure DevOps and learned about setting up and configuring Pipeline with a sample ASP.NET Core Azure DevOps project as well as fixing the bug in your build Pipeline.
Azure DevOps helps organizations to plan smarter, collaborate faster, and ship better within the set of development services. The automated Pipeline setup also provides the test, build, and deployment of the application easily. It is a good collaboration tool to get started with!
I hope you found this blog post helpful on CI/CD Pipeline: Your First in Azure DevOps with ASP.Net Core. Please let me know in the comment section if you have any questions.