The Azure Stack Hub Service Fabric is a distributed systems platform that makes it easy to package, deploy, and manage scalable and reliable microservices and containers. Service Fabric also addresses the significant challenges in developing and managing cloud-native applications. Developers and administrators can avoid complex infrastructure problems and focus on implementing mission-critical, demanding workloads that are scalable, reliable, and manageable. In this article, you will learn how to Create a Service Fabric Cluster using the Azure Stack Hub portal and the CLI.
Service Fabric represents the next-generation platform for building and managing these enterprise-class, tier-1, cloud-scale applications running in containers. Also here are some of my related guides: How to install and configure Ansible on Ubuntu, how to install Ansible on Windows with Cygwin, how to automate infrastructure deployments in the cloud with Ansible and Azure pipelines, how to install Kerberos packages in Windows via Cygwin, how to configure a remote server (windows) to Support Ansible, and how to deploy azure vmware solution private cloud.
Creating a new key vault
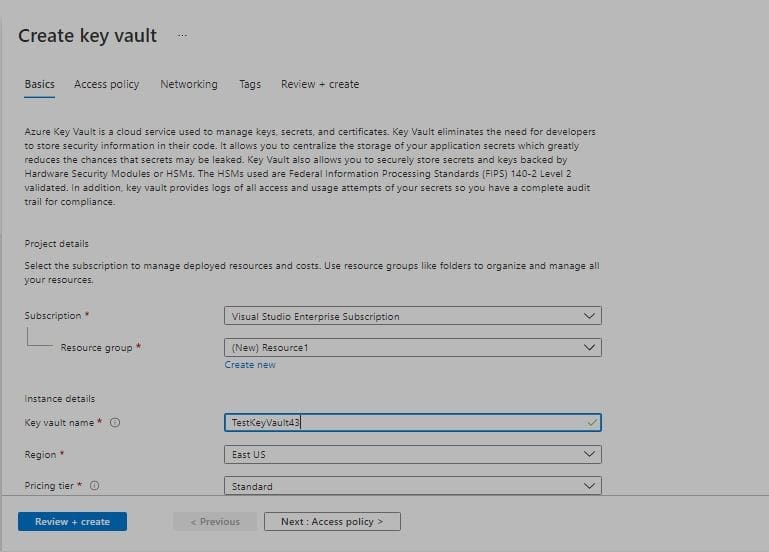
Before creating a Service Fabric cluster, it is necessary to create a key vault to store the certificates for the cluster. These certificates are used in Service Fabric to provide authentication and encryption to secure various aspects of a cluster and its applications.
- Log in to the Azure portal.
- In the favorites panel, select Create a resource.
- Type Key Vault inside the search services and market place.
- Select Key Vault and Create
Access policy tab
- Enable Access to: – Select the first two check boxes to allow access to the key vault for virtual machines and the Azure Resource Manager.
- Current Access Policies – Select +Add access policy to configure the permissions that a user, group or service principal has to the key vault.
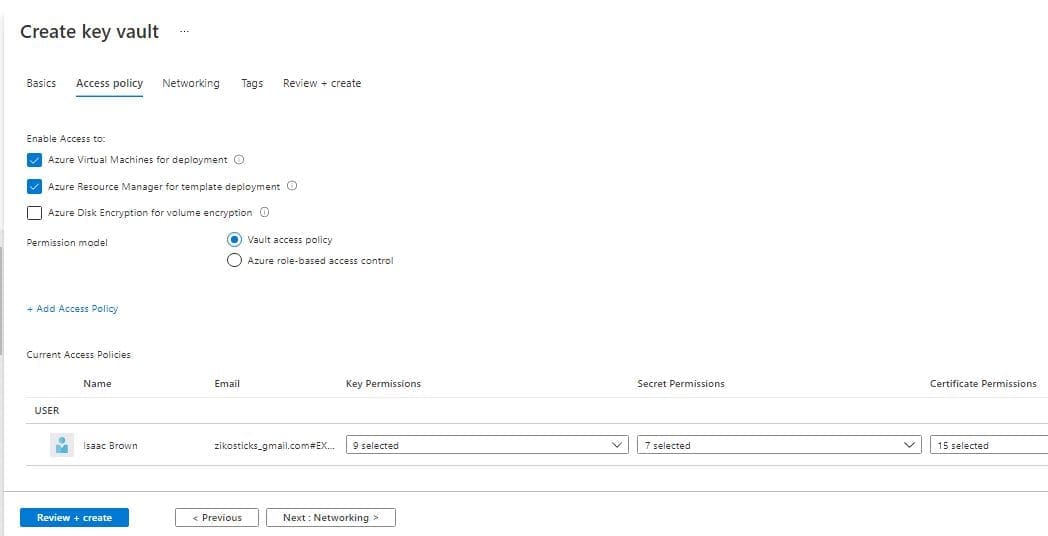
- Click Review + create.
- On the Review + create tab, review the selections you’ve made and then click Create to start the deployment.
Adding a certificate to the key vault
Once the key vault has been deployed, navigate to it by clicking All services in the favorites panel, then selecting Key Vaults under the Security section.
- Select your key vault from the list.
- In the Settings section of the key vault blade, select Secrets.
- On the Secrets page, click the + Generate/Import button.
- In the Create a secret blade, enter the following information:
- Upload options – Select the Certificate option.
- Upload certificate – Select the certificate to upload.
- Name – The name of the certificate to identify it within the Key Vault.
- Activation Date – Specifies when the certificate will become active.
- Expiration Date – Specifies when the certificate will become inactive.
- Enabled – Indicates whether or not the secret data can be retrieved.
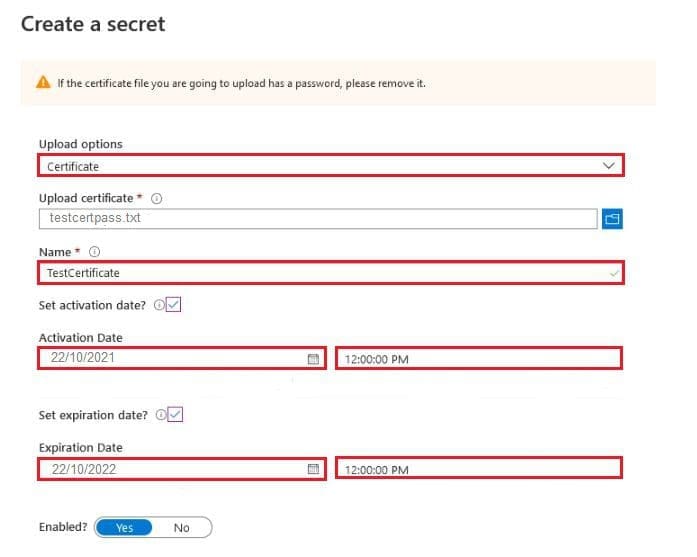
- Click Create.
- Repeat as necessary, depending on how many certificates you require.
Please see How To Use Azure Key Vault secrets in Azure Pipelines, How to “View RDP Configuration Settings: Connect automatically on an RDP session“, how to Fix cannot save to the location Windows\system32\Default.rdp, and how to Compact Virtual Hard Disks.
Gathering key vault and certificate information
During the configuration of the Service Fabric cluster, you must provide several details relating to the key vault and certificates.
- Once you have deployed the key vault, navigate to it by clicking All Services in the favorites panel, then selecting Key Vaults under the Security section.
- Select your key vault from the list.
- In the Settings section of the key vault blade, select Properties.
- Copy the Resource ID and store it for later use.
- In the Settings section of the key vault blade, select Secrets.
- On the Secrets blade, select the certificate you added in the previous section.
- On the certificate’s blade, select the current version.
- Copy the Secret Identifier.
- Repeat for each certificate that you are going to use for the Service Fabric cluster.
Create a Service Fabric cluster
In the favorites panel, select Create a resource. In the search bar, search for Service Fabric Cluster. Select Service Fabric Cluster and click Create, and In the Basics blade, enter the following information and click OK:
- Subscription: Select your subscription.
- Resource group: Select your resource group
- Cluster Name: The name of your cluster.
- Location: Prefix for the name of each node (VM).
- Operating system: Size of the VM scale set for the primary node type.
- Username: For every additional node type, add an array with a count of the nodes in each node type. For example, if you want two additional node types with three nodes in each, enter 3,3 (separating the amount of nodes for each node type with a comma).
- Password: Type your password.
- Confirm Password: Confirm password.
- Initial VM scale set capacity: Select your vm scale set capacity.
- Node types: Choose your node types.
- Keyvault and primary certificate: Select your certificate
Please see How to decide whether you need Data Fabric or Data Lake?, How to back up an Azure VM from the VM settings, How to Secure a Web Server on a Windows VM in Azure using TLS/SSL Certificates Saved in Azure Key Vault, and how to setup Up your Amazon S3 Glacier and FastGlacier for Your Online Vault.
Creating a Service Fabric Cluster via the CLI
The Azure Service Fabric command-line interface (CLI) is a command-line utility for interacting with and managing Service Fabric entities. The Service Fabric CLI can be used with either Windows or Linux clusters. The Service Fabric CLI runs on any platform where Python is supported.
Let’s Create A Resource Group
Log in to the Azure portal. At the top bar, select the Cloud Shell, Choose Bash, and Type the following below:
dir
mkdir serviceFabric
az group create --name azsfgroup --location eastus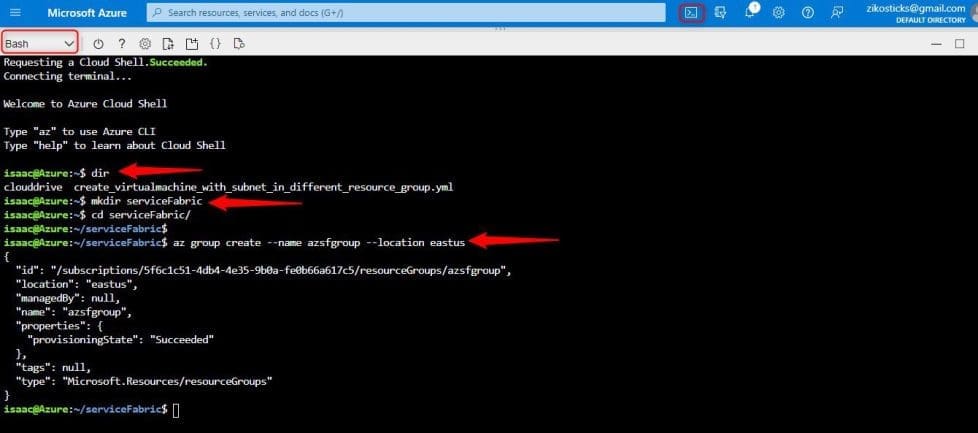
Let create a Service Fabric Cluster Using The CLI
Log in to the Azure portal. At the top bar, select the Cloud Shell, and choose Bash. Type the following below:
az sf cluster create --resource-group azsfgroup \
--location eastus \
--cluster-name azsjdsf \
--certificate-password aznotmyPass321^ \
--certificate-output-folder . \
--certificate-subject-name azsjdsf.eastus.cloudapp.azure.com \
--vault-name azsfnewvault \
--vault-resource-group azsfgroup \
Note: This will give an error as shown below. The reason is that the vm-password, user-name, KeyVault-name as not been set

Create a Key Vault using the Azure CLI
Log in to the Azure portal. At the top bar, select the Cloud Shell, Choose Bash, and Type the following below:
az keyvault create --name "azisbnewvault" --resource-group "azsfgroup" --location "EastUS"
Type the following below to Create a Service Fabric Cluster Using The CLi
az sf cluster create --resource-group azsfgroup \
--location eastus \
--cluster-name azsjdsf \
--certificate-password aznotmyPass321^ \
--certificate-output-folder . \
--certificate-subject-name azsjdsf.eastus.cloudapp.azure.com \
--vault-name azisbnewvault \
--vault-resource-group azsfgroup \
--vm-password aznotmyPass987^ \
--vm-user-name azsjdtestuser
This article provided a step-by-step overview of how to Create a Service Fabric Cluster using the Azure Stack Hub portal and the CLI.