
Web traffic to web servers can be easily encrypted using Transport Layer Security (TLS), formerly known as Secure Sockets Layer (SSL) certificates. These TLS/SSL certificates are deployable to Windows virtual machines (VMs) on Azure securely and can be saved in the Azure Key Vault. In this article, you will learn how to Secure a Web Server on a Windows VM in Azure using TLS/SSL Certificates Saved in Azure Key Vault. Please see how to Install Web Server IIS in Windows Server 2019, and how to Install “Lets Encrypt” on Apache HTTP Web Server.
A web server is software and hardware that responds to client requests sent over the World Wide Web using HTTP (Hypertext Transfer Protocol) and other protocols. A web server’s primary responsibility is to display website content by storing, processing, and sending web pages to users.
Also, see how to add and remove IIS Web Server on Windows Server 2019 via the Server Manager and PowerShell, and
Secure a Web Server on a Windows VM in Azure using TLS/SSL Certificates in Azure Key Vault
You can encrypt web servers such as Nginx, Apache, and Internet Information Service (IIS) hosted on Azure Windows Virtual Machines the same way you would encrypt the ones installed on any of the Linux Distros such as Debian, Ubuntu, or CentOS.
Please follow along and create an Azure Key Vault. Generate or upload a certificate to the Key Vault. Create a VM and install the IIS web server. And lastly, add the certificate into the VM, and configure IIS with a TLS binding.
Create Azure Key Vault TLS/SSL Certificates
You can get started with creating Azure Key Vault by launching the free interactive cloud shell window directly on the Azure Portal or running the commands using PowerShell on our local PC.
Here, I will create everything from the in-built PowerShell on the local PC because I have installed the Azure CLI . Please see How To Use Azure Key Vault secrets in Azure Pipelines, and how to back up an Azure VM from the VM settings.
Note: The reason why you need to store the SSL certificate in Azure Key Vault is that Azure Key Vault helps protect cryptographic secrets and keys, including passwords or certificates. Key Vault makes managing certificates easier and lets you keep control of the keys used to access those certificates.
To create an Azure Kay Vault, follow the steps below:
1: Run the command below in your PC’s cloud shell or the in-built PowerShell.
Note: Every resource created in Azure is held in a logical folder called the Resource Group. So you must create a Resource Group first before creating Key Vault. Review how to create linux vm to learn how to create a resource group with Azure CLI.
2: Proceed to create Azure Key Vault using the PowerShell cmdlets below:
$az keyvault create --name <keyvaultname> --resource-group <resourcegroupname> --location <yourlocation>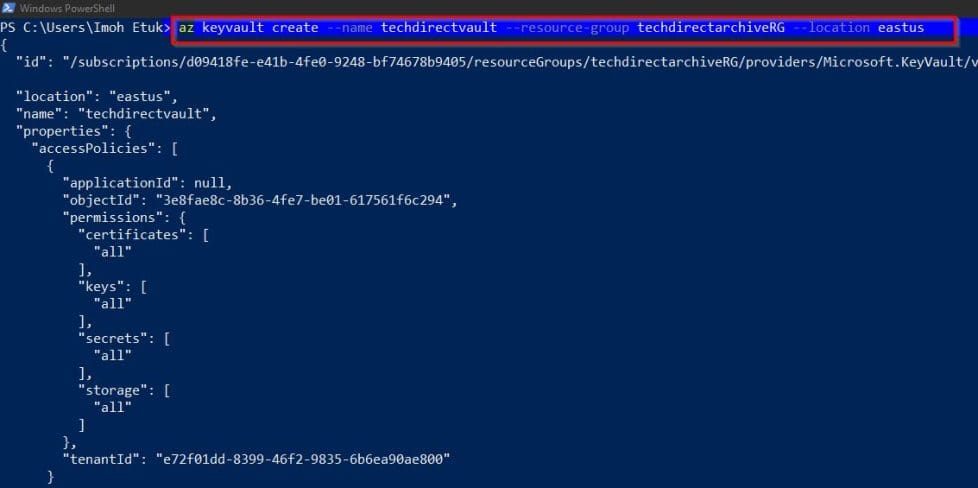
You should take a look at the following related articles: how to Create a Linux Virtual Machine Via Azure CLI, Install an Nginx Web-Server and Configure TCP Port, and how to Configure Virtual Host for Apache HTTP Web Server to Host Several Domains on Ubuntu 20.04 LTS,
Generate a TLS/SSL Certificates and store it in Key Vault
The next step is to generate a certificate and store it in Key Vault. Let’s do this through the Azure Portal. You can also generate a certificate using the PowerShell command below:
$policy = New-AzKeyVaultCertificatePolicy `
    -SubjectName "CN=www.techda.com" `
    -SecretContentType "application/x-pkcs12" `
    -IssuerName Self `
    -ValidityInMonths 12

Add-AzKeyVaultCertificate `
    -VaultName "Keyvaultname" `
    -Name "techdacert" `
    -CertificatePolicy $policy

The key vault I created is already there on the Azure Portal, as shown in the screenshot below:

Generate a Certificate
To generate the certificate, do the following:
1: Double-click to open the Key Vault you created. Locate "Certificate" within the Key Vault blade and click on Generate/Import tab

2. In the TLS/SSL Certificates method, select "generate." You can also import the certificate. In this case, select “import.”
Here, we’re generating it. After specifying the method of certificate creation, go ahead and specify other details as shown in the screenshot below, and click on "Create". Note, generating a self-signed certificate

Now the certificate has been generated and enabled.

You can also Here are some relevant articles: Setting Up your Amazon S3 Glacier and FastGlacier for Your Online Vault, and how to create a Service Fabric Cluster using the Azure Stack Hub.
Creating a Virtual Machine
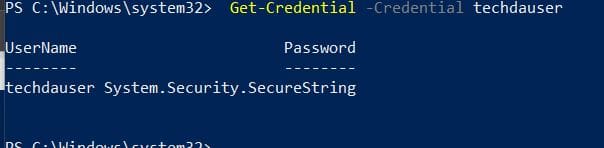
The next step in the article is to create a Windows virtual machine. The first thing we need to do is set an administrator username and password for the VM with the Get-Credential PowerShell cmdlet TLS/SSL Certificates:
Get-Credential -Credential <Username>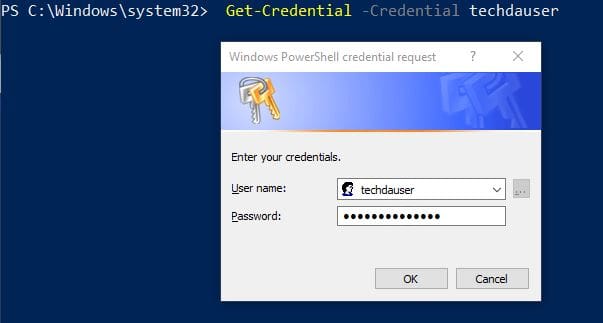
You will be prompted to provide the user’s password. Go ahead and type the password. The credentials will be set as shown below:
Now let’s create the Windows VM with the following PowerShell Cmdlet: (Note, to allow secure web traffic, you must keep port 443 open)
# Create a VM
New-AzVm `
    -ResourceGroupName techdirectarchiveRG `
    -Name techdavm `
    -Location eastus `
    -VirtualNetworkName techdaVnet `
    -SubnetName techdaSubnet `
    -SecurityGroupName techdaNetworkSecurityGroup `
    -PublicIpAddressName techdaPublicIpAddress `
    -Credential $cred `
    -OpenPorts 443
When you execute the code above, it will take a few minutes for the VM to be created.

Install the IIS web
Now, the step uses the Azure Custom Script Extension to install the IIS web server with Set-AzVmExtension.
Now let’s install the IIS with the below command:
$Set-AzVMExtension -ResourceGroupName techdirectarchiveRG`
    -ExtensionName "IIS" `
    -VMName <YourVMName> `
    -Location <YourPreferredLocation> `
    -Publisher "Microsoft.Compute" `
    -ExtensionType "CustomScriptExtension" `
    -TypeHandlerVersion 1.8 `
    -SettingString '{"commandToExecute":"powershell Add-WindowsFeature Web-Server
-IncludeManagementTools"}'
Adding the certificate to the Virtual Machine from the Key vault
To add the certificate from Key Vault to a VM, obtain the ID of your TLS/SSL Certificates with Get-AzKeyVaultSecret. Add the certificate to the VM with Add-AzVMSecret as shown below:
$certURL=(Get-AzKeyVaultSecret -VaultName techdirectvault12 -Name techdacert).id

$vm=Get-AzVM -ResourceGroupName techdirectarchiveRG -Name techdavm
$vaultId=(Get-AzKeyVault -ResourceGroupName techdirectarchiveRG -VaultName techdirectvault12).ResourceId
$vm = Add-AzVMSecret -VM $vm -SourceVaultId $vaultId -CertificateStore "techdacertstore" -CertificateUrl $certURL

Update-AzVM -ResourceGroupName techdirectarchiveRG -VM $vm 
Configure IIS to use the TLS/SSL Certificates
To configure the IIS use the TLS/SSL Certificates, run the cmdlet command below:
$publicSettings = '{
    "fileUris":["https://raw.githubusercontent.com/Azure-Samples/compute-automation-configurations/master/secure-iis.ps1"],
    "commandToExecute":"powershell -ExecutionPolicy Unrestricted -File secure-iis.ps1"
}'

Set-AzVMExtension -ResourceGroupName techdirectarchiveRG `
    -ExtensionName "IIS" `
    -VMName techdavm `
    -Location eastus `
    -Publisher "Microsoft.Compute" `
    -ExtensionType "CustomScriptExtension" `
    -TypeHandlerVersion 1.8 `
    -SettingString $publicSettings
Remember to replace the vm name and other details with your details.
Obtain the public IP Address to your VM to Test the web app
Obtain the public IP address of your VM using the Get-AzPublicIPAddress Cmdlets below:
Get-AzPublicIPAddress -ResourceGroupName techdirectarchiveRG -Name techdaPublicIpAddress | select "IpAddress"
Finally, browse to the IP address in your web browser by entering https://<myPublicIP> in the address bar. To accept the security warning if you used a self-signed certificate, select Details and then Go on to the webpage.
I hope you found this article helpful on how to Secure a Web Server on a Windows VM in Azure using TLS/SSL Certificates Saved in Azure Key Vault. if you require further assistance please let me know via the comment section.


The point of this article was securing IIS website with Azure Key Vault TLS certs but the article actually concludes with the promise to talk about “updating later” the topics of adding the cert and configuring TLS. Thanks for the intent but please finish or remove the post
Hi Matt,
The article has been updated now. Thanks for the reminder. Cheers