Skip to content

TechDirectArchive

Hands-on IT, Cloud, Security, Veeam & DevOps

  • Home
  • About
  • Advertise With US
  • Reviews
  • Contact
  • Toggle search form

How to install Ansible on Windows with Cygwin

Posted on 01/03/202017/08/2026 IT Expert By IT Expert No Comments on How to install Ansible on Windows with Cygwin
  1. Home /
  2. Windows Server /
  3. How to install Ansible on Windows with Cygwin
installing Ansible

Ansible is an open-source software provisioning, configuration management, and application-deployment tool enabling infrastructure as code. It runs on many Unix-like systems and can configure both Unix-like systems as well as Microsoft Windows. Installing Ansible generally is pretty straight forward but on windows, it is a little bit complicated.

Ansible uses the pywinrm package to communicate with Windows servers over WinRM. It is not installed by default with the Ansible package but can be installed, see the following link. Here are some related contents: How to view installed packages in Cygwin in Windows, how to configure Kerberos for Ansible Authentication, and how to determine Cygwin version.

Cygwin is free software that provides a Unix-like environment and software toolset to users of any modern x86 32-bit and 64-bit versions of Microsoft Windows. Cygwin consists of a Unix system call emulation library, cygwin1.dll, together with a vast set of GNU and other free software applications organized into a large number of optional packages.

Among these packages are high-quality compilers and other software development tools, an X11 server, a complete X11 development toolkit, GNU emacs, TeX and LaTeX, OpenSSH (client and server), and much more, including everything needed to compile and use PhysioToolkit software under MS-Windows. If you wish to install Ansible on Windows, follow these steps.

Note: Cygwin is a simple program that allows UNIX commands to be run on Windows systems. To automate Ansible for VMware Infrastructure Automation.

1. Install cygwin:

Here are the steps below to install Cygwin
– From https://cygwin.com/install.html
– Download the installer

Windows

Run the setup (install) the file that was just downloaded.

Cygwin installation

On the next page, select the Installation Type
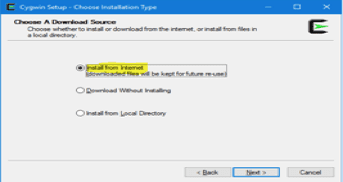
Ansible setup

– Select the root directory (will leave as default)
– Also, select install for all users if multiple users will be using the server

installing Ansible

– Select the Local Package Directory will store installation,( I will leave this as default as it is a test environment). It usually takes (assumes) the location of the initial download file (setup).

C:\Users\tester\Downloads

– Select Connection Type (Select Direct Connection)

Windows

– Choose a download site (will select the first by default)

Cygwin installation

– Click on Next
– This will continue the installation on Cygwin on your windows system and show the progress bar of the installation.

Ansible setup

– Select Packages to install

Windows

2. Install the following packages from the list

- curl
- python
- python-setuptools
- python-crypto
- openssl
- openssl-devel
- libffi-devel
- gcc-g++
- vim
- git

To install, you can use the search menu or expand the packages and from the New drop-down list associated with each package,

Select install as shown below if you wish to install all the packages associated with the Editor.

Ansible setup

– Or use the search menu for a single package and install.

Cygwin installation

 – For Git

Screenshot of a package selection interface for software installation, displaying a list of available packages, their current and new versions, and descriptions.

– For Libffi-Devel  which is a portable foreign function interface library

User interface displaying a selection of software packages to install, featuring a list of packages with their current versions, and options to uninstall or skip installation.

– Click on Next and will prompt a windows allowing you to review and confirm changes.

Screenshot of a software setup window titled 'Crypton Setup - Review and Confirm Changes', displaying a list of packages to be installed along with version numbers.

– This step is a two-step process and will download and then install the following packages on your device.

Cygwin setup progress window showing the installation status of a package, including progress percentages and download details.

– Installing the Cygwin onto our system

Cygwin setup progress screen displaying installation status with a progress bar.

Note: Do not interrupt this installation as this can take a lot of time.

– Click on Finish when the installation is complete

Cygwin setup window displaying options to create icons on the desktop and in the start menu, with a status message indicating installation is complete.

– Lastly, ensure to set the environment variable for Cygwin (This will enable you to run Cygwin from the terminal). Setting the path and environment variables will differ depending on the version of Windows you have on your computer. Choose a link below for your version of Windows.

– Access the System properties
– Click on System Properties via the Explorer window (Note: There are different steps to launch this window).

Windows File Explorer interface showing 'This PC' with folders for Desktop, Downloads, Music, Videos, and System Properties highlighted.

Previously this will open the control panel on the fly, but now it will open the Windows About Settings page.

– Then Click on System info and this will open the control panel window.

Windows settings page showing the 'About' section with a message that the PC is monitored and protected. 'System Info' is highlighted in yellow.

– Click on Advanced System settings

Screenshot of the System Properties window in Windows, showing the Advanced tab with highlighted 'Environment Variables' option.
- Click on Environment Variable
- In the Environment Variable window
- Search for “Path”
Screenshot of Windows Environment Variables settings, displaying user and system variables, including Path, OS, NUMBER_OF_PROCESSORS, and Processor Architecture.
- Double click or select and click on edit.
- On the Edit environment variable
- Click on New
- Add the following parameter
File path displayed in a text field, showing a Cygwin executable location on a Windows system.
Window displaying the 'Edit environment variable' settings, showing a list of system paths with options to New, Edit, Delete, Move Up, and Move Down, including highlighted paths for system32 and cygwin64 bin.

– Select on ok.

Note:
– This will ensure all windows are confirmed and ok is clicked about 3x.
– You may have to restart your environment or else this will not work on the fly in order to use Cygwin on Windows CMD.

Command Prompt interface showing a list of files and directories in the 'C:\Users\Administrator' directory on a Windows 10 system.
Command Prompt window displaying the current directory path for the Administrator user on a Windows system.

The steps below are necessary only if you want to explore other methods of installing Ansible on Windows. You can avoid the steps below if you wish to install Ansible with Cygwin as shown below.

Cygwin setup interface showing package selection for Ansible Server, with 'ansible' highlighted in the list of packages to install.

For other methods of installing Ansible on Windows, follow the steps below.

Install PIP:  What is PIP?  It is an alternate installer for python packages that many uses in managing python related package activities.

Right-click “Cygwin64 terminal on your desktop” and run as Administrator or run from the CMD because UNIX commands can be run now from the command prompt.

For more information about easy_install and PIP, see https://packaging.python.org/discussions/pip-vs-easy-install/

To install PIP, run the command below.
-Note: If you do not have the right python packages installed, the easy_install pip will not work

easy_install-2.7 pip
Command prompt window displaying a path related to Python's easy_install and pip installation
Terminal window showing installation process for pip version 19.2.3 on a Python 2.7 environment.

Install Pywinrm: Ansible uses the pywinrm package to communicate with Windows servers over WinRM. It is not installed by default with the Ansible package, but can be installed by running the following.

pip install "pywinrm>=0.3.0"
Command line output showing Python deprecation warning for version 2.7, and installation process for the 'pywinrm' package.

Install Ansible:
Method 1: The best way to achieve this is to install Ansible via Cygwin.
– Select the packages alongside other packages and install them.

Method 2. Use the command below.

- pip install Ansible
Terminal command output showing the installation of Ansible using pip2, with a warning about Python 2.7 reaching the end of its life and instructions for upgrading.

Note: You need also to rebase all the packages to solve the problem of forking. For this perform the following below.

  1. Rebase-trigger full
  2. Close Cygwin shells (or even reboot your windows)
  3. Run Cygwin installer again and just click on “Next” until you reach the end of the installation, then Cygwin will rebase all the packages.
Building wheel for ansible (setup.py) ... done
Created wheel for ansible: filename=ansible-2.9.5-cp27-none-any.whl size=16162543 sha256=b83577e80aa8c47d9647ed665de4bf59d7a45e7c3d128dc5f565ab9dc9841d32
Stored in directory: /home/tester/.cache/pip/wheels/3b/ab/74/4629c803bf5475edf5c0369f5cb95e834bdd2f7d70f439a027
Successfully built ansible
Installing collected packages: ansible
Successfully installed ansible-2.9.5
WARNING: You are using pip version 19.2.3, however version 20.0.2 is available.
You should consider upgrading via the 'pip install --upgrade pip' command.

To run Ansible on other Operating Systems, see https://techdirectarchive.com/2020/02/23/ansible-installation-and-configuration-on-ubuntu/

After installing Ansible, using the version to see if Ansible is correctly installed.

$ ansible --version
$ ansible --version
ansible 2.9.5
config file = None
configured module search path = [u'/home/tester/.ansible/plugins/modules', u'/usr/share/ansible/plugins/modules']
ansible python module location = /usr/lib/python2.7/site-packages/ansible
executable location = /usr/bin/ansible
python version = 2.7.16 (default, Mar 20 2019, 12:15:19) [GCC 7.4.0]

To see the default host files, navigate to the path C:\cygwin64\etc\ansible

A screenshot of a text editor displaying an ansible configuration file with examples of grouped hosts and database servers.

Now that Ansible is installed, let’s perform our first test. The below steps and command helps to test Ansible locally. Running some commands like ping by using the ping Ansible module against the localhost.

You will get a success message displayed in green after completion of the ping commands. – Response will to the ping command is the “pong” output.

ansible localhost -m ping
Terminal output showing the execution of an Ansible command to ping localhost, with a successful response indicating no changes and a ping response of 'pong'.
Terminal output showing an Ansible command execution result for localhost ping, indicating a warning about no inventory and a successful ping response.

Thank you for reading this post. Kindly share it with others.

  • Share on X (Opens in new window) X
  • Share on Reddit (Opens in new window) Reddit
  • Share on LinkedIn (Opens in new window) LinkedIn
  • Share on Facebook (Opens in new window) Facebook
  • Share on Pinterest (Opens in new window) Pinterest
  • Share on Tumblr (Opens in new window) Tumblr
  • Share on Telegram (Opens in new window) Telegram
  • Share on WhatsApp (Opens in new window) WhatsApp
  • Share on Mastodon (Opens in new window) Mastodon
  • Share on Bluesky (Opens in new window) Bluesky
Windows Server Tags:Configuration Management Tool, Cygwin, Microsoft Windows, Orchestration Tool

Post navigation

Previous Post: Various ways to hide Windows Taskbar
Next Post: How to install additional packages via Cygwin

Related Posts

  • Certificates
    The application /Certsrv does not exist: How to configure Certificate Enrollment Web Services and Certificate Authority Web Enrolment Windows Server
  • sdgfdhx
    MDT Warning: Unable to set working directory, the application returned an unexpected code 2 Windows Server
  • unnamed 1
    NSlookup Displays Error: UnKnown Default Server Windows Server
  • WAMPServer Virtual Host
    How to create Virtual Hosts in a WAMPserver Web Server
  • logon failure and requested session denied
    Logon Failure: User has not been granted the requested logon type Windows
  • images 8
    Microsoft Direct Access: Now Always On VPN Windows Server

More Related Articles

Certificates The application /Certsrv does not exist: How to configure Certificate Enrollment Web Services and Certificate Authority Web Enrolment Windows Server
sdgfdhx MDT Warning: Unable to set working directory, the application returned an unexpected code 2 Windows Server
unnamed 1 NSlookup Displays Error: UnKnown Default Server Windows Server
WAMPServer Virtual Host How to create Virtual Hosts in a WAMPserver Web Server
logon failure and requested session denied Logon Failure: User has not been granted the requested logon type Windows
images 8 Microsoft Direct Access: Now Always On VPN Windows Server

Leave a Reply Cancel reply

You must be logged in to post a comment.

Microsoft MVP

VEEAMLEGEND

vexpert-badge-stars-5

Virtual Background

GoogleNews

Categories

veeaam100

Veeam Vanguard

  • change keyboard layout windows 10 thumb800
    Prevent on-screen keyboard from starting automatically and from appearing at login Windows
  • How to Restore Microsoft Authenticator App on a New Device
    How to fix “Action required” in Microsoft Authenticator App Microsoft Exchange/Office/365
  • no pg hba
    Resolve “no pg_hba.conf entry for host on PostgreSQL Oracle/MSSQL/MySQL
  • Screenshot 2021 02 14 at 00.35.50
    How to manage automatic login on Ubuntu Linux Linux
  • azure
    Enter connection information for your on-premise directory or forests: Azure AD connect unable to connect directory, forest not available AWS/Azure/OpenShift
  • Create AWS RDS instance
    How to create an Amazon Relational Database Service Instance AWS/Azure/OpenShift
  • How to Disable Automatic Opening of Previous files in Notepad on Windows 11
    How to Disable Automatic Opening of Previous Files in Notepad on Windows 11 Windows
  • S3 Bucket Replication
    Set up Cross-Region Replication for S3 Buckets AWS/Azure/OpenShift

Subscribe to Blog via Email

Enter your email address to subscribe to this blog and receive notifications of new posts by email.

Join 1,762 other subscribers
  • RSS - Posts
  • RSS - Comments
  • About
  • Authors
  • Write for us
  • Contact
  • Advertise with us
  • General Terms and Conditions
  • Privacy policy
  • Feedly
  • Telegram
  • Youtube
  • Facebook
  • Instagram
  • LinkedIn
  • Tumblr
  • Pinterest
  • Twitter
  • mastodon
  • Bsky

Tags

Active Directory Azure Bitlocker Microsoft Windows PowerShell WDS Windows 10 Windows 11 Windows Deployment Services Windows Server 2016

Copyright © 2026 TechDirectArchive

Loading Comments...

You must be logged in to post a comment.