HashiCorp’s Terraform is an open-source infrastructure automation tool. The Go programming language was used to create it. It enables you to define and describe your infrastructure as code within configuration files using a declarative language, as well as deploy and manage that infrastructure across a range of public cloud providers like AWS, GCP, and Azure. If you’re looking to learn how to install terraform on Linux, you’re in the right place. Other Guides can be found here: How to install Apache Tomcat on Ubuntu/ and How to Install LAMP Stack on Ubuntu 18.04/ and How to install MariaDB on Ubuntu/ and How to Configure Advanced PAM in Linux/ also Practical use of SELinux in production/ and How to create and deliver a report on System Utilization on a Linux based OS
Terraform is an infrastructure as code (IaC) tool that allows you to build, change, and version infrastructure safely and efficiently.
Benefits of Installing Terraform
- Infrastructure as code (IaC) solutions allow you to manage infrastructure without using a graphical user interface by using configuration files. IaC enables you to define resource configurations you can version, reuse, and share. It also allows you to develop, change, and manage your infrastructure in a secure, consistent, and repeatable manner.
- HashiCorp’s infrastructure as code tool is Terraform. It maintains the lifespan of your infrastructure and allows you define resources and infrastructure in human-readable, declarative configuration files. Using Terraform instead of manually maintaining your infrastructure has numerous benefits:
- Terraform can manage infrastructure across a variety of cloud platforms. What’s more, the human-readable configuration language aids in the rapid development of infrastructure code. Terraforms state feature allows you to keep track of resource changes as they happen throughout your deployments. Meanwhile, to cooperate on infrastructure safely, you can commit your configurations to version control.
- Automated infrastructure management, lower deployment costs, and reduced provisioning time
To use terraform, you need to download from source and install it, it is distributed as a binary package. In this guide, I will walk you through a few short steps on how to install terraform on your Linux machine, whether you use Centos, RHEL or Ubuntu, the procedure is the same.
Installing Terraform on Linux
Follow the steps below to ensure terraform is installed on your Linux machine.
Step1: Retrieve the terraform binary by downloading a pre-compiled binary or compiling it from source with the command:
wget https://releases.hashicorp.com/terraform/1.1.2/terraform_1.1.2_linux_amd64.zip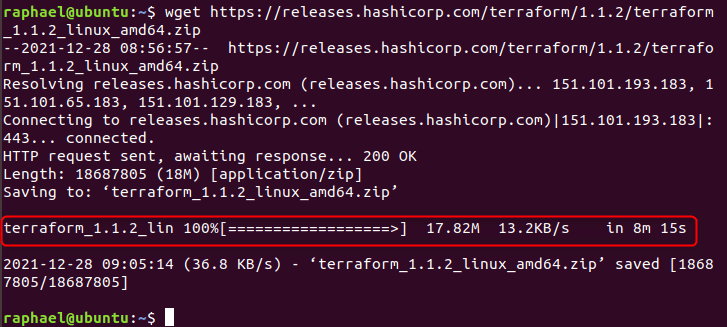
Step2: Install zip with the command:
sudo apt-get install zip -y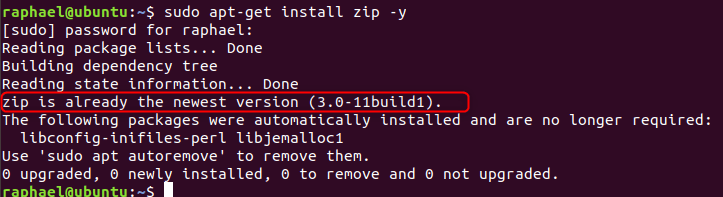
Step3: unzip the Terraform download with the command:
unzip terraform*.zip
Step4: move the executable with the command:
sudo mv terraform /usr/local/bin
Step5(optional): check the version of terraform downloaded
After you’ve successfully installed terraform on Linux, confirm the downloaded version.
Terraform --version
First Steps after installation:
- Create a directory, we decided our directory name in terraform as shown below
mkdir ~/terraform2. Change into the newly created directory
cd ~/terraform3. Create a new configuration file with the command:
vim config.tflet’s paste this sample provider information into the config file we just created
provider "google" {
  project     = "my-project-id"
  region      = "us-central1"
}

Save and close the file .
more info about the provider can be gotten here: https://registry.terraform.io/providers
4. Initialize Terraform
Terraform init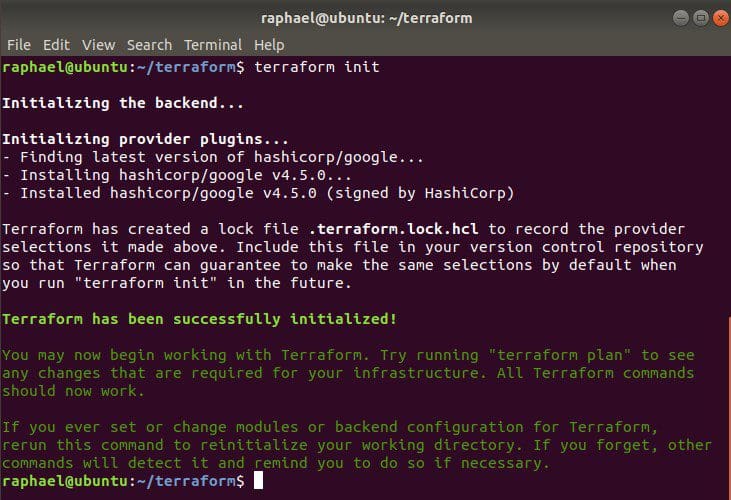
After installing and initializing terraform on your Linux machine, you can proceed to start using it.
Demo
Deploy a resource to AWS: The first thing to do will be to install aws-cli
sudo snap install aws-cli --classic
We will also set up the AWS CLI with credentials from our aws account by running the command below:
aws configureConsequently, you will be prompted for security details as shown below:

Next thing would be to change into the directory we created earlier and create a main.tf file. It will be wise to comment out the provider we wrote earlier so that when we call init, it ignores that one.
cd ~/terraform
touch main.tf
Next, we open main.tf in a text editor and add a block for terraform, provider & the resource we are creating
vim main.tf
Our objective for this exercise is to make sure that an s3 bucket defined in the main.tf file is created in our aws console.
terraform init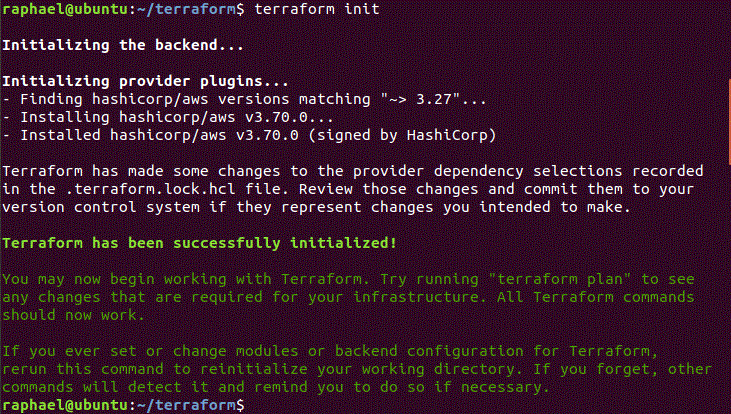
terraform plan

terraform apply
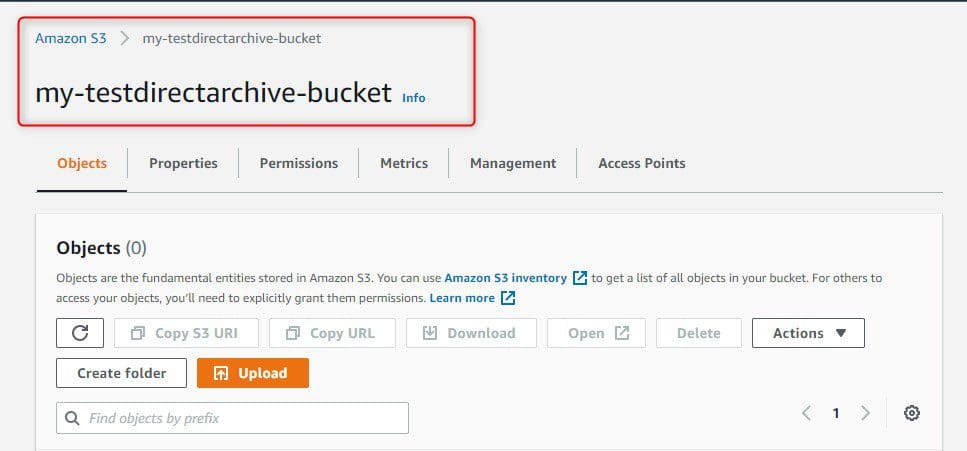
Meanwhile, we can see from the screenshot above, the deployment was successful. Let’s try something else that is interesting, to show you that terraform is cloud agnostic. Thus, we shall be using terraform to create a resource group in Azure.
The steps as are shown below, you will use the Azure CLI tool to authenticate with Azure.
Invoke-WebRequest -Uri https://aka.ms/installazurecliwindows -OutFile .\AzureCLI.msi; Start-Process msiexec.exe -Wait -ArgumentList '/I AzureCLI.msi /quiet'; rm .\AzureCLI.msiaz loginmkdir terraform && cd $_code main.tfcode main.tf will take your directly to visual studio code. When you are there just past the code
provider "azurerm" {
version = "1.38.0"
}
#create resource group
resource "azurerm_resource_group" "rg" {
name = "rg-MyFirstTerraform"
location = "westus"
tags = {
Environment = "Terraform Demo"
}
}

Terraform Plan

Approve Terraform

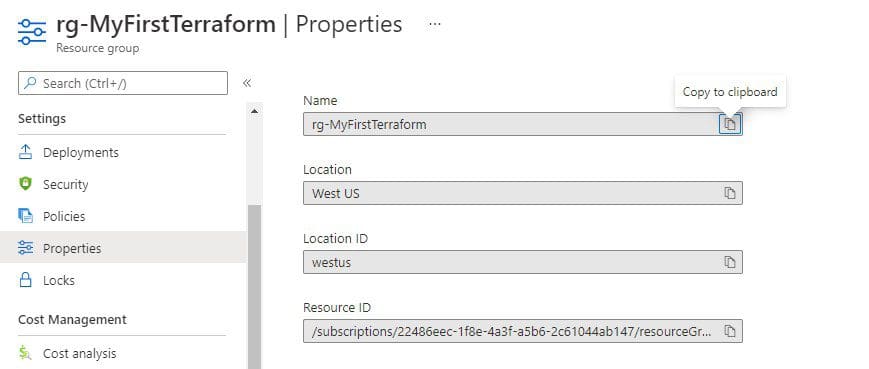
let’s check the azure platform for the resource group that we deployed with terraform. For instance, you can see that the ID matches that of the one in Visual studio code
Summary
Installing Terraform on any system is not difficult, whether it’s aws or azure you are deploying to, the steps are same. In this guide I walked you through how to install Terraform on Linux and how to create your directory and config files before initializing , I deployed to AWS and also deployed to Azure.