Skip to content

TechDirectArchive

Hands-on IT, Cloud, Security & DevOps Insights

  • Home
  • About
  • Advertise With US
  • Reviews
  • Contact
  • Toggle search form
Home » Mac » How to add one or more external displays with your Mac

How to add one or more external displays with your Mac

Posted on 20/03/202223/08/2023 Christian By Christian No Comments on How to add one or more external displays with your Mac
external displays

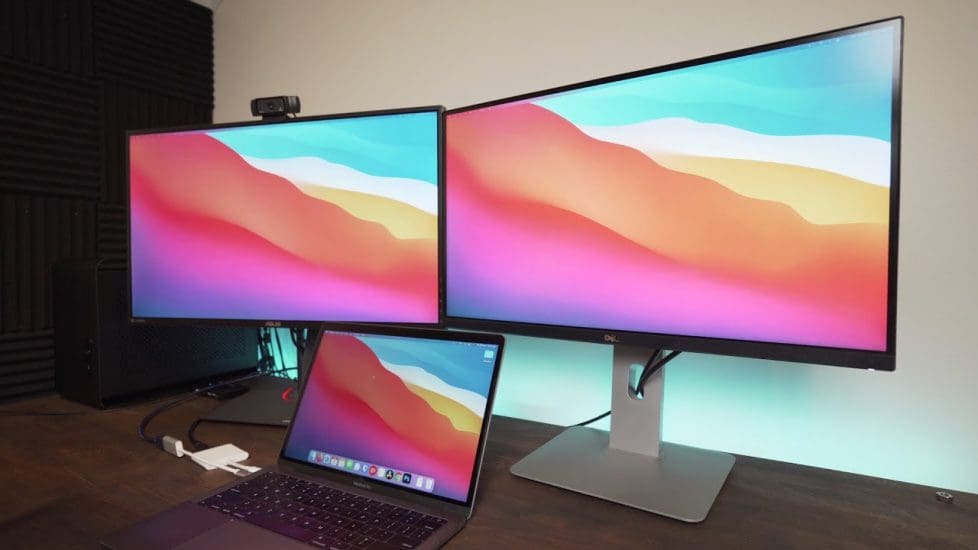
You may be able to connect one or more external displays to your Mac. To do so, you need a video cable for each display, and you might need an adapter. See the Apple Support article Adapters for the Thunderbolt 4, Thunderbolt 3, or USB-C port. I had to come up with this post because I recently added a third screen. For each display, securely connect a video cable (and adapter, if necessary) from a video output port on your Mac to the video input port on the display. After you connect one or more displays to your Mac, you can choose whether to use them as an extended desktop or for video mirroring.

However, Kindly refer to these related guides on macOS: How to connect and remove Beoplay E8 3rd Generation to Mac, How to upgrade macOS Big Sur to macOS Monterey, Install Telegram Desktop: How to integrate WordPress site with WP Telegram, how to enable or disable automatic Live Caption on macOS through Chrome, and how to stop apps from launching automatically upon startup on Mac.

See the images below. On your Mac, choose Apple menu  
- System Preferences, then
- Click Displays  See the images below.
Mac
adding displays

Moreover, You can connect one or more external displays, depending on your Mac. Before we start discussing the various connection methods, I would like to discuss the various video ports on Mac. Nonetheless, This is because, Mac includes one or more video ports which you can use to connect to a display, TV, or projector.

If your Mac has a Thunderbolt 3 (USB-C), Thunderbolt / USB 4, Thunderbolt 4 (USB-C), or USB-C port, you can use USB-C adapter cables to connect your Mac to displays and other devices.

Video portIconDescription
Thunderbolt 3 (USB-C), Thunderbolt / USB 4, and Thunderbolt 4 (USB-C) PortThunderbolt LabelThunderbolt 3 (USB-C), Thunderbolt / USB 4, and Thunderbolt 4 (USB-C): Connect to a Thunderbolt device or Mini DisplayPort display. Use an adapter to connect to a Thunderbolt 2 device or a DVI, HDMI, or VGA display.
USB-C PortNo iconUSB-C: Connect to a Thunderbolt device or Mini DisplayPort display. Use an adapter to connect to a Thunderbolt 2 device or a DVI, HDMI, or VGA display.
Thunderbolt and Thunderbolt 2 portThunderbolt LabelThunderbolt and Thunderbolt 2: Connect to a Thunderbolt device or Mini DisplayPort display. Use an adapter to connect to a DVI, HDMI, or VGA display.
Mini DisplayPortMini DisplayPort labelMini DisplayPort: Connect to a Mini DisplayPort. Use an adapter to connect to a DVI, HDMI, or VGA display.
HDMI portHDMI Port labelHDMI: Connect to an HDTV with an HDMI port. This port lets you play your computer’s audio as well as its video on an HDTV.

Connect the displays

Nonetheless,When connecting your display(s) to mac and finds out your Mac has different ports, use an adapter. You can purchase an Apple display adapter from an Apple Store or Amazon etc.

For Mac computers with the Apple M1 Chip

Furthermore, You can connect a single external display to your Mac. Docks don’t increase the number of displays you can connect. Moreover, On a Mac mini with M1 chip, you can connect a second display to the HDMI port.

For Mac computers with Thunderbolt 3 (USB-C)

You can connect a single display to each port. If you connect multiple Thunderbolt devices to each other, the Thunderbolt 3 display must be the last device in the chain. If your Thunderbolt 3 display has USB ports, those can be used for data and power.

For Mac computers with Mini DisplayPort, Thunderbolt, or Thunderbolt 2

You can connect up to two displays. If the displays themselves have Thunderbolt ports, you can connect one display to another, and then connect one of the displays to a Thunderbolt port on your Mac. If your Mac has two Thunderbolt ports, you can connect each display to separate Thunderbolt ports on your Mac. A DisplayPort device must be the last device in a chain of connected Thunderbolt devices.

For Mac computers with Thunderbolt 4 (USB-C) and HDMI ports

You can connect up to four external displays to your Mac, depending on your Mac model. 

I hope you found this blog post helpful. If you have any questions, please let me know in the comment session.

Rate this post

Thank you for reading this post. Kindly share it with others.

  • Share on X (Opens in new window) X
  • Share on Reddit (Opens in new window) Reddit
  • Share on LinkedIn (Opens in new window) LinkedIn
  • Share on Facebook (Opens in new window) Facebook
  • Share on Pinterest (Opens in new window) Pinterest
  • Share on Tumblr (Opens in new window) Tumblr
  • Share on Telegram (Opens in new window) Telegram
  • Share on WhatsApp (Opens in new window) WhatsApp
  • Share on Mastodon (Opens in new window) Mastodon
  • Share on Bluesky (Opens in new window) Bluesky
  • Share on Threads (Opens in new window) Threads
  • Share on Nextdoor (Opens in new window) Nextdoor
Mac Tags:Display, macOS Monterey

Post navigation

Previous Post: How to Install Apache HTTP Server on Ubuntu 20.04 LTS
Next Post: How to Install and Configure Nagios on Ubuntu

Related Posts

  • macOSapps
    Fix macOS Apps opening on the wrong desktop Mac
  • Prevent the downloads of apps without password on App store
    Download Apps without passwords on App Store Mac
  • Credential Sync acrosss devices
    How to sync your passwords across iOS and Mac devices Mac
  • image 10
    Change Visual Studio Code UI language JIRA|Confluence|Apps
  • plain screenshot 1
    How to make a screenshot on a macOS device Mac
  • fba7f screenshot 2019 04 15 at 18.33.30
    File System Overview: How to decide on the right File System to use for your USB Linux

More Related Articles

macOSapps Fix macOS Apps opening on the wrong desktop Mac
Prevent the downloads of apps without password on App store Download Apps without passwords on App Store Mac
Credential Sync acrosss devices How to sync your passwords across iOS and Mac devices Mac
image 10 Change Visual Studio Code UI language JIRA|Confluence|Apps
plain screenshot 1 How to make a screenshot on a macOS device Mac
fba7f screenshot 2019 04 15 at 18.33.30 File System Overview: How to decide on the right File System to use for your USB Linux

Leave a Reply Cancel reply

You must be logged in to post a comment.

Microsoft MVP

VEEAMLEGEND

vexpert-badge-stars-5

Virtual Background

GoogleNews

Categories

veeaam100

Veeam Vanguard

  • Screenshot 2024 02 29 at 8.03.48 PM
    How to create an Elastic Beanstalk environment in AWS AWS/Azure/OpenShift
  • Microsoft LAPS
    Configure Windows LAPS Management with Microsoft Intune AWS/Azure/OpenShift
  • azure logo
    Azure CLI commands: How to use Azure Command-line Interface AWS/Azure/OpenShift
  • squid proxy feature
    How to Set Up and Configure a Squid Proxy Server Linux
  • ESXi
    How to install ESXi on VirtualBox Virtualization
  • AADSTS900144
    Fix AADSTS900144: The request body must contain the parameter Network | Monitoring
  • maxresdefault
    How to remove a Printer from Windows 10 via PowerShell, Windows registry and Print Management Windows
  • oracle virtualbox
    Fix VirtualBox Virtual Machine Encountered a Non-Fatal problem Virtualization

Subscribe to Blog via Email

Enter your email address to subscribe to this blog and receive notifications of new posts by email.

Join 1,821 other subscribers
  • RSS - Posts
  • RSS - Comments
  • About
  • Authors
  • Write for us
  • Advertise with us
  • General Terms and Conditions
  • Privacy policy
  • Feedly
  • Telegram
  • Youtube
  • Facebook
  • Instagram
  • LinkedIn
  • Tumblr
  • Pinterest
  • Twitter
  • mastodon

Tags

Active Directory Azure Bitlocker Microsoft Windows PowerShell WDS Windows 10 Windows 11 Windows Deployment Services Windows Server 2016

Copyright © 2025 TechDirectArchive


Loading Comments...
 

You must be logged in to post a comment.