Skip to content

TechDirectArchive

Hands-on IT, Cloud, Security, Veeam & DevOps

  • Home
  • About
  • Advertise With US
  • Reviews
  • Contact
  • Toggle search form

How to enable Secure Boot on PC to install Windows 11

Posted on 28/05/202225/03/2024 Matthew By Matthew No Comments on How to enable Secure Boot on PC to install Windows 11
  1. Home
  2. Windows
  3. How to enable Secure Boot on PC to install Windows 11
Featured-Image-2

în this article, we shall discuss how to enable Secure Boot on PC to install Windows 11. To install Windows 11, a device must have “Secure Boot” activated in addition to a Trusted Platform Module (TPM). Secure Boot is a security feature present on most current hardware with UEFI firmware that provides a secure environment for booting Windows and prevents malware from hijacking the system during the boot process. Here are some related guides: How to extend System Drive Partition on Windows, to create a disk volume see: How to create volumes via the Command Prompt in Windows.

To put it another way, Secure Boot allows the computer to boot only with software from the Original Equipment Manufacturer (OEM). This feature provides a more secure experience, which is one of the reasons Microsoft has made it a must for installing Windows 11.

The main downside is that activating this functionality prevents other operating systems, such as Linux, from running.

Here are other related guides: How to Convert a System Drive from MBR to GPT Partition on Windows 10,  and how to upgrade Windows 10 with an unsupported CPU and TPM 1.0 to Windows 11​.

How to Determine the Windows 11 security Status in Windows 10

Follow these procedures to check the Secure Boot status in Windows 10: Launch the Start menu and search for System Information and start the app by clicking the first result.

UEFI Secure Boot

In the left pane, select System Summary. Check the “Secure Boot State”: On – signifies that the feature is turned on. Off implies that the functionality is not available or is not supported.

Windows 11 security

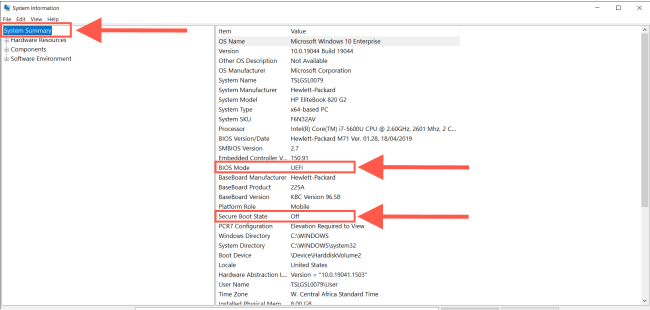
Check the “BIOS Mode” information: UEFI – signifies the ability to enable Secure Boot. Legacy (BIOS) – implies that the functionality can be enabled, but it will need extra actions.

If the “Secure Boot State” is Off and the BIOS Mode is UEFI, you can continue with the instructions listed below to enable Secure Boot to with the Windows 11 standards.

If the “Secure Boot State” is set to Off and “BIOS Mode” is Legacy and then continue with the steps to enable Secure Boot.

How to enable on Windows 10

The steps listed below assume that the device is already running UEFI firmware. If the machine is still running the Legacy BIOS.

The conversion is not required to execute a clean installation. But it is required before an in-place update. The conversion of the disk partition should have no effect on the installation, but it is usually a good idea to make a backup before starting.

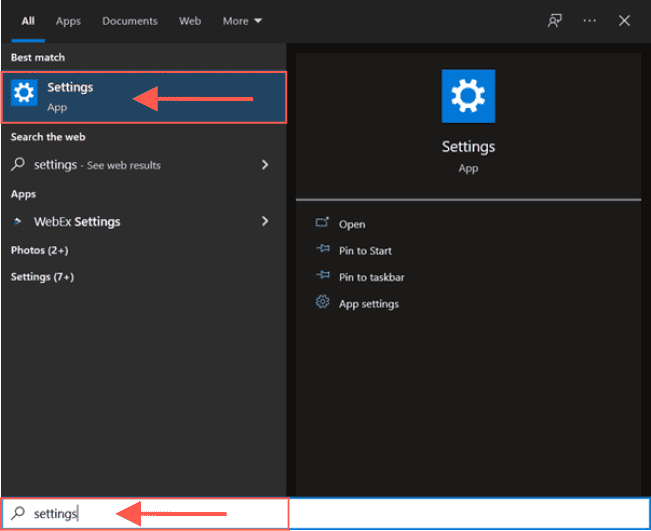
Use the following steps to enable Secure Boot on a machine with UEFI firmware. Press the Windows Key to open the Start menu and search for Settings.

Boot process encryption

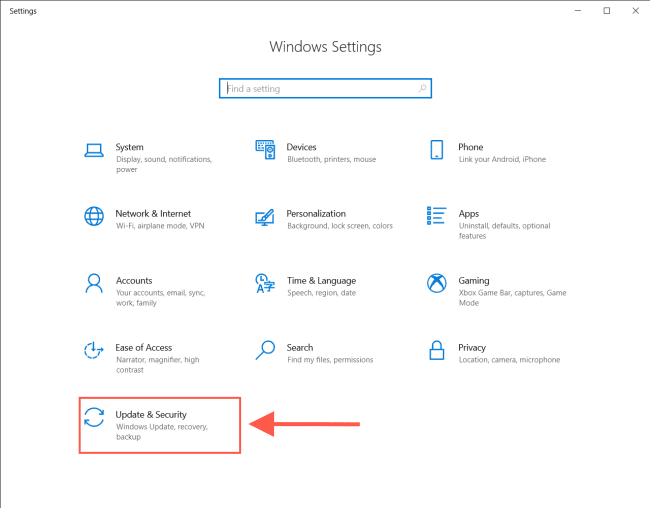
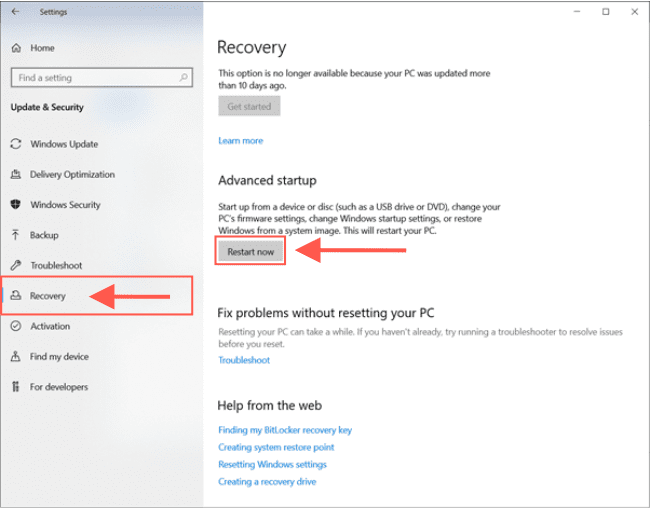
Go to Settings and select Update & Security.

PC firmware protection

Select Recovery and click the Restart now option under the “Advanced startup” section.

UEFI Secure Boot

On the advance startup page, click on Troubleshoot.

Img2

Next click on Advanced options.

Img3

Click the UEFI Firmware Settings from the menu. If you have a Legacy BIOS, this option will be unavailable.

Img4

Click the Restart button.

Img5

Navigate to the boot or security settings page.  Note: UEFI settings vary by manufacturer and even by computer model. You may need to consult the manufacturer’s support website to locate the settings.

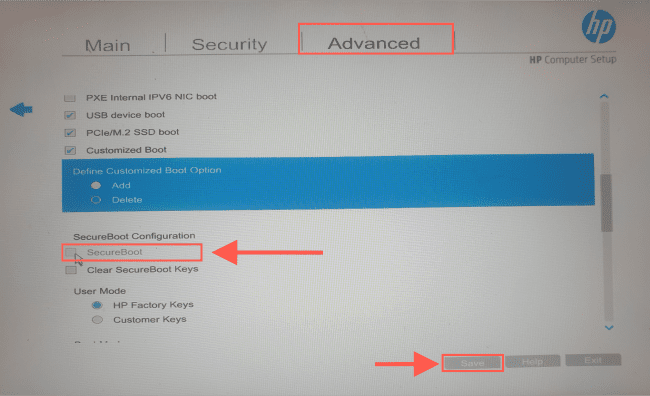
For example, on HP EliteBook 820 computer, go to the Advanced section and click on the Secure Boot options.

Image3-3

Tick the SecureBoot box and press the Save button.

Image4-5

Exit the UEFI settings.

After you finish the steps. The system will begin using the Secure Boot feature to meet the requirements of Windows 11.

Enable during startup.

Instead of using the Settings app, you may enable Secure Boot on the computer during startup. Follow these procedures to access the device firmware during the Windows boot process:

  • Click the Power button.
  • Check the screen splash to determine which key you must hit to enter the firmware (if applicable).
  • Keep pressing the needed key until you reach the setup mode. You must press Esc, Delete, or one of the Function keys (F1, F2, F10, etc.).
  • Navigate to the boot or security settings page.
  • Select the SecureBoot option and press save.
Image4-6

Exit the UEFI settings.

Once the steps are completed, Secure Boot will allow you to support the installation of Windows 11. If you cannot reach the firmware via the keyboard, see the manufacturer’s instructions to determine the keyboard key to use during boot.

I hope you found this blog post on how to enable Secure Boot on PC to install Windows 11 helpful. Please let me know in the comment session if you have any questions.

Rate this post

Thank you for reading this post. Kindly share it with others.

  • Share on X (Opens in new window) X
  • Share on Reddit (Opens in new window) Reddit
  • Share on LinkedIn (Opens in new window) LinkedIn
  • Share on Facebook (Opens in new window) Facebook
  • Share on Pinterest (Opens in new window) Pinterest
  • Share on Tumblr (Opens in new window) Tumblr
  • Share on Telegram (Opens in new window) Telegram
  • Share on WhatsApp (Opens in new window) WhatsApp
  • Share on Mastodon (Opens in new window) Mastodon
  • Share on Bluesky (Opens in new window) Bluesky
  • Share on Threads (Opens in new window) Threads
  • Share on Nextdoor (Opens in new window) Nextdoor
Windows Tags:Disk management, Disk Partition, Microsoft Windows, Partitions, Secure Boot, security, Windows 10, Windows 11, Windows 11 Security

Post navigation

Previous Post: System Drive Conversion: MBR to GPT on Windows 10
Next Post: How to upgrade Windows Server Evaluation to Full Version

Related Posts

  • windows 10 technical preview windows 10 logo microsoft 97543 1920x1080
    Disable the sleep mode in Windows to never turn off the display Windows
  • Featured image wifipass
    Find saved Wi-Fi Passwords in Windows 10 and 11 Network | Monitoring
  • Windows Logo
    Restrict IP Address Range on Windows PC Windows
  • Feature image  Error Code 0xC1900101 – 0x30018
    How to Fix Windows Update Error Code 0xC1900101 – 0x30018 Windows
  • Windows Image Converation from Evaluation to retail Edition
    Convert Windows Server Essentials or Evaluation to Retail Edition Windows
  • gfhj
    Debugging: How to debug a PowerShell script Windows

More Related Articles

windows 10 technical preview windows 10 logo microsoft 97543 1920x1080 Disable the sleep mode in Windows to never turn off the display Windows
Featured image wifipass Find saved Wi-Fi Passwords in Windows 10 and 11 Network | Monitoring
Windows Logo Restrict IP Address Range on Windows PC Windows
Feature image  Error Code 0xC1900101 – 0x30018 How to Fix Windows Update Error Code 0xC1900101 – 0x30018 Windows
Windows Image Converation from Evaluation to retail Edition Convert Windows Server Essentials or Evaluation to Retail Edition Windows
gfhj Debugging: How to debug a PowerShell script Windows

Leave a Reply Cancel reply

You must be logged in to post a comment.

Microsoft MVP

VEEAMLEGEND

vexpert-badge-stars-5

Virtual Background

GoogleNews

Categories

veeaam100

Veeam Vanguard

  • 960x0
    How to resolve request timed out when pinging Windows Server
  • ext
    How to install Standalone Installation DriveLock Encryption software Security | Vulnerability Scans and Assessment
  • Manually resize your partition
    KB5034439 Windows Update Error: Resize WinRE Partition Windows Server
  • mailx
    [MAILX ERROR: STATUS=BOUNCED] Fixing Mailx error when sending emails from Command line Linux
  • Slide2 2
    Oracle VirtualBox: Installing Windows 11 without TPM Support Virtualization
  • sql server installation
    How to Install all Editions of Microsoft SQL Server 2025 Oracle/MSSQL/MySQL
  • Screenshot
    An error occurred while attempting to start the selected VM Virtualization
  • Hyper V Virtual Switch Copy
    How to Create VDI Collections on Windows Server 2022 Network | Monitoring

Subscribe to Blog via Email

Enter your email address to subscribe to this blog and receive notifications of new posts by email.

Join 1,800 other subscribers
  • RSS - Posts
  • RSS - Comments
  • About
  • Authors
  • Write for us
  • Advertise with us
  • General Terms and Conditions
  • Privacy policy
  • Feedly
  • Telegram
  • Youtube
  • Facebook
  • Instagram
  • LinkedIn
  • Tumblr
  • Pinterest
  • Twitter
  • mastodon

Tags

Active Directory Azure Bitlocker Microsoft Windows PowerShell WDS Windows 10 Windows 11 Windows Deployment Services Windows Server 2016

Copyright © 2025 TechDirectArchive

Loading Comments...

You must be logged in to post a comment.