In this guide, I will show you how to configure Volume Shadow Copies (VSS) on Windows Server. Volume Shadow Copies (VSS) is a feature available in Windows Server 2022, Windows Server 2019, Windows Server 2016, Windows Server 2012 R2, Windows Server 2012, Windows Server 2008 R2, Windows 10, Windows 8.1, Windows 8, Windows 7, and Windows Server 2008. For the purpose of this guide, we’re going to configure VSS on Windows Server 2019. Volume Shadow Copies is also a Windows 11/10/8/7 feature that creates snapshots (shadow copies) of disk volumes even when they are in use. It is implemented as a Windows service known as Volume Shadow Copies. You can use it to make or save shadow copies on a local disk, an external hard drive, or a network drive.
The Shadow Copies feature in Windows Server is one implementation of VSS (called Restore Points in client versions of Windows). On a disk, you enable and schedule shadow copies, and then you can restore a file, folder, or the entire volume. Shadow copies are “differential, block-level backups,” which means they only capture the changed bits of each file and thus don’t take up much space. They are also quick and simple to recover from windows. See also how to create a Restore Point in Windows 10 and Windows 11, Bare-metal Backup: How to setup Windows server backup and create backup jobs, How to create and delete a snapshot on VMware Workstation, SEP Sesam Hybrid Backup, and Disaster Recovery Solution
To create and save shadow copies, the NTFS file system is required. As a result, only NTFS volumes can be protected when Shadow Copy technology is enabled in Windows Backup and Restore. The same can be said of System Restore and File History.
Volume Shadow Copies Service is a Microsoft technology that creates recoverable snapshots of a volume.
Why VSS?
Data must usually be backed up while the applications that generate it are still running. This implies that some of the data files may be open or in an inconsistent state. When the data set is large, backing it up all at once can be difficult.
Shadow Copies can be used to recover accidentally deleted or modified user files. Additionally, Shadow Copies can be enabled on any disk on your server; however, they are most useful for volumes that store user data, such as data disks on a Windows file server that store user profile disks and network drives.
Prerequisite:
Following Microsoft’s best practices, to avoid performance issues, create an additional disk to hold the shadow copies on each server that you want to protect with VSS. To create an additional disk, follow these short steps:
Step 1-From the menu bar, search for Disk Management

Step 2 – From the list of disks that displays, click-right click on the disk you will like to create an additional disk from and select "Shrink Volume" from the drop-down menu.

Step 3 – Enter the amount of volume you will like to shrink and click okay. Here, we created a 10GB volume size.

Step 4 – From step 3 above, a new unallocated 10GB size of the disk is created. Right-click on it and select "New Simple Volume". Kindly refer to these related guides: How to extend a VM’s Hard Disk on VMware Workstation, and How to Add a New Virtual Disk to an EC2 Instance and Format it.

A new simple volume screen wizard shows up:

Step 5 – Click Next to go to specify the volume size screen

Step 6 – Format the new partition using the NTFS file system and assign a name to the new partition and click on Next. Leave the "Perform quick format" box checked.

Step 7 – Assign a drive letter and click on Next. Here, we assigned letter F to the new partition

Step 8 – Click on finished to complete the process

Now, navigate to the list of drives in the disk management pane to see the newly created volume.

Configuring Volume Shadow Copies on Disk
Now, let’s configure the shadow copies on one of our disk partitions.
Step 1-Open File Explorer, click on "This PC" and right-click on the drive volume for which you want Shadow Copies enabled, and then select Configure Shadow Copies.
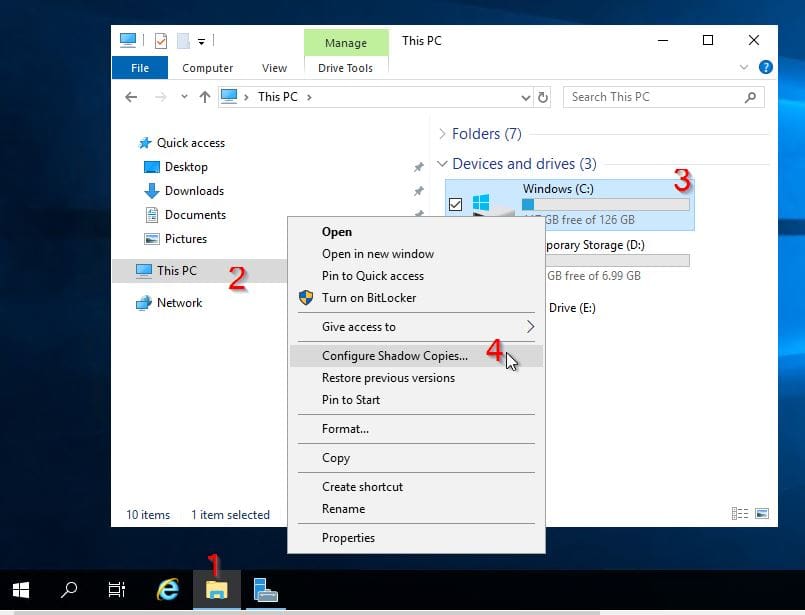
Step 2 – Click on the Volume you want to enable Shadow Copies for, then click Settings. Here, I want to enable Shadow Copies on the C:\ drive. C:\ drive is the drive with the operating system boot manager.

Move the Storage Area to the additional disk you created in the Prerequisite Steps section of this guide. Additionally, you can modify the volume copy size limit, therefore system will automatically delete the oldest copy when it reaches this storage limit.

You can set a preferred schedule for capturing Shadow Copies using the Schedule button. Configure the settings as desired, then click OK to save your changes in the Schedule and Settings dialogues.

As shown in the screenshot above, we selected Mon – Fri and scheduled tasks to occur on weekly basis at 7: 00 AM
Step 3 – In the Shadow Copies window, ensure the volume is still selected and click Enable. Windows will create the first Shadow Copy with the settings you implemented and will use the schedule to create subsequent Copies.
Kindly pay attention to the warning displayed in the image below for your production environment setup.

From the above step, you will get a prompt, click yes to continue. The screenshot below shows that the Volume Shadow copies have been enabled fully.

Note: You can create more one Volume Shadows Copies in one disk. To create additional shadows copies, simply click on the "Create Now" button.
To revert or delete the shadow copies, simply select it and click on either revert or delete button. To disable it completely, click on “Disable“.
Note: You cannot revert a volume that contains operating system files or a files that reside on a cluter shared disk.
In conclusion, you have learned how to configure Volume Shadow Copies on Windows Server and Windows because the same steps stated above also apply to client versions of Windows such as Windows 11 and so on.
Now you have also learned how to create a new disk volume from an existing disk volume. I hope you found this blog post helpful. Please let me know in the comment session if you have any questions.