Skip to content

TechDirectArchive

Hands-on IT, Cloud, Security, Veeam & DevOps

  • Home
  • About
  • Advertise With US
  • Reviews
  • Contact
  • Toggle search form

Find BIOS Serial Number and System Information on Windows 11

Posted on 31/10/202215/08/2026 Imoh Etuk By Imoh Etuk No Comments on Find BIOS Serial Number and System Information on Windows 11
  1. Home
  2. Windows
  3. Find BIOS Serial Number and System Information on Windows 11
Header-picture

The serial number of your computer is not visible anywhere in the interface of Windows or widely used system information utilities. However, running the same commands in PowerShell or Windows Command Prompt console is one of the easiest ways to find your PC’s serial number. Apart from checking the computer pack or hardware component. In this article, we shall discuss how to find BIOS Serial Number and System Information on Windows 11. Please see How to Delete Diagnostic Data in Windows 10 and Windows 11, How to Upgrade Windows 11 Pro to Enterprise and vice Versa, and How to install Windows Subsystem for Android (WSA) in Windows 11.

The Windows Management Instrumentation (WMI) Command-Line Utility is one of the notable commands for finding out the serial number of your system. Although, in this post, we’re going to try out other commands. In this article, you will learn how to find BIOS Serial Number and System Information on Windows 11.

The Windows Management Instrumentation (WMI) Command-Line Utility (WMIC) is a command-line utility that allows users to perform WMI operations from a command prompt. An interface called WMI offers a number of Windows management features.

Applications and WMI scripts can be deployed to automate administrative tasks on remote computers. Or interface with other Windows tools like System Center Operations Manager (SCCM) or Windows Remote Management (WinRM).

In addition, I will also be showing you how to check your Windows 11 PC’s System Information. System Information (also known as msinfo32.exe) shows details about your PC, operating system, hardware, and software, system manufacturer & model including drivers.

Also, see how to disable Ads in Windows 11, how to create Desktop Windows stickers on Windows 11, and how to modify Windows 11 Taskbar via Intune and GPO. Here is how to install Veeam Backup Console on a Jump Server.

Find BIOS serial Number via wmic

To check your BIOS serial number, right-click on the startup menu icon and click on Windows PowerShell (Admin). This will launch PowerShell with administrative rights.

Click-on-Powershell-Admin

To view the BIOS Serial Number, run:

$ wmic bios get serialnumber
Type-wmic-bios-get-serial-serialnumber
 Note: Sometimes checking your BIOS serial number using the above command can fail. If that that happens, your PC might not have a serial number, or it might not have been saved correctly. Try checking the packaging, documentation, or the hardware components of your computer instead.

Method 2 – Using Win32 Command

Another method of finding out the serial number of your system is by running the command below:

get-wmiobject Win32_BIOS
Another-Method-of-checking-PC-SN

Viewing System Information

The next thing to cover in this post is how to view your system or device information. To do this, open PowerShell with admin privileges and run:

msinfo32
msinfo32
Checking-System-info-through-GUI

One other way to view System Information is to use the GUI. From the search bar on your Windows taskbar, search for and click on System Information and press the Enter key:

Search-for-System-Info
Checking-System-info-through-GUI

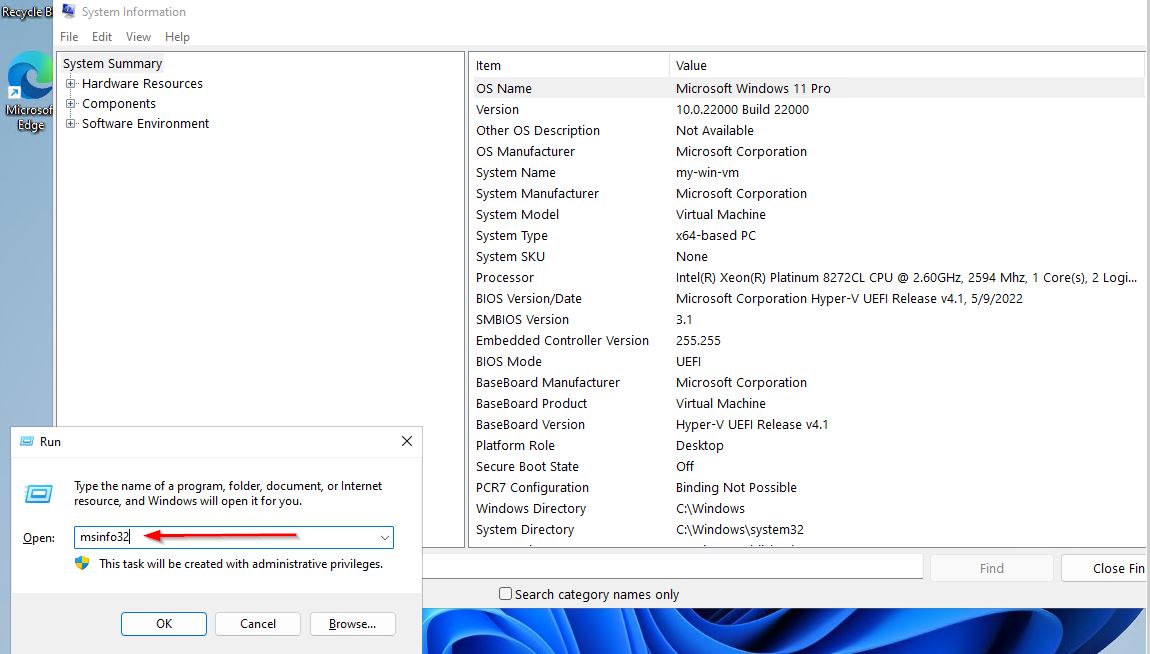
You can also view your system information by pressing Windows + R to open the Windows Run command and then typing "msinfo32" and press the Enter key:

Checking-System-info-through-GUI

I hope you found this blog post on how to find BIOS Serial Number and System Information on Windows 11 helpful. Please let me know in the comment session if you have any questions.

Thank you for reading this post. Kindly share it with others.

  • Share on X (Opens in new window) X
  • Share on Reddit (Opens in new window) Reddit
  • Share on LinkedIn (Opens in new window) LinkedIn
  • Share on Facebook (Opens in new window) Facebook
  • Share on Pinterest (Opens in new window) Pinterest
  • Share on Tumblr (Opens in new window) Tumblr
  • Share on Telegram (Opens in new window) Telegram
  • Share on WhatsApp (Opens in new window) WhatsApp
  • Share on Mastodon (Opens in new window) Mastodon
  • Share on Bluesky (Opens in new window) Bluesky
Windows Tags:BIOS, Windows 10, Windows 11

Post navigation

Previous Post: How to install Googler on a Linux System
Next Post: How to Switch between Users in Linux

Related Posts

  • MBAM
    Fix MBAM Client Deployment is only supported on MBAM 2.5 SP1 Windows
  • download9
    Change the default Save and Download Location in Windows Windows
  • Featured image defaultStartPage
    Change the default start page for File Explorer on Windows 11 Windows
  • media8
    How to create a Windows 11 Bootable USB drive Windows
  • screenshot 2020 03 01 at 21.19.07
    Various ways to hide Windows Taskbar Windows
  • iso10
    Mount an ISO image in Windows 10 and 11 Windows

More Related Articles

MBAM Fix MBAM Client Deployment is only supported on MBAM 2.5 SP1 Windows
download9 Change the default Save and Download Location in Windows Windows
Featured image defaultStartPage Change the default start page for File Explorer on Windows 11 Windows
media8 How to create a Windows 11 Bootable USB drive Windows
screenshot 2020 03 01 at 21.19.07 Various ways to hide Windows Taskbar Windows
iso10 Mount an ISO image in Windows 10 and 11 Windows

Leave a Reply Cancel reply

You must be logged in to post a comment.

Microsoft MVP

vexpert-badge-stars-5

Virtual Background

VEEAMLEGEND

Categories

veeaam100

Veeam Vanguard

  • linkyourandriodtoyourpc
    Microsoft Phone Link: Connect Android to Windows 11 Windows
  • How to backup Azure VIM 3
    How to backup Azure VM with VM Settings AWS/Azure/OpenShift
  • fghj
    How to enable or disable DotNet Framework (NetFx3) Windows
  • Windowsfilesystemxx
    Failed to remove network for the build, Job failed error: Invalid volume specification: “/cache” Containers
  • windows1019h2
    Synchronize your Domain Controller with an external time source Windows Server
  • Azure SASE
    [AZURE] Security Service Edge (SSE) and Microsoft Entra ID AWS/Azure/OpenShift
  • Slide2
    How to Clear Cache on Windows 10 Windows
  • sandbox
    How to Configure Windows Sandbox Virtualization

Subscribe to Blog via Email

Enter your email address to subscribe to this blog and receive notifications of new posts by email.

Join 1,757 other subscribers
  • RSS - Posts
  • RSS - Comments
  • About
  • Authors
  • Write for us
  • Contact
  • Advertise with us
  • General Terms and Conditions
  • Privacy policy
  • Feedly
  • Telegram
  • Youtube
  • Facebook
  • Instagram
  • LinkedIn
  • Tumblr
  • Pinterest
  • Twitter
  • mastodon
  • Bsky

Tags

Active Directory Azure Bitlocker Microsoft Windows PowerShell WDS Windows 10 Windows 11 Windows Deployment Services Windows Server 2016

Copyright © 2026 TechDirectArchive

Loading Comments...

You must be logged in to post a comment.