Skip to content

TechDirectArchive

Hands-on IT, Cloud, Security & DevOps Insights

  • Home
  • About
  • Advertise With US
  • Reviews
  • Contact
  • Toggle search form
Home » Windows » How to forcefully remove Language Pack on Windows 10 and 11

How to forcefully remove Language Pack on Windows 10 and 11

Posted on 14/07/202211/12/2023 Imoh Etuk By Imoh Etuk No Comments on How to forcefully remove Language Pack on Windows 10 and 11
How-to-Remove-Language-Pack

In this article, we will discuss how to forcefully remove Language Pack on Windows 10 and 11. Windows 10 and 11 are available in various languages, and you can even install language packs for each language you speak. This feature allows you to use a specific language for display (Settings and File Explorer) while still using a different language for the keyboard, apps, and websites. See the following related articles: how to add languages to your Personal PC, how to change or add another keyboard language in Windows Server, Local Experience Packs: How to add languages to Windows images using DISM and PowerShell.

With millions of worldwide users, Windows OS is one of the most popular desktop and laptop operating systems. Currently, it’s installed on over 900 million devices.

As a result of its large user base, it supports the majority of languages. While most users won’t change default display languages, they can install new language packs in Windows (10 & 11). If using multiple languages and facing settings issues, the option to remove a secondary pack might be unavailable. For instance, the upgrade process may unintentionally install a package with the same base language as the display language, resulting in an inability to remove either language.

You need to remove a language but the option is greyed out. Don’t worry; you can use a workaround to swiftly eliminate the unwanted pack using a few PowerShell commands. Let me demonstrate this in the guide. Here, I’m going to show you this in Windows 11. The steps in Windows 10 are the same thing. So feel free to apply the same steps if you’re using Windows 10.

How to remove language packs using PowerShell

Most times, the option to remove the language pack gets greyed out. In such cases, the best bet is to use PowerShell to remove it. The following are the steps to take:

Step 1 – Right-click and run PowerShell as an admin by searching for it in the Windows search bar.

Language Bundle
Opening PowerShell

When the PowerShell console opens up, type the following Cmdlet to display the list of languages currently installed on your PC:

Get-WinUserLanguageList
Screenshot
List of Currently Installed Language Packs

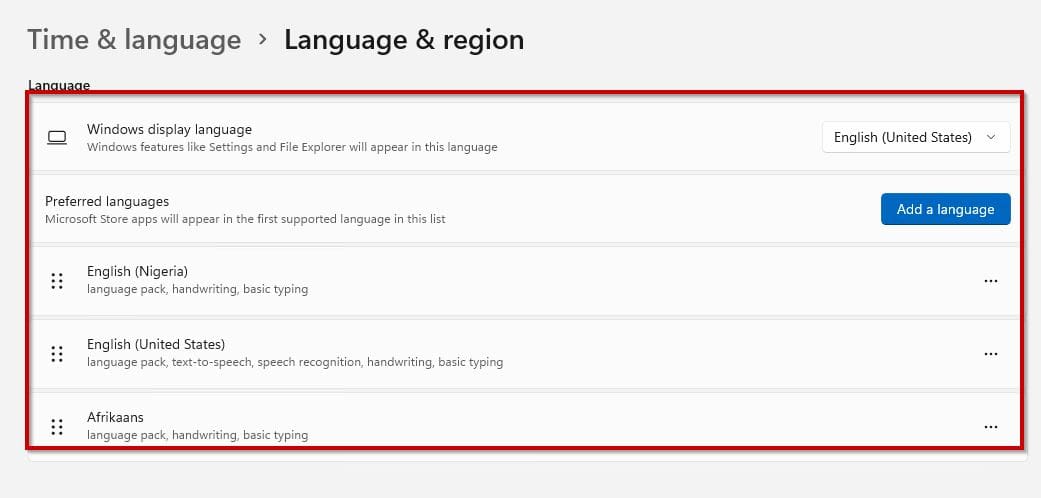
From the screenshot above, I have 3 language packs and I have highlighted the one I want to remove. You should also make a note of the language you wish to remove.

Step 2 – Type the following commands (one at a time) to remove the language that you don’t need and press enter.

1. $LangList = Get-WinUserLanguageList
2. $MarkedLang = $LangList | where LanguageTag -eq "LANGUAGETAG"
3. $LangList.Remove($MarkedLang)
4. Set-WinUserLanguageList $LangList -Force
Localization Pack
Removing Language Pack
Note: in the second Cmdlet command, ensure to replace "LANGUAGETAG" with the code of the language you want to remove. For example, en-DE, if your primary language is not the German English, and it's the pack you want to delete.

Simply rerun the Cmdlet command to verify the removal of the language.

Get-WinUserLanguageList
Multilingual Module
Language Pack Removed

After you’ve finished the steps, open the Settings app by pressing the Windows key + I and navigate to the "Region & language” page, where the language you couldn’t remove before should now be gone. (If you wish to remove another language if necessary, repeat the steps)

Language Bundle
Screenshot before Removing the Language

If you want to remove a primary language, keep in mind that you must first set a new language as the new default before the Remove button appears.

Screenshot
Screenshot After Removing the Language

Explore these captivating guides that may pique your interest: How to install Zoom video conference software in Linux System,  how to manage your Cloud Assets in AWS with CloudQuery, and Charmed Kubernetes: How to install CNF certified Kubernetes in AWS.

I hope you found this blog post on how to forcefully remove Language Pack on Windows 10 and 11 helpful. If you have any questions, please let me know in the comment session.

Rate this post

Thank you for reading this post. Kindly share it with others.

  • Share on X (Opens in new window) X
  • Share on Reddit (Opens in new window) Reddit
  • Share on LinkedIn (Opens in new window) LinkedIn
  • Share on Facebook (Opens in new window) Facebook
  • Share on Pinterest (Opens in new window) Pinterest
  • Share on Tumblr (Opens in new window) Tumblr
  • Share on Telegram (Opens in new window) Telegram
  • Share on WhatsApp (Opens in new window) WhatsApp
  • Share on Mastodon (Opens in new window) Mastodon
  • Share on Bluesky (Opens in new window) Bluesky
  • Share on Threads (Opens in new window) Threads
  • Share on Nextdoor (Opens in new window) Nextdoor
Windows Tags:PowerShell, PowerShell Cmdlet, Windows 10, Windows 11

Post navigation

Previous Post: How to install Zoom video conference software on Linux System
Next Post: How to Exit Linux Vim or Vi Editor

Related Posts

  • winSEARCH
    Hide or Remove Search Button from Windows 10 Taskbar Windows
  • Featured image 2
    Enable Microsoft Defender SmartScreen: How to prevent Exe files from getting deleted randomly in Windows 10 and 11 Security | Vulnerability Scans and Assessment
  • MBAM
    Fix MBAM Client Deployment is only supported on MBAM 2.5 SP1 Windows
  • How To Put Multiple OS ISO Files In One Bootable USB Disk
    USB Drive: Create a Multiboot with Multiple OS ISOs Windows
  • image
    How to start HyperV VMs in safe mode Virtualization
  • RDP Certificate Issues
    Connecting to the RDP host: Fix the Certificate could not be verified back to the root certificate Mac

More Related Articles

winSEARCH Hide or Remove Search Button from Windows 10 Taskbar Windows
Featured image 2 Enable Microsoft Defender SmartScreen: How to prevent Exe files from getting deleted randomly in Windows 10 and 11 Security | Vulnerability Scans and Assessment
MBAM Fix MBAM Client Deployment is only supported on MBAM 2.5 SP1 Windows
How To Put Multiple OS ISO Files In One Bootable USB Disk USB Drive: Create a Multiboot with Multiple OS ISOs Windows
image How to start HyperV VMs in safe mode Virtualization
RDP Certificate Issues Connecting to the RDP host: Fix the Certificate could not be verified back to the root certificate Mac

Leave a Reply Cancel reply

You must be logged in to post a comment.

Microsoft MVP

VEEAMLEGEND

vexpert-badge-stars-5

Virtual Background

GoogleNews

Categories

veeaam100

Veeam Vanguard

  • How to determine Active Directory Site Name
    How to determine Active Directory Site Name Network | Monitoring
  • winSEARCH
    Hide or Remove Search Button from Windows 10 Taskbar Windows
  • Enable autologon and autostart for user session
    Enable Autologon and Autostart for user session Windows
  • Implement Split Brain DNS Policies in Active Directory
    Implement Split-Brain DNS Policies in Active Directory Windows Server
  • Featured image Periodic scanning
    How to enable or disable Windows Defender Antivirus Scanning periodically on Windows via Windows Settings Security | Vulnerability Scans and Assessment
  • tmgexchange2013owachangepasswordform
    How to change your password in Outlook Web Access Network | Monitoring
  • BitLocker renamedevicefghjkl
    What are the effect of renaming an MBAM-Protected Computer Windows
  • Standby Mode
    Disable modern standby on Windows 10 and 11 Windows

Subscribe to Blog via Email

Enter your email address to subscribe to this blog and receive notifications of new posts by email.

Join 1,819 other subscribers
  • RSS - Posts
  • RSS - Comments
  • About
  • Authors
  • Write for us
  • Advertise with us
  • General Terms and Conditions
  • Privacy policy
  • Feedly
  • Telegram
  • Youtube
  • Facebook
  • Instagram
  • LinkedIn
  • Tumblr
  • Pinterest
  • Twitter
  • mastodon

Tags

Active Directory Azure Bitlocker Microsoft Windows PowerShell WDS Windows 10 Windows 11 Windows Deployment Services Windows Server 2016

Copyright © 2025 TechDirectArchive


Loading Comments...
 

You must be logged in to post a comment.