Cloud-based asset management enables centralized data storage, which may help organizations easily access their cloud estates from anywhere, as any device that supports an internet connection can view this information. In addition, the main advantage is that it offers data security. The good thing about these kinds of software programs is that they not only give you visibility into your cloud estates, but they can also track any lapse between recorded and what’s on the ground so that you can take the right measure. With the possibility to find and keep an eye on all an organization’s assets, audit and budget teams can easily make plans as they give a digital depiction of a real-world thing. Thus, this article explains how to manage Cloud Assets in AWS with CloudQuery.
Concisely, Cloud Asset management is a technique for gathering data and information about the asset as they often automate asset management so that the entire asset is not handled manually. Thus, there are precise real-time data available to the user. Find other guides here Charmed Kubernetes: How to install CNF-certified Kubernetes in AWS and how To Install Google Cloud SDK on a Linux system and how to install Microsoft Teams on a Ma,c PC also How to Cancel Office 365 Family Subscription and How to download a shared ZOOM recording also How to install AnyDesk on a Linux Machine and how to offload individual Apps on iPhone
Benefits of Managing Cloud Assets
Below are the benefits of using Cloud Assets Management Software.
- Security: Every piece of data is kept in an encrypted format. The cloud management system provides data security as a result, and most of the time, information about the item being queried is often metadata about that item.
- Correctness: Any computation done by hand is prone to mistakes. Thus, accurate information is provided through a cloud-based management system.
- Speed: A lot of time may be saved when assets can be tracked conveniently from any device with an internet connection.
- Accurate Decisions: Since reliable asset statistics are available, businesses may make better decisions.
- Centralized Data AcceEveryvery asset’s data is collected in a single location. As a result, retrieving it is simple.
What is CloudQuery
Powered by SQL and supported by PostgreSQL, CloudQuery is an open-source cloud asset inventory. Furthermore, your cloud infrastructure and SaaS apps are pulled, normalized, exposed, and monitored as SQL databases, allowing you to inspect, audit, and evaluate the settings of your cloud assets. As a result, you may use SQL to create security, governance, cost, and compliance requirements.
This abstracts numerous dispersed APIs. Therefore, you can easily add more resources and SaaS providers to CloudQuery with ease (open an Issue in GitHub). For this article, we will use Cloudquery for cloud asset management. Below are the prerequisite for setting up CloudQuery.
- An AWS Account
- Security credentials (Access key & secret key)
- AWS CLI
- Ubuntu Machine.
Step1: Setting up our local environment with AWS
We need to install AWS CLI on our local machine: we can do this with the command below. Here are some guides relating to AWS CLI: How to add an EBS volume to AWS EC2 via the AWS Console and CLI, how to configure Command Line Interface [Part 2], and AWS Command-Line Interface: How to configure AWS CLI [Part 1].
sudo apt install awscliAfter this, we can confirm its installation with the command shown below:

Next, you need to configure your machine and bind it with your security credentials; you can do so with the command:
aws configure
Step2: Download and Install Cloud Query to Manage Cloud Assets
Afterward, you may use CLI or releases to download the precompiled binary with the command:
curl -L https://github.com/cloudquery/cloudquery/releases/latest/download/cloudquery_linux_arm64 -o cloudquery
chmod a+x cloudquery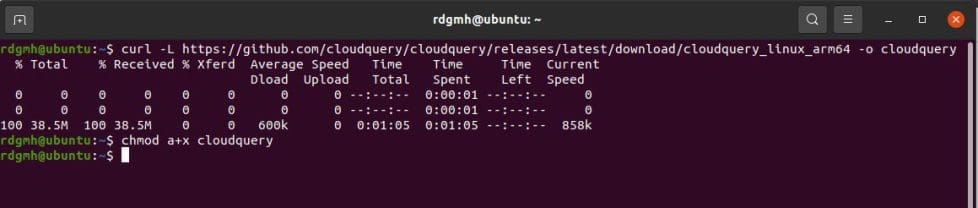
Step2: Running
Furthermore, you must create a cloudquery.yml file after installing CloudQuery that specifies the cloud provider and resources you wish to utilize. A cloud query to an ETL: Following the installation of CloudQuery, you must create a cloudquery.yml file that specifies the cloud provider and resources that CloudQuery should ETL, and you can accomplish this with the command:
./cloudquery init aws
Step 3: Install Docker to Manage Cloud Assets
we need Docker for the next step to be able to instalPostgreses database, this can be done with the command below:
sudo apt install docker.ioSo, here is the output below
root@ubuntu:/home/rdgmh# apt install docker.io
Reading package lists... Done
Building dependency tree
Reading state information... Done
The following packages were automatically installed and are no longer required:
  linux-headers-5.11.0-27-generic linux-hwe-5.11-headers-5.11.0-27
  linux-image-5.11.0-27-generic linux-modules-5.11.0-27-generic
  linux-modules-extra-5.11.0-27-generic
Use 'sudo apt autoremove' to remove them.
Suggested packages:
  aufs-tools btrfs-progs cgroupfs-mount | cgroup-lite debootstrap docker-doc
  rinse zfs-fuse | zfsutils
The following packages will be upgraded:
  docker.io
1 upgraded, 0 newly installed, 0 to remove and 141 not upgraded.
Need to get 31.8 MB of archives.
After this operation, 29.7 MB disk space will be freed.
Get:1 http://us.archive.ubuntu.com/ubuntu focal-updates/universe amd64 docker.io amd64 20.10.12-0ubuntu2~20.04.1 [31.8 MB]
Fetched 12.2 MB in 1min 48s (113 kB/s)
Preconfiguring packages ...
(Reading database ... 242327 files and directories currently installed.)
Preparing to unpack .../docker.io_20.10.12-0ubuntu2~20.04.1_amd64.deb ...
Unpacking docker.io (20.10.12-0ubuntu2~20.04.1) over (20.10.7-0ubuntu5~20.04.2)
...
Setting up docker.io (20.10.12-0ubuntu2~20.04.1) ...
Processing triggers for man-db (2.9.1-1) ...
root@ubuntu:/home/rdgmh#
Step 4: Spawn a Local Database with Docker
Cloudquery will, by default, attempt to connect to the Postgres database at localhost:5432. with the credentials postgres and pass. After installing Docker, use the command below to establish a local Postgres instance:
docker run --name cloudquery_postgres -p 5432:5432 -e POSTGRES_PASSWORD=pass -d postgres
Step 5: Authenticate with AWS
So, to retrieve details about your cloud configuration, CloudQuery requires authentication through your AWS account.
export AWS_ACCESS_KEY_ID={Your AWS Access Key ID}
export AWS_SECRET_ACCESS_KEY={Your AWS secret access key}
export AWS_SESSION_TOKEN={Your AWS session token}
Step 6: Fetch your AWS Resources
Since cloudquery.yml has been generated and you are authenticated with A; runun the following command to fetch the resources.
./cloudquery fetch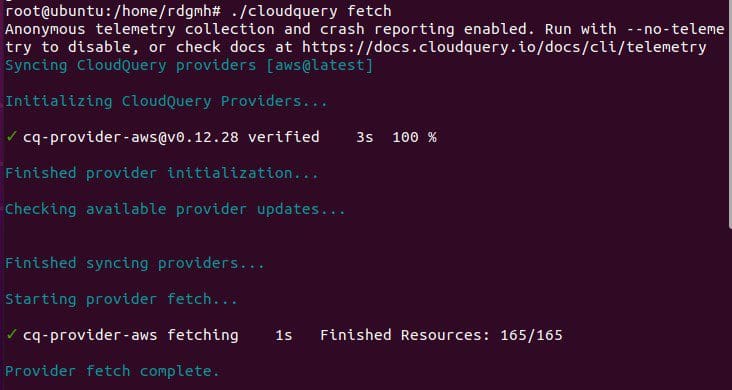
Step 7: Run PSQL on the previously installed Docker
After CloudQuery has retrieved the resources, you may use SQL to explore your cloud infrastructure. Running psql on the Docker
docker exec -it cloudquery_postgres psql -U postgres
Step 8: Run Queries to Help Manage Cloud AssHere are ats
A few examples of queries for AWS:
SELECT * FROM aws_elbv2_load_balancers WHERE scheme = 'internet-facing';
Summary
In conclusion, Cloudquery is an open-source cloud asset inventory tool that can help you gain visibility into your cloud estate and you can by following the steps above. With the steps mentioned earlier, you can manage your cloud assets in AWS with CloudQuery.
I hope you found this blog post helpful. Please let me know in the comment session if you have any questions.


