Skip to content

TechDirectArchive

Hands-on IT, Cloud, Security & DevOps Insights

  • Home
  • About
  • Advertise With US
  • Reviews
  • Contact
  • Toggle search form
Home » Windows » How to enable and use Diagnostic Data Viewer on Windows

How to enable and use Diagnostic Data Viewer on Windows

Posted on 23/07/202228/08/2024 Temitope Odemo By Temitope Odemo No Comments on How to enable and use Diagnostic Data Viewer on Windows
diagnostic6

Whether you are using Windows 11 or Windows 10 you may not be aware that Microsoft has a diagnostic system on your computer to collect diagnostic data for your system. But it is very important to know some of the diagnostic data that is collected from your computer which is why Microsoft released a new tool called Diagnostic Data Viewer. In this article, you will learn how to enable and use Diagnostic Data Viewer on Windows. Please see how to prevent your computers from sending Diagnostics & feedback off via Windows Settings and Group Policy.

This tool will help you with all the information you need concerning the diagnostic data that is sent to the Microsoft server directly from your computer. Here is a YouTube video on how to Enable and Use Diagnostic Data Viewer on Windows.

Read this if you want to know How to Delete Diagnostic Data in Windows 10 and Windows 11, Microsoft Support Diagnostic Tool Vulnerability Fix, and how to “Prevent your PC from sending Diagnostics Feedback off via Windows Settings and Group Policy“.

View the diagnostic data that Microsoft collects 

Some of the data sent to Microsoft are information about installed software, drivers, hardware configuration and showing their compatibility. This information helps Microsoft improve the user experience on their operating system.

If you want access to this Diagnostic Data Viewer then you need to enable it.

Enable and use Diagnostic Data Viewer

Follow this steps on how to enable and use Diagnostic Data Viewer

1: Go to your computer setting and search for Diagnostics & feedback. Toggle the View diagnostic data button to ON. Click on the Open Diagnostic Data Viewer to launch the Microsoft Store.

image-30
Diagnostic and Feedback

If you want to read more on some diagnostic tools you can read these: Workaround for Microsoft Support Diagnostic Tool Vulnerability, How to Improve Website Response using Traffic Manager, Setup up WatchGuard Log and Report Server in a VM, How to setup WatchGuard Log Server.

Download Diagnostic Data Viewer

2. Click Get in the Microsoft Store to download and install the Diagnostic Data Viewer. After installation click on Open.

image-31
Diagnostic Data Viewer

Note: Diagnostic Data Viewer stores a history of diagnostic data sent by your Windows device. Events are removed starting with the oldest once either the storage size or storage time capacity is reached.

3. You can see the diagnostic data below. It is very easy for you to analyze this data by exporting all your diagnostic data as a CSV file.

image-32
Diagnostic Data

Please see how to restrict additional Microsoft Support Diagnostic Tool download in Windows. Also, see Azure Virtual Machines: Windows Admin Center & Serial Console
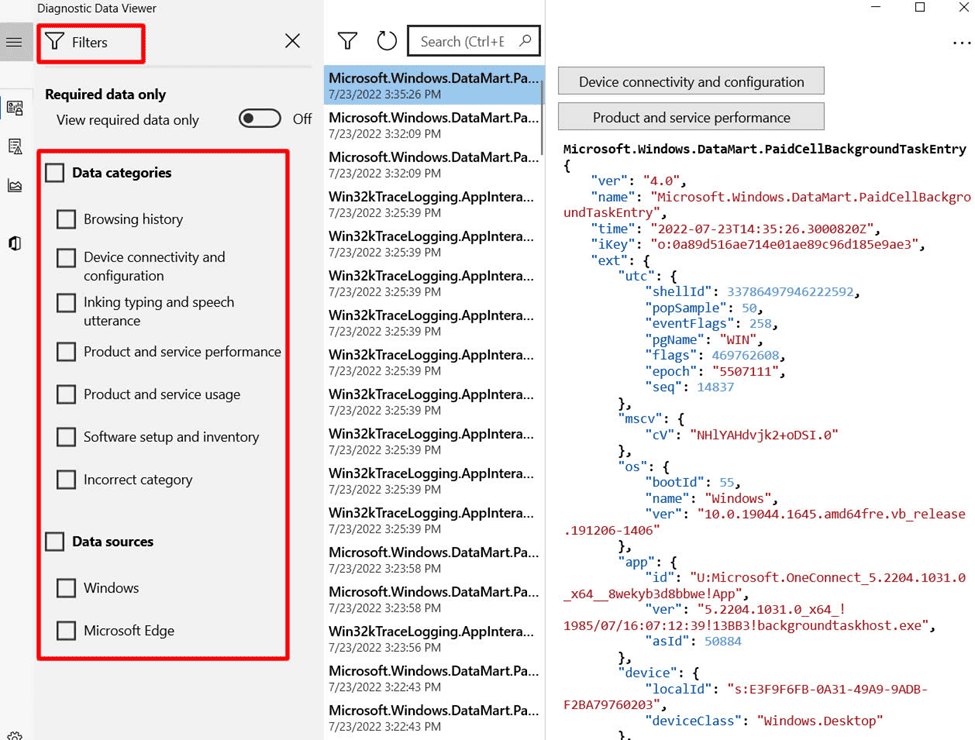
Use the filter icon

4. You can click on the filter icon so that you can filter the type of data you want to view.

image-33
Diagnostic Data Filter

5. The CSV file contains the time stamp. The name of the log captured, and the JSON that shows all the data sent to Microsoft

image-34
CSV File

Please see How to run Windows Memory Diagnostics Tool on Windows. Also, see how to Install Windows Admin Center on Windows 10 and Windows 11, and “How to restrict additional Microsoft Support Diagnostic Tool Downloads on Windows“.

I hope you found this blog post on how to enable and use Diagnostic Data Viewer on Windows Interesting and helpful. In case you have any questions do not hesitate to ask in the comment section.

5/5 - (1 vote)

Thank you for reading this post. Kindly share it with others.

  • Share on X (Opens in new window) X
  • Share on Reddit (Opens in new window) Reddit
  • Share on LinkedIn (Opens in new window) LinkedIn
  • Share on Facebook (Opens in new window) Facebook
  • Share on Pinterest (Opens in new window) Pinterest
  • Share on Tumblr (Opens in new window) Tumblr
  • Share on Telegram (Opens in new window) Telegram
  • Share on WhatsApp (Opens in new window) WhatsApp
  • Share on Mastodon (Opens in new window) Mastodon
  • Share on Bluesky (Opens in new window) Bluesky
  • Share on Threads (Opens in new window) Threads
  • Share on Nextdoor (Opens in new window) Nextdoor
Windows Tags:data, Event Viewer, Microsoft Windows, Windows 10, Windows 11, Windows Server 2016

Post navigation

Previous Post: How to update the BIOS on your Dell system
Next Post: How to Delete Diagnostic Data in Windows 10 and Windows 11

Related Posts

  • Spell Check Not Working in Microsoft Word
    How to Fix Spell Check Not Working in Microsoft Word Microsoft Exchange/Office/365
  • Windows 10 logo wmskill.com
    Handy Shutdown commands available in Windows Windows
  • Best Disk Partition Manager for Mac
    How to extend System Drive Partition on Windows Windows
  • main
    How to Move OneDrive Folder to a different location in Windows Windows
  • License
    Windows Licensing: How to find your Windows 10 Product key Windows
  • ReasonsforBitLockerRecovery
    Reasons for BitLocker Recovery Prompt: Query the number of BitLocker recovery request Windows

More Related Articles

Spell Check Not Working in Microsoft Word How to Fix Spell Check Not Working in Microsoft Word Microsoft Exchange/Office/365
Windows 10 logo wmskill.com Handy Shutdown commands available in Windows Windows
Best Disk Partition Manager for Mac How to extend System Drive Partition on Windows Windows
main How to Move OneDrive Folder to a different location in Windows Windows
License Windows Licensing: How to find your Windows 10 Product key Windows
ReasonsforBitLockerRecovery Reasons for BitLocker Recovery Prompt: Query the number of BitLocker recovery request Windows

Leave a Reply Cancel reply

You must be logged in to post a comment.

Microsoft MVP

VEEAMLEGEND

vexpert-badge-stars-5

Virtual Background

GoogleNews

Categories

veeaam100

sysadmin top30a

  • screenshot 2020 02 13 at 22.47.41
    Active Directory Flexible Single-Master Operations Roles [FSMO] Windows Server
  • Featured image externaldis
    How to fix the external display not working on Windows 11 Windows
  • gpmc 1
    How to Install Group Policy Management Console on Windows 11 Windows
  • image 130
    How to fix the Security Database on the Server does not have a Computer Account for this Workstation Trust Relationship on Windows Server [Part 2] Scripts
  • Featured image Desktop Stickers
    How to create Desktop Stickers in Windows 11 Windows
  • Azure logo
    Microsoft Azure Active Directory: How to setup Azure AD Tenant AWS/Azure/OpenShift
  • Resize Proxmox VM
    How to Resize or Expand Proxmox Hard Drive Virtualization
  • nonRDP admin
    Allow RDP access for non administrators: Add User to Remote Desktop Users Group in Active Directory Windows Server

Subscribe to Blog via Email

Enter your email address to subscribe to this blog and receive notifications of new posts by email.

Join 1,823 other subscribers
  • RSS - Posts
  • RSS - Comments
  • About
  • Authors
  • Write for us
  • Advertise with us
  • General Terms and Conditions
  • Privacy policy
  • Feedly
  • Telegram
  • Youtube
  • Facebook
  • Instagram
  • LinkedIn
  • Tumblr
  • Pinterest
  • Twitter
  • mastodon

Tags

Active Directory Azure Bitlocker Microsoft Windows PowerShell WDS Windows 10 Windows 11 Windows Deployment Services Windows Server 2016

Copyright © 2025 TechDirectArchive


Loading Comments...
 

You must be logged in to post a comment.