Skip to content

TechDirectArchive

Hands-on IT, Cloud, Security, Veeam & DevOps

  • Home
  • About
  • Advertise With US
  • Reviews
  • Contact
  • Toggle search form

Install Windows Server 2022 on VirtualBox

Posted on 28/09/202215/08/2026 Temitope Odemo By Temitope Odemo No Comments on Install Windows Server 2022 on VirtualBox
  1. Home
  2. Network | Monitoring
  3. Install Windows Server 2022 on VirtualBox
Windows Server 2022

Installing the latest Windows Server 2022 on VirtualBox is very seamless. VirtualBox is a free and open-source hosted hypervisor for x86 virtualization, developed by Oracle Corporation. You may decide to run multiple VMs on your operating system this is very possible with type 2 virtualization. You can read How to install Windows Server 2019 on Virtualbox and you may want to know How to clone a Windows Server running on VirtualBox.

If you are a Linux user you may likely check How to install and configure Ubuntu Linux on VirtualBox. Windows 11 can equally be installed without TPM Support by reading How to install Windows 11 in Oracle VirtualBox.

Evaluate Windows Server 2022 by registering here and you can download Virtualbox here. But you may want to know How to install Windows Server 2022 on VMware Workstation and also How to install and Configure Hyper-V on Windows Server on Windows Server 2019, and 2022 via the Server Manager, PowerShell or DISM. After downloading both the Windows server 2022 iso file and VirtualBox and

Create a New VirtualBox VM

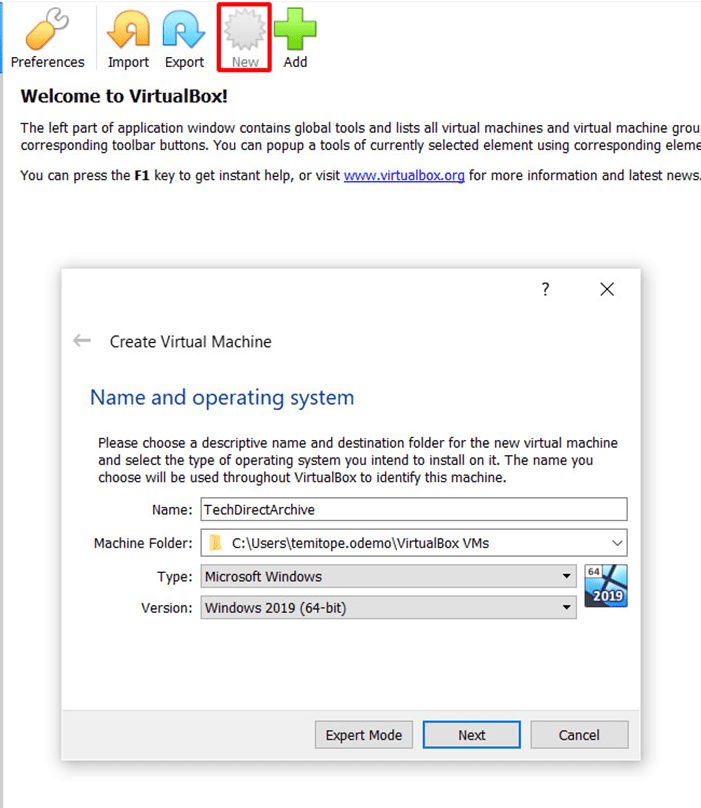
1. After installing the VirtualBox, launch it and click on New. Supply the name of the virtual machine and select the location where you would like to save the virtual machine files.

In the Type drop-down select Microsoft Windows and the Version should be Windows 2019 because the current version of VirtualBox I used when writing this article does not have Windows 2022 but selecting Windows 2019 does not have any negative impact so go ahead.
VirtualBox
Setting up VirtualBox

2. Make sure the minimum Memory is 2048MB. Click Next.

installation guide
Setting up your Memory

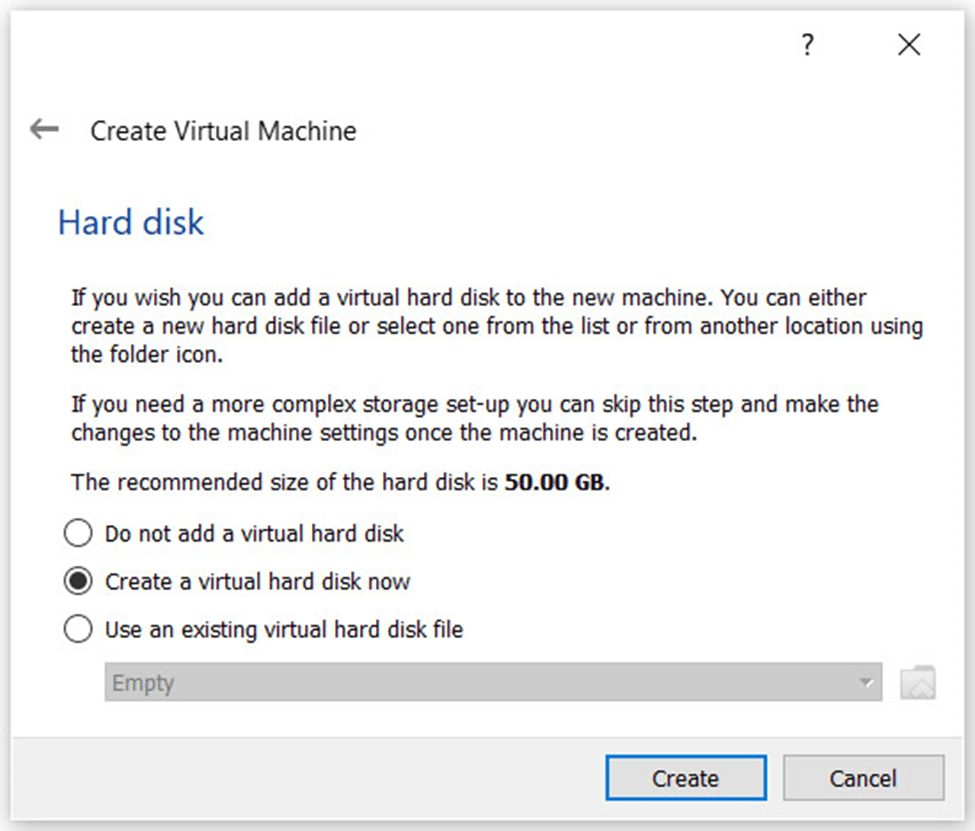
3. On the Create Virtual Machine page select Create a virtual hard disk now and click Create.
setting up virtual machine
Setting the Hard disk

4. On the Create virtual hard disk page select Virtual Machine Disk (VMDK) as the Hard disk file type. Please note that if you have the intention to later move the virtual machine to another hypervisor then select VMDK otherwise select your choice.
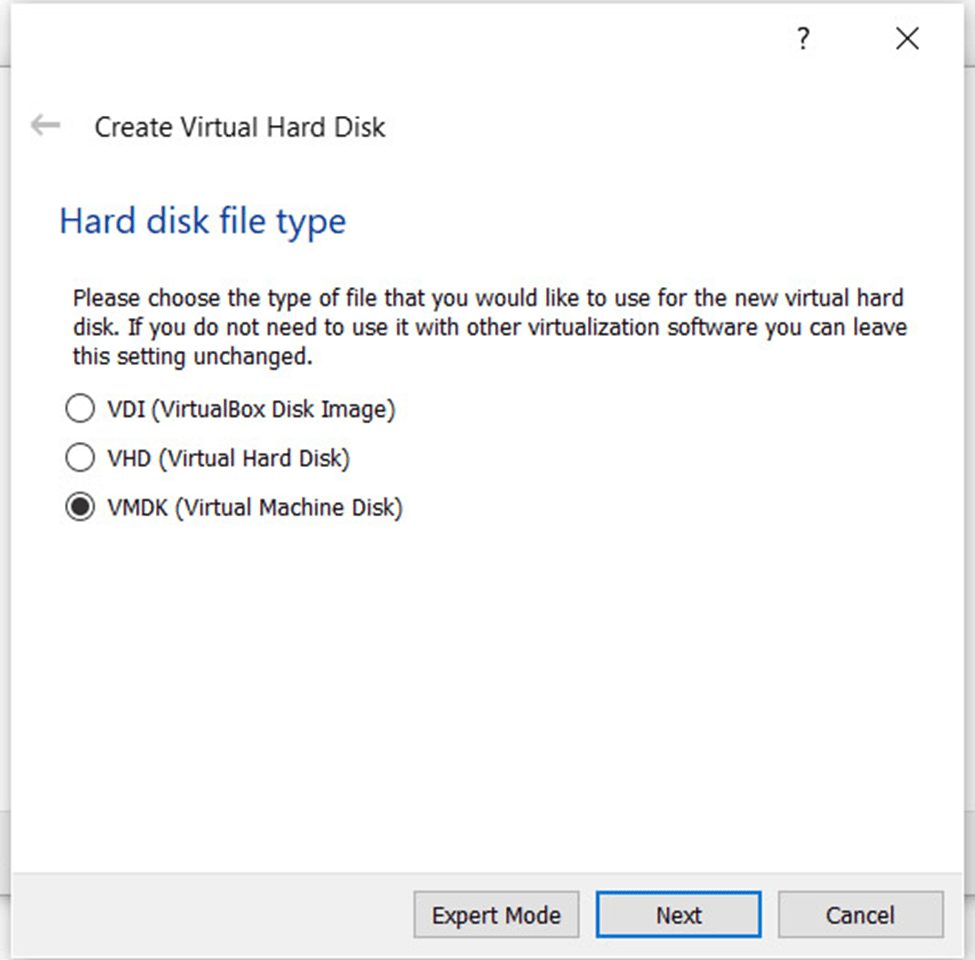
image-32
Creating a Virtual Hard Disk

Install Windows Server 2022 on VirtualBox

5. In this article we will be using Dynamically allocated storage, though this depend on your choice.
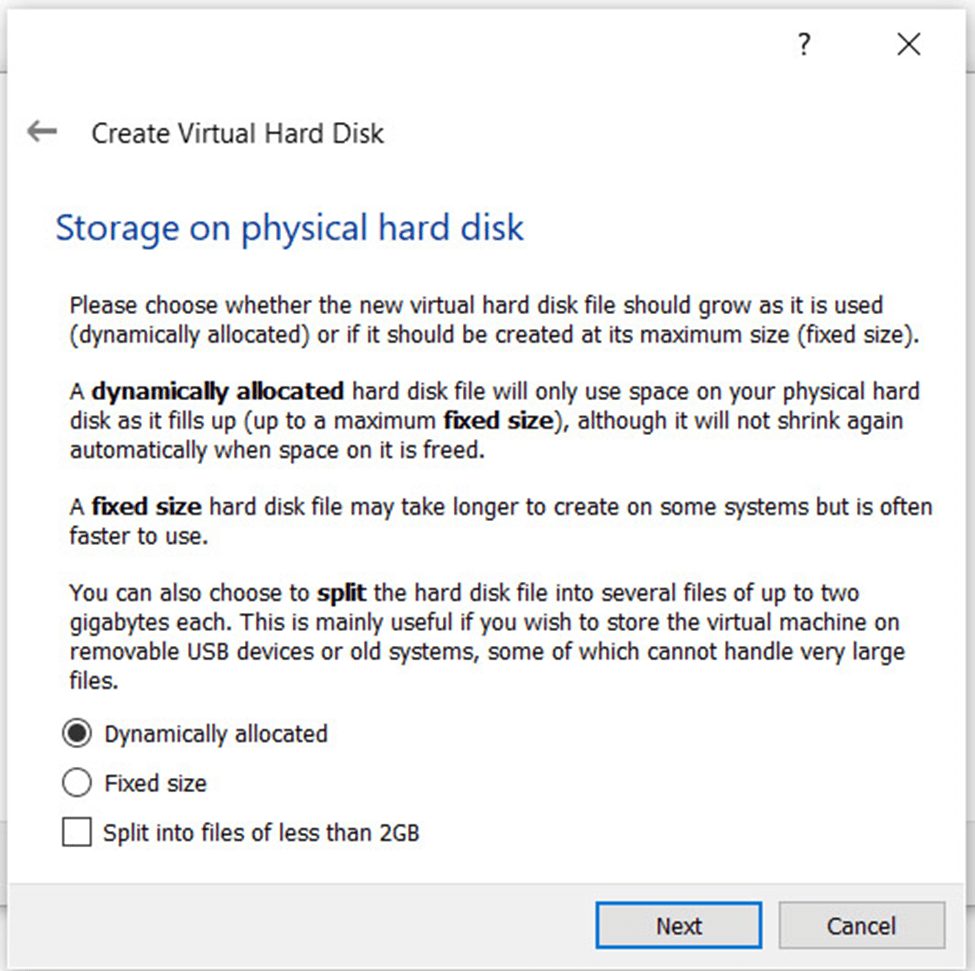
Windows Server 2022
Setting up Storage on physical HD

6. Choose the file location where you want to save the virtual hard disk file which is always the same with the Machine folder selected earlier. I will be allocating 50GB of storage size, yours can be bigger than this it’s your choice.
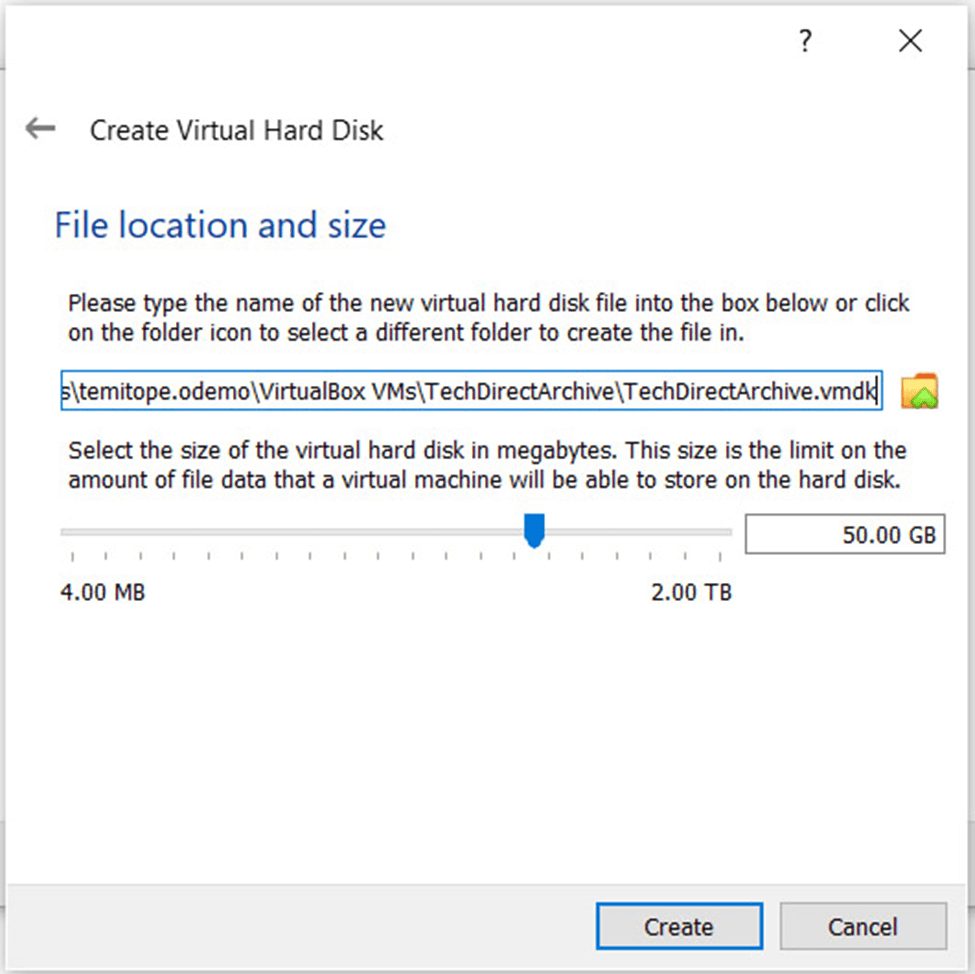
image-34
File location and size

7. Now Goto > System> Processor to configure the CPU which by default is always a single CPU. If you want a better performance you can add more CPU and make it a minimum of 2 CPUs. After making the change, click OK.
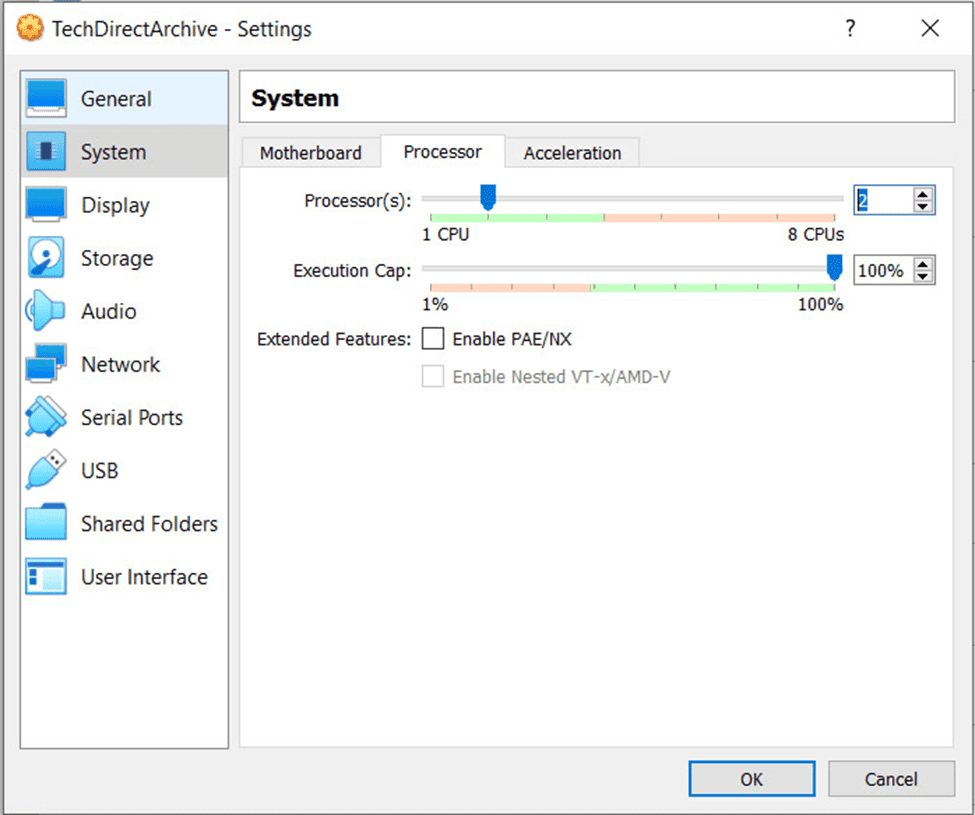
image-35
Increasing the CPU

8. Now to attach the Windows Server 2022 iso image to the Virtual machine created. Go to settings and click on storage-> Empty disk-> Choose a disk file, locate and attach the Windows Server 2022 iso image downloaded to your system.

image-36
Attaching the Image

9. The image below shows that the Windows Server 2022 iso image has been attached and can now be installed.
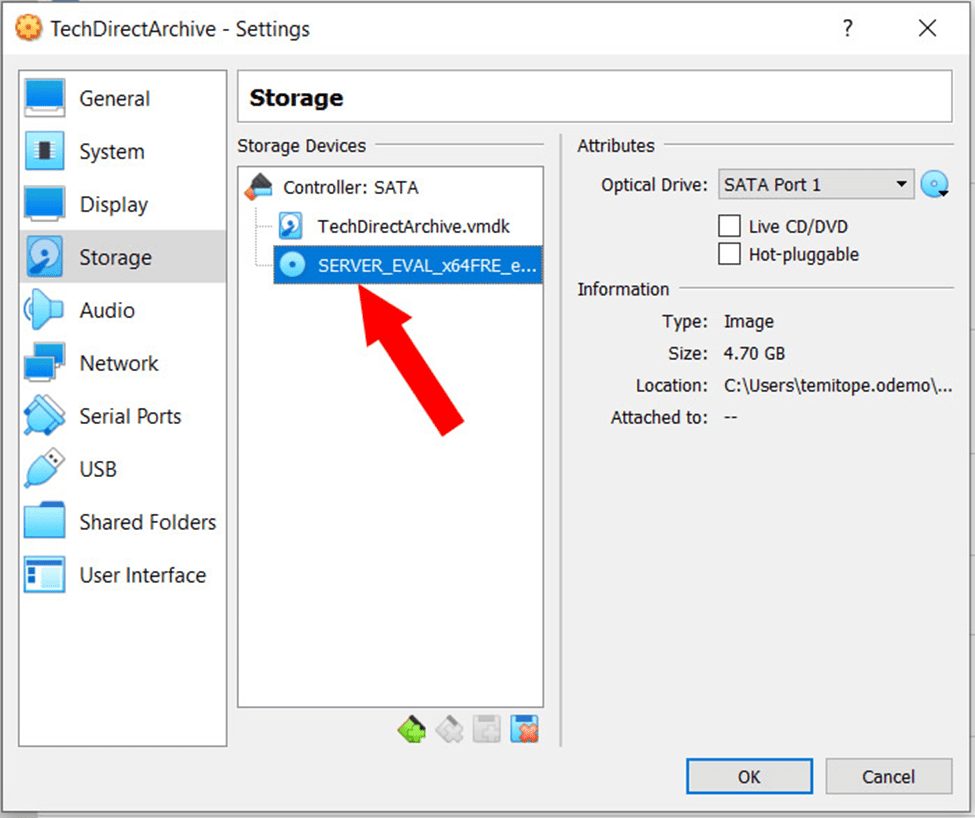
image-37
Image attached

Configure Network Settings for LAN Connectivity

10. By default, the VirtualBox would assign a NAT to the VM which can be used by the VM to connect to the internet but will be unable to connect to LAN.

For you to be able to connect to LAN select the bridge adapter which will make the VM as part of the LAN network. Click on OK.

image-38
Network Setup

11. After it is attached you will see the VM created then click on Start.

image-39
VM Successfully setup

12. Immediately the VM starts the Windows Server 2022 installation will begin. Choose your desired language, location, and keyboard layout and click Next.
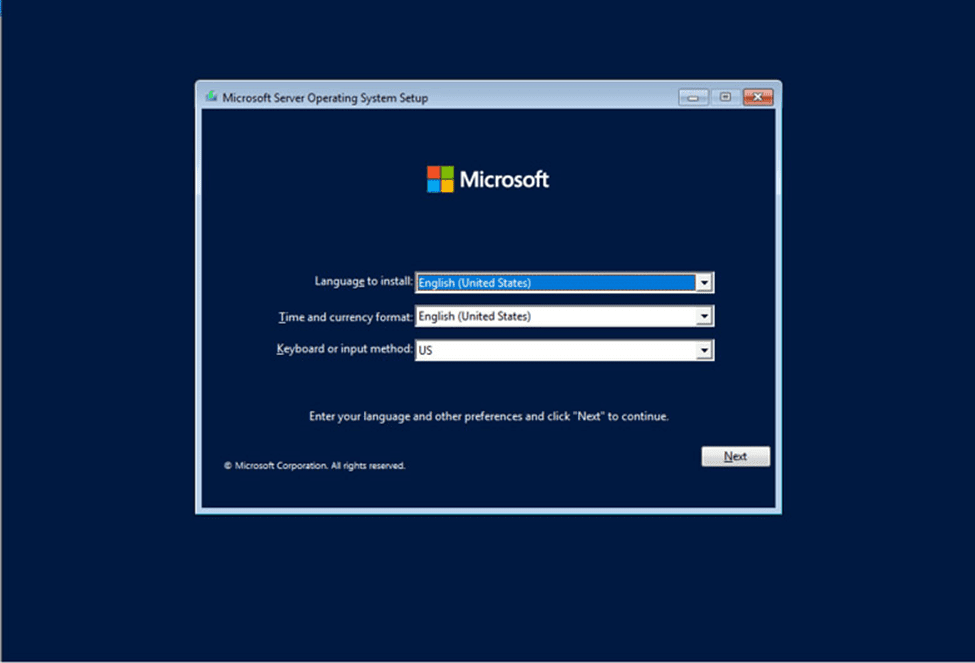
image-40
Installation begin

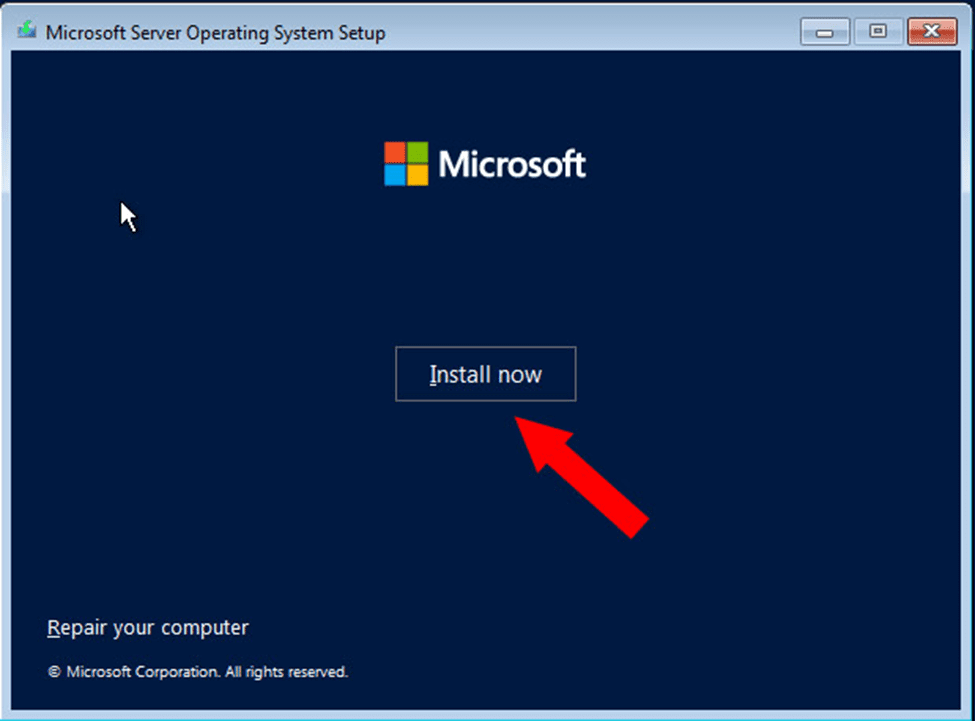
13. Click Install now

image-41
Install Server OS

14. Select the Server Operating system you want to install.  You decide if you want GUI or Command line interface.
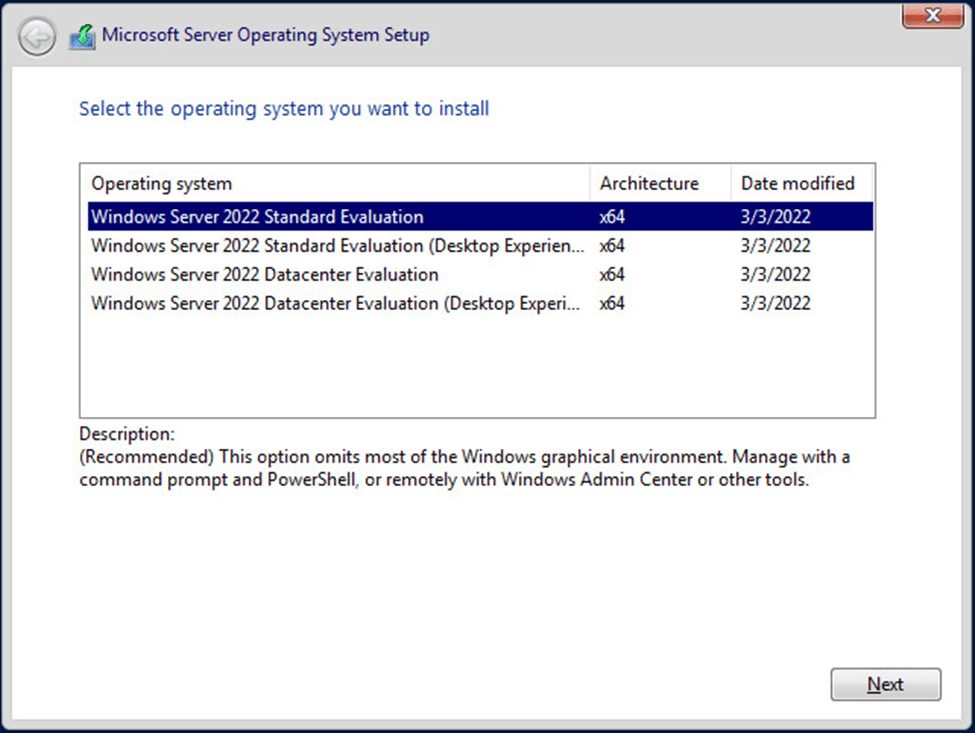
image-42
Select the operating system

15. Select the Drive you want to install the Operating system.

image-43
Drive to install the OS

16. Installation Under Processing

image-44
Installation under processing

17. Set the Local Admin Password and click Finish.

image-45
Setup the Admin Password

18. Immediately you Setup the Admin Password the Windows Lock screen display and to unlock go to Input > Keyboard > Insert Ctrl + Alt + Del and you can go ahead to login.
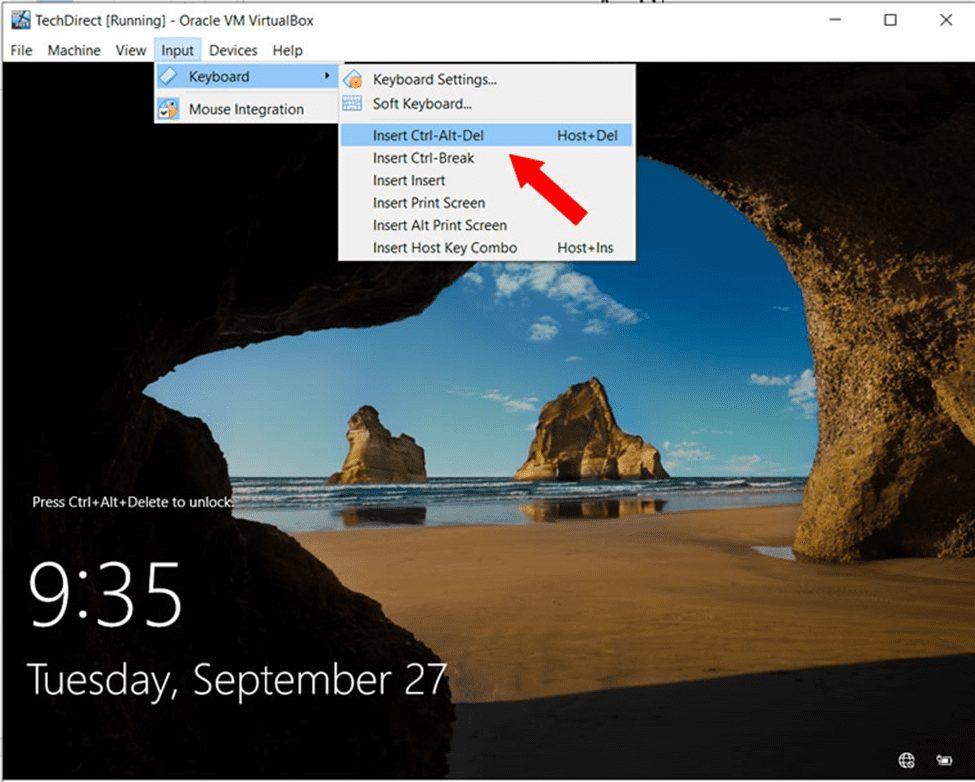
image-46
Login to the New Account

I hope you found this blog post on how to install Windows Server 2022 on VirtualBox very interesting and helpful. In case you have any questions do not hesitate to ask in the comment section.

Thank you for reading this post. Kindly share it with others.

  • Share on X (Opens in new window) X
  • Share on Reddit (Opens in new window) Reddit
  • Share on LinkedIn (Opens in new window) LinkedIn
  • Share on Facebook (Opens in new window) Facebook
  • Share on Pinterest (Opens in new window) Pinterest
  • Share on Tumblr (Opens in new window) Tumblr
  • Share on Telegram (Opens in new window) Telegram
  • Share on WhatsApp (Opens in new window) WhatsApp
  • Share on Mastodon (Opens in new window) Mastodon
  • Share on Bluesky (Opens in new window) Bluesky
Network | Monitoring, Windows Server Tags:Microsoft Windows, Oracle VirtualBox, Virtual Host, Virtual Machine, VirtualBox, virtualization, Windows 11, Windows Server 2016

Post navigation

Previous Post: Create Azure Container instance to deploy your image to Azure using Azure CLI
Next Post: Discord Installation Guide for Linux System

Related Posts

  • MDT Workbench Crashes when opening WinPE tab Properties
    Fix MDT Workbench Crashes when opening WinPE tab Properties Windows
  • dfggg
    SimpleSAMLphp Setup on Windows Server [Part 1] Windows Server
  • Add additional Windows drives
    How to Add Another Hard Drive to a Virtual Machine in HyperV  Virtualization
  • original 1
    DISM “Failed to open image” CWimImageInfo Mount(hr:0x8007000d): Fix Error DISM WIM Provider Windows
  • yxxycx yx
    How to change the Default First-Site-Name in Active Directory Windows Server
  • nonRDP admin
    Allow RDP access for non administrators: Add User to Remote Desktop Users Group in Active Directory Windows Server

More Related Articles

MDT Workbench Crashes when opening WinPE tab Properties Fix MDT Workbench Crashes when opening WinPE tab Properties Windows
dfggg SimpleSAMLphp Setup on Windows Server [Part 1] Windows Server
Add additional Windows drives How to Add Another Hard Drive to a Virtual Machine in HyperV  Virtualization
original 1 DISM “Failed to open image” CWimImageInfo Mount(hr:0x8007000d): Fix Error DISM WIM Provider Windows
yxxycx yx How to change the Default First-Site-Name in Active Directory Windows Server
nonRDP admin Allow RDP access for non administrators: Add User to Remote Desktop Users Group in Active Directory Windows Server

Leave a Reply Cancel reply

You must be logged in to post a comment.

Microsoft MVP

VEEAMLEGEND

vexpert-badge-stars-5

Virtual Background

GoogleNews

Categories

veeaam100

Veeam Vanguard

  • OxscsIP
    Enable Virtualization in Windows: Fixing VirtualBox’s 32-bit Option Virtualization
  • GitLab 1
    How to Setup GitLab Runner on WSL Linux
  • msinfo32 thumbnail
    How to use MSINFO32 to view System Information Windows
  • screenshot 2020 04 27 at 13.30.17
    What are the differences between a Role and a Feature in AD Windows Server
  • Enable Hyper V on Windows 11 Create a VM with PowerShell
    Run Hyper-V on Windows 11: Convert Physical PC to Hyper-V VM Virtualization
  • k8 cluster
    How to build and deploy a Docker Image with Kubernetes Cluster Network | Monitoring
  • windows server 2019 logo
    How to create a Windows Server reference image using WDS Windows Server
  • Smartscreen defender blocking application
    Unable to run downloaded Programs due to Defender SmartScreen Windows

Subscribe to Blog via Email

Enter your email address to subscribe to this blog and receive notifications of new posts by email.

Join 1,762 other subscribers
  • RSS - Posts
  • RSS - Comments
  • About
  • Authors
  • Write for us
  • Contact
  • Advertise with us
  • General Terms and Conditions
  • Privacy policy
  • Feedly
  • Telegram
  • Youtube
  • Facebook
  • Instagram
  • LinkedIn
  • Tumblr
  • Pinterest
  • Twitter
  • mastodon
  • Bsky

Tags

Active Directory Azure Bitlocker Microsoft Windows PowerShell WDS Windows 10 Windows 11 Windows Deployment Services Windows Server 2016

Copyright © 2026 TechDirectArchive

Loading Comments...

You must be logged in to post a comment.