


Force BitLocker Recovery mode: How to unlock BitLocker Protected Drive

In this article, you will learn how to Force BitLocker Recovery mode: How to unlock BitLocker Protected Drive with the Self-service Portal or HelpDesk. BitLocker Drive Encryption is a data protection feature that integrates with the operating system. It addresses the threats of data theft or exposure from lost, stolen, or inappropriately decommissioned computers. This is where MBAM comes in. Please see how to Perform a Self-service Password Reset using the Windows Login Integration Client, and “Enable Secure Boot: Fix Secure Boot certificates expiration“.
MBAM is an administrator interface used to manage BitLocker drive encryption. It allows you to configure your enterprise with the correct BitLocker encryption policy options. As well as monitor compliance with these policies.
There are times you may want to test your BitLocker recovery process just for proof of concept or documentation. In the next section, I will work you through how to Validate BitLocker Recovery Process and force BitLocker Recovery mode. Kindly refer to the following similar guides on BitLocker. how to fix the missing BitLocker Recovery Tab in Active Directory Users and Computers. And how to enable or disable BitLocker Drive Encryption on Windows 10 and Virtual Machines.
MBAM takes BitLocker to the next level by simplifying deployment and key recovery. By centralizing compliance monitoring and reporting, enforcing drive encryption, preventing simple PIN usage, supporting enhanced PINs, and providing a grace period for encryption postponement, etc.
Here are some more guides: how to fix your device cannot use a Trusted Platform Module: Allow BitLocker without a compatible TPM” and how to enable FileVault disk encryption on a Mac device.
Validating BitLocker Recovery Process
With your machine now protected or having taken control of the management of the device. We can now look at ensuring the keys are present in the database. So first of all we can run the manage-bde -Protectors command on our Windows device to obtain the BitLocker recovery key.
To do this, open a Command Prompt or PowerShell Window and type the command below. You must run the command Command Prompt or PowerShell as an Administrator.
Manage-BDE -Protectors -Get C:
Now that you are sure the keys are correctly escrowed. You can now start with the next steps to test the recovery process. Here is an interesting guide on how and where to find your BitLocker recovery key on Windows.
You could also use the command manage-bde -status to view the stats of the encrypted drive as shown below

Now we have three options to verify if the key is in the database. The first is to look at the database table – dbo.RecoveryAndHardwareCore_KeysAlso, see Understanding Microsoft BitLocker Administration and Monitoring Roles, How to unlock a fixed drive protected by BitLocker, and How does Bitlocker Network Unlock work?
Force BitLocker Recovery mode
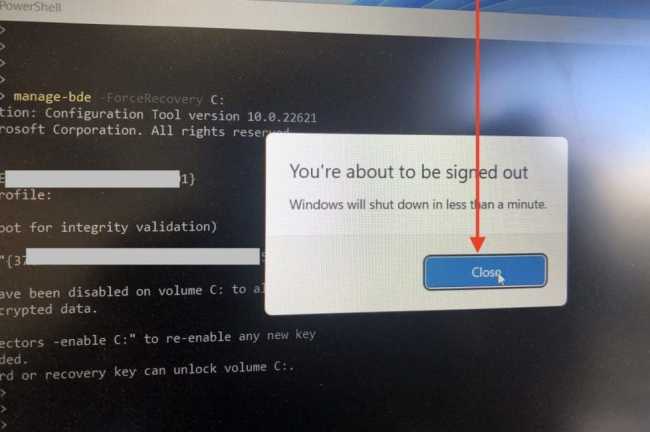
To Force BitLocker Recovery, launch the Command Prompt or PowerShell window. Type the following command <manage-bde -ForceRecovery C:> This depends on the drive you wish to initiate the recovery on.

Restart your PC.

When prompted that you are about to sign out. Click on Close.
Please see the following comprehensive guide on how to enable Bitlocker Pre-Boot Authentication via the Group Policy, and BitLocker PIN bypass: How to configure Network Unlock. I will be using Windows Server 2019 for this deployment.
Now, your PC should restart as well.

Upon restart, the BitLocker Recovery screen will be invoked.

Unlock BitLocker Protected Drive with the Self-service Portal, HelpDesk or AD
The self-service portal will be used by employees to recover their BitLocker keys as part of the self-service process without involving the help desk at all. You can keep tabs on this via the MBAM Recovery Audit report.
Here are some related guides: E-mail notification: Create MBAM Enterprise and Compliance, and Recovery Audit reports, and how to Query MBAM to display the BitLocker Recovery report.
BitLocker Unlock Via Active Directory
The BitLocker Recovery Password Viewer lets you locate and view BitLocker recovery passwords that are stored in AD DS.
Two additional tools in the Remote Server Administration Tools can be used to manage BitLocker. See the following guide on Backup existing and new BitLocker Recovery Keys to Active Directory
- BitLocker Recovery Password Viewer. The BitLocker Recovery Password Viewer enables the BitLocker Drive Encryption recovery passwords that have been backed up to Active Directory Domain Services (AD DS) to be located and viewed. This tool can be used to help recover data that is stored on a drive that has been encrypted by using BitLocker.
- BitLocker Drive Encryption Tools. BitLocker Drive Encryption Tools include the command-line tools, manage-bde and repair-bde, and the BitLocker cmdlets for Windows PowerShell.
Upon installation of these utilities, proceed to the object in Active Directory. Right-click on the computer object and select properties. Locate the BitLocker Recovery Tab as shown below.

Unlock BitLocker Protected Drive with the Help Desk Portal
To perform self-service BitLocker recovery, you must ensure you are a member of the Helpdesk or advanced helpdesk User Group in Active Directory.
If you are not a member of these two groups, you will not be able to perform recovery as shown below as the options are not available to you.

To you have been assigned the rights to perform BitLocker recovery on behalf of other users. Please access the URL as shown:
http(s)://<servername>/HelpDeskAs you can see, I am a member of the advanced helpdesk and as such, I do not have to enter the User Domain and User ID. But the Key ID and the reason for the recovery must be specified.

Note: You can also manage TPM for users via the Helpdesk as well as shown below. Here are some related TPM articles. , and how to clear, enable or disable TPM in Windows via the BIOS, and When Should I Use TPM or TPM + PIN.

Unlock BitLocker Protected Drive with the Self-service Portal
Below are the prerequisites for recovery BitLocker Recovery Key via the SelfService Portal. When using the self-service portal. You may encounter an error such as “Resolve Invalid Key ID when requesting BitLocker Recovery Key“. With this guide, you will be able to resolve it.
- You must be the end user of the system to recover the key through the Self-Service Portal *
- You must use your usual login credentials for that PC when logging into the Self-Service Portal. Else you will not be able to perform the recovery.
To use the Self-Service Portal to regain access to a computer. Kindly access the Self-Service Portal URL of your Company

In the Recovery Key Id field, enter a minimum of eight of the 32-digit BitLocker Key ID that is displayed on the BitLocker recovery screen of your computer. If the first eight digits match multiple keys, a message displays that require you to enter all 32 digits of the recovery key ID.
In the Reason field, select a reason for your request for the recovery key. Next, click on Get Key. Your BitLocker recovery key is displayed in the Your BitLocker Recovery Key field.
Bonus Point!
When the BitLocker Recovery Window is prompted, you can no longer query the BitLocker Management Interface using the “manage-bde -status” command.

FAQs
Why am I prompted to enter the BitLocker recovery key every time I reboot my dual-boot system?
This issue occurs because a dual-boot setup modifies the system’s bootloader, which BitLocker interprets as a potential tampering attempt. BitLocker is designed to ensure the integrity of the system’s boot process, and any changes to the bootloader can trigger the recovery key prompt as a security measure.
Additionally, changes to Secure Boot settings can disrupt BitLocker’s validation process, leading to the same behavior.
What are the steps to mitigate BitLocker Recovery Prompt when using Dual-Boot?
1: You will need to suspend BitLocker Before Making System Changes by opening the Command Prompt as Administrator.
– Run: manage-bde -protectors -disable C:
– Re-enable BitLocker after completing changes.
2:You may need to adjust BitLocker Group Policy Settings by opening gpedit.msc and then navigate to: Computer Configuration > Administrative Templates > Windows Components > BitLocker Drive Encryption > Operating System Drives.
Enable the policy: “Allow BitLocker without a compatible TPM.”
3: Reconfigure the Bootloader: To do this, please use a bootloader manager (e.g., GRUB) that integrates smoothly with Windows Boot Manager to minimize conflicts.
I hope you found this blog post helpful on how to force BitLocker Recovery mode: How to unlock BitLocker Protected Drive with the Self-service Portal or HelpDesk. If you have any questions, please let me know in the comment session.