Before jumping into what BitLocker Unlock is and how it works, let me first quickly discuss what BitLocker is. “BitLocker Drive Encryption” is a data protection feature that integrates with the operating system. It addresses the threats of data theft or exposure from lost, stolen, or inappropriately decommissioned computers. In this guide, we will discuss “How does Bitlocker Network Unlock work?”. Here is a guide on how to Create a certificate template for BitLocker Network Unlock, and how to Manage BitLocker and FileVault with Trellix Native Encryption.
BitLocker is Microsoft’s easy-to-use, proprietary encryption program for Windows that can encrypt your entire drive. See the following guides on how to implement Bitlocker Network Unlock and how to enable Bitlocker Pre-Boot Authentication.
BitLocker Network Unlock was introduced in Windows 2008, It allows automatic access to the BitLocker key needed to unlock the volume. That automatic access occurs over the corporate network when the machine boots thereby bypassing any manual input or steps.
BitLocker Network Unlock works in a similar fashion to the TPM+startup key BitLocker method, except the key is being sent over the network.
Here are the steps for implementing BitLocker Network Unlock
1: The device must have UEFI firmware and UEFI DHCP capability.
2: Any UEFI Compatibility Support Modules (CSM)/Legacy modes must be disabled.
3: The BitLocker-Network Unlock feature must be installed on a Windows Deployment Server.
Note: The WDS server must not be configured specifically for this but has to be up and running.
4: A separate DHCP server must be available to provide an IP address.
5: The necessary certificates for the public/private key pairing must be configured.
6: Group Policy settings to configure Network Unlock must be configured.
Now that I have listed the requirements to get BitLocker Network Unlock implemented in your environment. I will expatiate on the various services needed as shown below.
See the following guides on how to enable or disable BitLocker on Windows 10” or this “This device cannot use a Trusted Platform Module” and BitLocker Drive Encryption architecture and implementation scenarios.
DHCP Server
A DHCP server provides IP addresses to the clients in the pre-OS boot environment. DHCP Server is required when you are using IPv4. This is optional if you are using IPv6 due to auto-configuration (link-local IPv6 address).
Note 1: Network Unlock on the client uses its linked local address to create the DHCPv6 request packet, so it works without configuring a DHCPv6 server. You can configure both DHCPv4 and DHCPv6 scopes on the same machine or on different devices.
Note 2: If you have DHCP and client computers in different subnets you will have to configure the DHCP Relay agent on your router. A DHCP relay agent is any host that forwards DHCP packets between clients and servers.
Relay agents are used in forwarding requests, and used to reply between clients and servers when they are not on the same physical subnet. See post-DHCP configuration.
Windows Deployment Server (WDS) Server
WDS is a really interesting tool from Microsoft for the network-based installation of Windows operating systems.
In Windows Server 2003 it was called Remote Installation Services (RIS). The WDS server is a separate server role and is required to provide PXE functionality (Pre-boot Execution Environment).
PXE is mainly used to install or boot the operating systems from the network. But in this case, it will answer all NKPU requests arriving at the server.
Digital Certificate
Public-key certificate is also referred to as a digital certificate. It is an electronic document used to prove the ownership of a public key. This includes information about the key, the identity of its owner (called the subject), and the digital signature of an entity that has verified the certificate’s contents (called the issuer).
This certificate is used to encrypt Bitlocker Key Material sent by the client to the WDS server. Only the WDS server can decrypt it with its private key and send it back to the client. You may find this article interesting “what are the components needed to create a certificate signing request“.
Once the certificate has been configured on WDS. You should deploy the public key certificate to end devices that will be unlocked automatically using BitLocker Network Unlock.
Note: You have two options for configuring certificates for Network Unlock which are as follows.
Import certificates from your IT infrastructure Public Key Infrastructure (PKI): This requires you to request for a certificate from your certification authority (CA) using Certificate Manager (certmgr.msc) on the WDS server. See how to create a how-to request certificate signing request in Windows using Microsoft Management Console.
You could also use a self-signed certificate. If you decide to use a self-signed certificate, you can generate the certificate. You can verify if the certificate is present using certlm.msc or command line as shown below.
Certutil -verifystore FVENKP
GPO Configuration
These certificates generated (WDS certificate (public key) have to be deployed to all computers that will be using the network unlock feature. The easiest method to roll this out is via GPO.
For more information on Group Policy, please see the following guides. “What is Group Policy Object“, and how to analyze group policies applied to a user and computer account.
Computer Configuration\Policies\Windows Settings\Security Settings\Public Key Policies\Bitlocker Drive Encryption Network Unlock Certificate
See this guide on how to set up and install the WDS role, how to configure Windows Deployment Services on Windows Server 2019, and how to configure DHCP Server option 60, 66, and 67 for Windows Deployment Services.
Clients (Workstations)
BitLocker Network Unlock allows automatic access to the BitLocker key needed to unlock the volume. The clients have to support UEFI and TPM enabled, activated and with ownership taken by the system.
NKPU protocol (which is used by Bitlocker Network Unlock) can work with both wired and wireless networks.
The security of this protocol assumes that only a physical local area network (LAN) connection is available when executing this protocol, and that physical connectivity to the LAN is an implicit built-in authentication factor.
Please see BitLocker PIN bypass: How to configure Network Unlock in Windows, How to unlock a fixed drive protected by BitLocker via the Control Panel or Command Prompt in Windows, and how to backup and restore a Windows DHCP Server via the DHCP Manager and PowerShell.
Network Unlock sequence
The unlock sequence starts on the client side. When the Windows boot manager detects the existence of the Network Unlock protector. It uses the DHCP driver in UEFI to get an IP address for IPv4. Then it broadcasts a vendor-specific DHCP request that contains the network key and a session key for the reply, all encrypted by the server’s Network Unlock certificate.
The Network Unlock provider on the supported WDS server recognises the vendor-specific request, decrypts it with the RSA private key, and returns the network key encrypted with the session key via its own vendor-specific DHCP reply.
On the server side, the WDS server role has an optional plug-in component, like a PXE (Preboot Execution Environment) provider. The plug-in component handles the incoming Network Unlock requests. The provider can also be configured with subnet restrictions.
These restrictions require the IP address that’s provided by the client in the Network Unlock request to belong to a permitted subnet in order to release the network key to the client. If the Network Unlock provider is unavailable, then BitLocker fails over to the next available protector to unlock the drive.
So in a typical configuration, the standard TPM+PIN unlock screen is presented to unlock the drive.
The server-side configuration to enable Network Unlock requires provisioning a 2048-bit RSA public/private key pair in the form of an X.509 certificate. The configuration also requires the public key certificate to be distributed to the clients via GPO as described above.
Scr: Microsoft
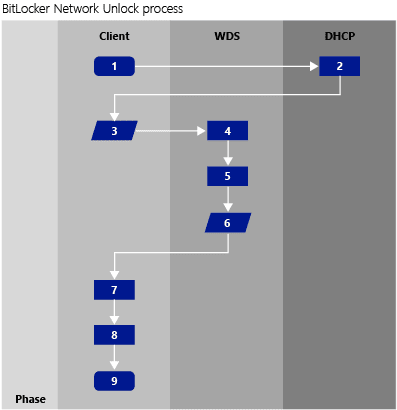
The Network Unlock process follows these phases
Below are the steps for BitLocker Network unlock- Please see Force BitLocker Recovery mode: How to unlock BitLocker Protected Drive.
1: The Windows boot manager detects a Network Unlock protector in the BitLocker configuration.
2: The client computer uses its DHCP driver in the UEFI to get a valid IPv4 IP address.
3: The client computer broadcasts a vendor-specific DHCP request that contains:
– A network key (a 256-bit intermediate key) that’s encrypted by the 2048-bit RSA public key of the Network Unlock certificate from the WDS server.
– An AES-256 session key for the reply.
4: The Network Unlock provider on the WDS server recognises the vendor-specific request.
5: The provider decrypts the request by using the WDS server’s BitLocker Network Unlock certificate RSA private key.
6: The WDS provider returns the network key encrypted with the session key by using its own vendor-specific DHCP reply to the client computer. This key is an intermediate key.
7: The returned intermediate key is combined with another local 256-bit intermediate key. This key can be decrypted only by the TPM.
8: This combined key is used to create an AES-256 key that unlocks the volume.
9: Windows continues the boot sequence.
See the following guides on how to enable FileVault disk encryption on a Mac device and also see “insight on Full Disk Encryption with PBA / without PBA, UEFI, Secure Boot, BIOS, File and Directory Encryption and Container Encryption“.
I hope you found this blog post helpful on how does Bitlocker Network Unlock work? If you have any questions, please let me know in the comment session.