How to Install ROOT CA Enterprise and NPS Wifi Certificate

Why you need a Microsoft Root CA Enterprise to authenticate Wi-Fi users with NPS. In this guide, we will discuss how to Install ROOT CA Enterprise and NPS Wifi Certificate. When you want to authenticate users who connect to your corporate Wi-Fi network using credentials (such as those from Active Directory), one of the most secure solutions is to use the 802.1X protocol together with Microsoft’s NPS (Network Policy Server). Please, see Windows 10 Always On VPN (AOVPN) Overview, features and Requirements, and how to Import certificates into Trusted Root and Personal certificate store.
In this scenario, it is essential to have a PKI (Public Key Infrastructure), specifically a Microsoft Root CA Enterprise, to issue the certificates required for secure authentication. The Root CA is used to:
- In the guide, I have included the steps for migrating an NPS to a new server.
- Issue digital certificates to NPS servers and client users or computers.
- Guarantee the identity of devices thanks to validated certificates.
- Enable EAP-TLS authentication, which is certificate-based and much more secure than username/password.
- Integrate with Active Directory, simplifying the automatic distribution of certificates via Group Policy.
In summary, Microsoft Root CA Enterprise is the heart of security when implementing robust, centralized Wi-Fi authentication via NPS and certificates.
Also, see “The application /Certsrv does not exist: How to configure Certificate Enrollment Web Services and Certificate Authority Web Enrolment, and “How to Install and configure Active Directory Certificate Services“
Install Active Directory Certificate Services (ADCS) Role
To install ADCS, launch the Server Manager and navigate to add roles and features. On the Server Role, select Active Directory Certificate Services and also add the features required as shown below.

Click on Next to proceed

Proceed with the rest prompts and on the result tab, click on close as the configurations have succeeded.

Certificate Authority Web Enrolment
Certification Authority (CA) Web Enrollment in Active Directory Certificate Services (AD CS) simplifies certificate management by providing a browser-based interface to request and renew certificates, retrieve certificate revocations lists (CRLs) and enroll for smart card certificates. This role service is useful for organizations that need a flexible and interactive method for certificate enrollment without requiring specific client configurations.
That is, the CA Web Enrollment enables users to submit PKCS #10 requests to the CA interactively through a web browser and an Internet Information Services. You can read more from the Microsoft Learn guide.
Navigate through the steps discussed above and select Certificate Authority Web Enrollment and add the features when prompted.

Click on Next to proceed

Now we have installed the role services, click on Next

Select next as well.

Ensure that the following role services needed to for the Web Server (IIS) are selected

Now, you can click on install and select the option “Restart the destination server automatically when required”.

The installation has succeeded. You can close the window if you waited for it to complete.

Post Active Directory Certificate Services Deployment
Start the Active Directory Certificate Service configuration wizard Upon the completion of the installation process.
To do this, click on the Post-Deployment Configuration icon and click on the configure Active Directory Certificate Services on this server to configure it.

Enter your credentials as shown below.

Proceed by clicking on the Next button

Click on Next as shown below and ensure that both role services are selected.

Select CA Type
We will be installing an Enterprise CA and from the image below, you can learn about the differences

Now, select Root CA as shown below

Please, specify the type of private key

Verify the configuration as SHA 256 – RSA 2048 Bits

Choose the right Hash Algorithm and cryptographic options as shown below.

Specify the common name of the CA etc as shown below.

Enter the database locations as shown below and click on Next

On the confirmation page, click on Configure.

Click on close.
Please, see Review of the Synology CC400W Installation and Configuration, and how to Prevent Users from Seeing Wi-Fi Password on Windows.
Launch the Certificate Authority
Open CA as shown below.

You will be redirected to the following page below where you can request a cert etc.

Below is an example of a certificate deployed by the customer

You can take a look at the validity period etc and configre the properties as you wish.
Configure new CA Template for Domain Controller Client Server Auth
Note: Certificate templates are only available on Enterprise CAs
- Log on to the CA server as a member of the Enterprise Administrators group
- Open the certificate templates MMC snap-in (i.e. certtmpl.msc)

Right-click the Domain Controller Authentication template and click Duplicate Template

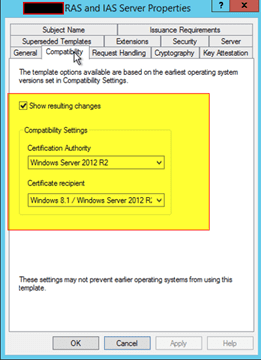
From the Compatibility Tab, modify the Compatibility Settings for both the CA and certificate recipients to as high as possible (e.g.Windows Server 2012 R2, Windows 7 / 2008 R2)

Under the General tab:
- Recommend modifying Renewal period to: 6 weeks

From the Cryptography tab:
- If possible, set Request hash to SHA256

Open the CA console (i.e. certsrv.msc). In the console tree, click the name of the CA. From the details pane, double-click Certificate Templates. On the console tree, right-click Certificate Templates, click New, and then click Certificate Template To Issue
Add the template from the CLI when the template is not visible in the ‘Certificate Template to Issue’ menu
Certutil -Set-CATemplate +"Ballestra DomainControllerAuthentication"
Select and enable the certificate template that were created in step 9 above, and then click OK

Auto-enroll Domain Controller Certificate Using Group Policy Object (GPO)
Log on to the Domain Controller server as a member of the Enterprise Administrators group. Open the GPMC (i.e. gpmc.msc). Within the appropriate GPO, navigate to Computer Configuration\Policies\Windows Settings\Security Settings\Public Key Policies\
Configure Certificate Services Client – Auto-Enrollment with the following options:
- Configuration Model: EnabledRenew Expired Certificates, Update Pending Certificates, Remove Revoked Certificates: Check
- Update Certificates That Use Certificate Templates: Check
You can now force the group policy to update via command-line: gpupdate /force or wait for the group policy to update on its own
If successful, you should see a new DC cert in the Certificate (Local Computer) -> Personal -> Certificates folder. (i.e. open MMC.exe -> File -> Add/Remove Snap-in ->Certificates ->Computer account ->Local computer). If you look at the furthest tab called “Certificate Template” you should see a cert generated with the custom template you created in step 9.
Create Template Certificate Client and Server Authentication RADIUS
To do this, right click on the Certificate Template and click on Manage

No, duplicate the template

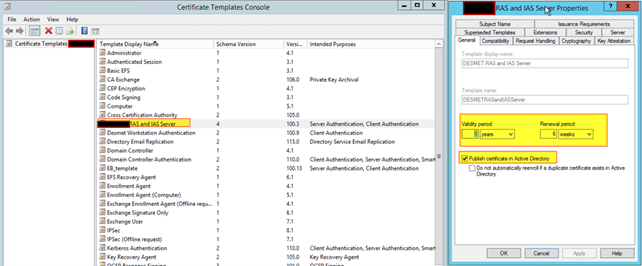
Go through the certificate properties and specify your desired settings.

Enter the template name and specify the validity etc

For Request Handling and select your desired properties

Specify the Cryptographic key etc

Specify the subject name as shown below

Remove your users

For RAS and IAS Server, ensure the following permissions are enabled for the Enrol and Autoenrol.

Also, do this for the domain computers

Now we have the new template created

Issue Certificate
Right-click on the new template that was created and select new and certificate template to issue.

Select the right template and click on OK

Install and configure NPS
Network Policy Server (NPS) is the Microsoft implementation of a Remote Authentication Dial-in User Service (RADIUS) server and proxy. You can use NPS to create and enforce organization-wide network access policies for connection request authentication and authorization.
You can also configure NPS as a Remote Authentication Dial-In User Service (RADIUS) proxy. When you use NPS as a RADIUS proxy, NPS forwards connection requests to a remote NPS RADIUS server or other RADIUS servers.
You can use the proxy configuration to load-balance connection requests and forward them to the correct domain for authentication and authorization. NPS is installed when you install the Network Policy and Access Services (NPAS) role in Windows Server.
Now, launch the Add Roles and Features Wizard from the Server Manager and click on Next

Select Role Based or feature based installation and click Next

From the server where you want the role to be installed on, select it from the list of server. Here, we have just one.

Choose the Network Policy and Access Server, and when prompted, click on Add features.

To proceed, click on Next

Click Next to deploy NPS

On the confirmation page, click on Install.

Click on Close.

How to migrate NPS
To export NPS from customer environment, run the command below.
Export-NpsConfiguration -Path "C:\Npsconfig.xml"
Copy files to the server where you want to import the configuration file to migrate NPS.

Import conf file NPS
Import-NpsConfiguration -Path "C:\Npsconfig.xml"
Rename Rules

Edit the conditions as shown below

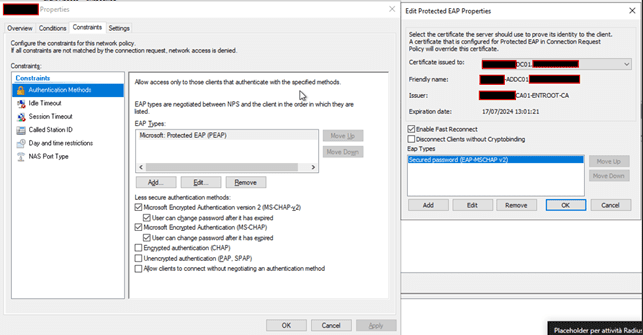
Click on Apply as shown below

Modify the shared key configuration of the APs. Verify DC certificates

The next guide will be how to migrate an MS ROOT CA Enterprise.
FAQs
How does AD CS simplify certificate management?
AD CS provides a full PKI infrastructure including certificate issuance, revocation, and auto-enrollment. Features like auto-enrollment automate certificate distribution and renewal for users and devices, reducing administrative overhead and minimizing the risk of expired certificates. It also integrates seamlessly with Active Directory for policy enforcement
What is Cross-Certificate Trust and when should we use it?
Cross-Certificate Trust allows two PKIs to trust each other by exchanging certificates between their CAs. It is used when two organizations or PKI environments need mutual trust without fully merging their certificate hierarchies, such as for collaboration with external institutions or partners.
Can AD CS certificates be trusted outside the organization?
Yes. AD CS certificates can be trusted externally by linking your internal PKI with an external CA. This can be done via a Subordinate CA model (internal CA as subordinate to an external root CA) or a Cross-Certificate Trust model (mutual trust between your CA and external PKIs). Both methods ensure external systems recognize your certificates as valid.
What is a Subordinate CA and why should we use it?
A Subordinate CA is a Certification Authority that sits below a root CA in a PKI hierarchy. It issues certificates to users, devices, and services while relying on the trust established by the root CA. Organizations use a subordinate CA to maintain an internal PKI while ensuring certificates are trusted externally, reducing dependency on external CAs for all certificate issuance.
I hope you found this article very useful on how to Install ROOT CA Enterprise and NPS Wifi Certificate. Please, feel free to leav a comment below.


