Skip to content

TechDirectArchive

Hands-on IT, Cloud, Security & DevOps Insights

  • Home
  • About
  • Advertise With US
  • Contact
  • Reviews
  • Toggle search form
Home » Windows » How to use the DigiCert certificate utility for Windows to create a CSR

How to use the DigiCert certificate utility for Windows to create a CSR

Posted on 19/11/202125/08/2023 Temitope Odemo By Temitope Odemo No Comments on How to use the DigiCert certificate utility for Windows to create a CSR
DigiCert

The free DigiCert Certificate Utility for Windows is a very good an indispensable tool for administrators and a must-have for anyone that uses SSL Certificates for Websites and servers or Code Signing Certificates for trusted software. This is a globally accepted tool that you can used for certificate management and various certificate troubleshooting. It is very easy to configure and a straight-forward approach in the usage.

You can read more related guides like: Enable LDAP over SSL with a Third-party Certification Authority such as DigiCert, Generate a self-signed SSL certificate: How to enable LDAP over SSL with a self-signed certificate, and How to Import your SSL Certificate to Your Windows Server using DigiCert Utility

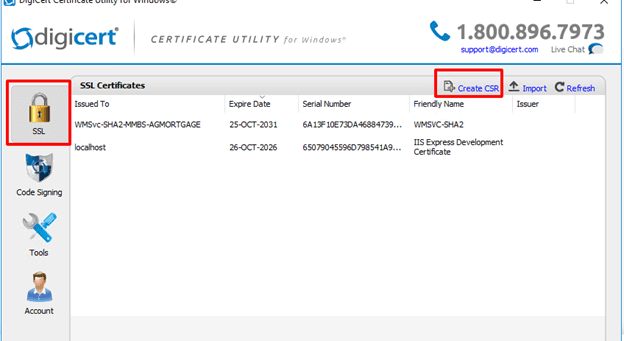
Follow these Steps to Create Your CSR with the DigiCert Utility

  • On your Windows Server, download and save the DigiCert Certificate Utility for Windows executable DigiCertUtil.exe
  • After downloading run the utility file.
certificate utility
Setting up the DigiCert Utility
  • Launch the DigiCert Certificate Utility for Windows and click SSL (with gold lock), and then, click Create CSR.
Windows
Creating CSR

On the Create CSR page, enter this information:

  • Select SSL as the Certificate Type
  • Common Name: enter the fully qualified domain name (e.g., www.techdirectarchive.com) or you may enter the IP address.
  • Subject Alternative Names: assuming you are requesting a Multi-Domain (SAN) Certificate, you can enter any SANs e.g (www.techdirectarchive2.com)
  • Organization: Enter your company’s legally registered name. e.g TechDirectArchive
  • Department: Optional
  • City: Enter the city where your company is located.
  • State: Select the correct state your company is located.
  • Country: Select the correct country your company is located.
  • Key Size: In the drop-down list select 2048.
CSR
Creating CSR
  • Click the Generate button.
  • You can either click the Copy CSR button to copy the certificate contents to a clipboard like Notepad or you can save to file.
image-76
Certificate request successful

I hope you found this blog post on How to use the DigiCertCertificate Utility for Windows to create a CSR very interesting and helpful. In case you have any questions do not hesitate to ask in the comment section

Rate this post

Thank you for reading this post. Kindly share it with others.

  • Share on X (Opens in new window) X
  • Share on Reddit (Opens in new window) Reddit
  • Share on LinkedIn (Opens in new window) LinkedIn
  • Share on Facebook (Opens in new window) Facebook
  • Share on Pinterest (Opens in new window) Pinterest
  • Share on Tumblr (Opens in new window) Tumblr
  • Share on Telegram (Opens in new window) Telegram
  • Share on WhatsApp (Opens in new window) WhatsApp
  • Share on Mastodon (Opens in new window) Mastodon
  • Share on Bluesky (Opens in new window) Bluesky
  • Share on Threads (Opens in new window) Threads
  • Share on Nextdoor (Opens in new window) Nextdoor
Windows, Windows Server Tags:Certificate Signing Request

Post navigation

Previous Post: How to backup Azure VM with VM Settings
Next Post: What are the differences between dnf and apt package managers?

Related Posts

  • hero windowsadmincenter
    Failed to create a scheduled task: There is no disconnected command associated with the runspace Windows Server
  • Screenshot 2020 06 25 at 22.51.15
    Why is Data recovery is almost impossible from an overwritten Hard Drive Windows
  • Featured Image
    Remote WMI Connection: How to enable or disable WMI Traffic Using Firewall UI Windows
  • Test your webcam and microphone before meeting
    How to Test Your Webcam And Microphone Before Meeting Windows
  • Featured image 1
    How to enable or disable color filters in Windows Windows
  • Allow and Disallow Simultaneous Connection to Domain and Non Domain network
    Allow and Disallow Simultaneous Connection to Domain and Non-Domain network Network | Monitoring

More Related Articles

hero windowsadmincenter Failed to create a scheduled task: There is no disconnected command associated with the runspace Windows Server
Screenshot 2020 06 25 at 22.51.15 Why is Data recovery is almost impossible from an overwritten Hard Drive Windows
Featured Image Remote WMI Connection: How to enable or disable WMI Traffic Using Firewall UI Windows
Test your webcam and microphone before meeting How to Test Your Webcam And Microphone Before Meeting Windows
Featured image 1 How to enable or disable color filters in Windows Windows
Allow and Disallow Simultaneous Connection to Domain and Non Domain network Allow and Disallow Simultaneous Connection to Domain and Non-Domain network Network | Monitoring

Leave a Reply Cancel reply

You must be logged in to post a comment.

Microsoft MVP

VEEAMLEGEND

vexpert-badge-stars-5

Virtual Background

GoogleNews

Categories

veeaam100

Veeam Vanguard

  • Windows Server 2016 1 1
    Merits and demerits of Local System Account and Service Logon Account Windows Server
  • windowsztrf
    Microsoft Desktop Optimization Pack [MDOP] at a glance Windows
  • azure app service with office 365 and yammer sharepoint saturday florence 2015 session 8 638
    WordPress site on Azure: How to create a website hosted in Azure Oracle/MSSQL/MySQL
  • Banner
    How to Stop OneDrive from Starting Up Automatically on Windows 11 Windows
  • logon
    Configure logon hours for users in Active Directory Windows Server
  • Azure App Service
    How to Restore Deleted Azure App Service Using PowerShell Automation
  • Check Virtualization
    Enable Virtualization in BIOS: Determine if the Intel VT-x or AMD-V Virtualization Technology is enabled in BIOS Virtualization
  • Slide1
    Read-only Files: Saving Files in VIM Editor on Linux/Unix-like OS Linux

Subscribe to Blog via Email

Enter your email address to subscribe to this blog and receive notifications of new posts by email.

Join 1,814 other subscribers
  • RSS - Posts
  • RSS - Comments
  • About
  • Authors
  • Write for us
  • Advertise with us
  • General Terms and Conditions
  • Privacy policy
  • Feedly
  • Telegram
  • Youtube
  • Facebook
  • Instagram
  • LinkedIn
  • Tumblr
  • Pinterest
  • Twitter
  • mastodon

Tags

Active Directory Azure Bitlocker Microsoft Windows PowerShell WDS Windows 10 Windows 11 Windows Deployment Services Windows Server 2016

Copyright © 2025 TechDirectArchive


Loading Comments...
 

You must be logged in to post a comment.