How to update Proxmox VE 9.0 now Supported by Veeam

If you have not upgraded yet due to dependencies on Veeam Backup and Replication (VBR). The wait is over as Proxmox Virtual Environment (PVE) 9.0 is now fully supported. It is packed with powerful new capabilities for modern virtualization and software-defined data centers. Whether you are running a home lab or managing enterprise-scale clusters, this release is a game-changer. Therefore, in this guide, I will be showing you the steps on how to update Proxmox VE 9.0 now Supported by Veeam. Please, see how to delete a VM and Storage in Proxmox, and how to create a bootable USB on Mac: Proxmox VE Setup.
Recently, I created some blogposts on how to setup Proxmox VE and also how to Backup and Restore Proxmox VE virtual machines with Veeam. So I had wanted to upgrade to Proxmox 9.0. But because this was not supported by Veeam yet, I ended up protecting the VMs only running on Proxmox 8-3-1.

But with the release of the new Veeam Plug-in for Proxmox VE v12.1.5.17 It now support for Proxmox Virtual Environment versions 9.0 as shown below or in the referenced link.

Also, see how to Resolve the Update Package Database failure on Proxmox VE, and how to Install Proxmox VE on a Beelink EQ12 Mini PC.
What’s New in Proxmox VE 9
Proxmox VE 9.0 is not just an incremental update as it introduces innovations that enhance performance, flexibility, and manageability. Below are a few features in this new release;
- Snapshots as Volume Chains: This is a storage vendor-agnostic snapshot mechanism. It allows snapshots to be handled more consistently across different storage backends, simplifying hybrid environments.
- High Availability (HA) Rules: New node and resource affinity options. This gives administrators more control over where VMs and containers should run in failover scenarios
- Fabrics for SDN: Fabrics introduce a new abstraction layer for routed networks. This is ideal for complex networking setups in cloud-like environments
- Refreshed Mobile Web Interface: Provides a modernised UI that is faster, cleaner, and easier to use from smartphones and tablets.
- Updated Foundations: It is based on Debian 13 “Trixie”. And runs on Linux Kernel 6.14.8 for improved hardware support and performance. It ships with the latest versions of:
– QEMU 10.0.2
– LXC 6.0.4
– ZFS 2.3.3, and
– Ceph Squid 19.2.3
Please, see how to set up the OOTBI Virtual Appliance on Proxmox VE. Here is what to know about “Failed to perform Veeam Worker Upgrade”. Also, see how to deploy and integrate VHR with VBR.
Update Proxmox VE
To update Proxmox VE, you can use either the web interface or the command line. The recommended approach is to first update the configured APT repositories and then perform a full system upgrade. Regular updates are crucial for security and performance
First, lets ensure that the Proxmox VE 8 is correctly up to date . To do this, select the node and click on Update. Then select upgrade as shown below.

Click Yes to continue and shortly, your node will be updated. As you can see, it is up to date. You will be prompted to reboot the Proxmox node as shown in the image below.


Note: Without ensuring that the node is correctly updated. You will not be able to upgrade to version 9. Therefore, the above update step is vital.
Run PVE Update Script
When you run the following command “pve8to9”, the following checks will be performed.
pve8to9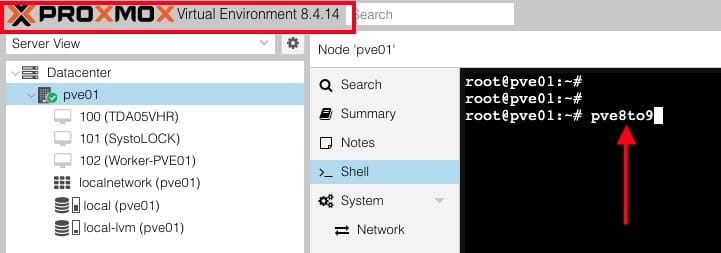

As you can see, I have one running guest and I will stop this very shortly

Below are other errors and warning that will be resolved shortly.


Please, see Veeam Backup Console must be updated to the latest version, and how to Shrink and Compact Virtual Hard Disks in Hyper-V. and how to create Folders and Enable File sharing on Windows.
Error and Warning Fix
This command first tells Debian’s package configuration system (debconf-set-selections) to force installation of the GRUB EFI binary into the “removable media path” (so UEFI firmware without NVRAM entries can still boot it).
echo 'grub-efi-amd64 grub2/force_efi_extra_removable boolean true' | debconf-set-selections -v -uThen it reinstalls the grub-efi-amd64 package, ensuring GRUB is properly written to the EFI system partition with the setting applied.
apt install --reinstall grub-efi-amd64
With Debian Trixie the systemd-boot package got split up a bit further into systemd-boot-efi (containing the EFI-binary used for booting), systemd-boot-tools (containing bootctl) and the systemd-boot meta-package (containing hooks which run upon upgrades of itself and other packages and install systemd-boot as bootloader).
As Proxmox Systems usually use systemd-boot for booting only in some configurations (ZFS on root and UEFI booted without secure boot), which are managed by proxmox-boot-tool, the meta-package systemd-boot should be removed. The package was automatically shipped for systems installed from the PVE 8.1 to PVE 8.4 ISOs, as it contained bootctl in bookworm.
Since the pve8to9 migration check script suggests removing the systemd-boot meta-package, you can safely remove it by running the command below.
apt remove systemd-boot
Enable non-free firmware to fix the Microcode warning
If you try to run the command without modifying the sources list. You will get the following error “Package ‘intel-microcode’ has no installation candidate”.

Current APT source list
Note: If your repositories are already pointing to the new Debian release (Trixie for PVE 9) and the Proxmox 9 repos, the GUI will handle the upgrade similar to
apt dist-upgrade

Add the following non-free firmware to the Debian repo lines for Debian13 and Trixie. Do not forget to save
deb http://deb.debian.org/debian trixie main contrib non-free-firmware
deb http://deb.debian.org/debian trixie-updates main contrib non-free-firmware
deb http://security.debian.org/debian-security trixie-security main contrib non-free-firmware
Note: The the new APT sources file, you will run into new issues. This is because “same base-suite for all Proxmox and Debian provided repos and ask original vendor for any third-party repos. E.g., for the upgrade to Proxmox VE 9 use the ‘trixie’ suite”. To fix this, I have decided to have the following in my source file.
# Debian 13 "Trixie"
deb http://deb.debian.org/debian trixie main contrib non-free-firmware
deb http://deb.debian.org/debian trixie-updates main contrib non-free-firmware
# Debian Security updates
deb http://security.debian.org/debian-security trixie-security main contrib non-free-firmware
# Proxmox VE 9.x (no subscription repo)
deb http://download.proxmox.com/debian/pve trixie pve-no-subscription
Next, update the package list with the command below. The PVE Processor Microcode script could not help me in this case.
apt update
Next, install the Intel microcode package
apt install intel-microcode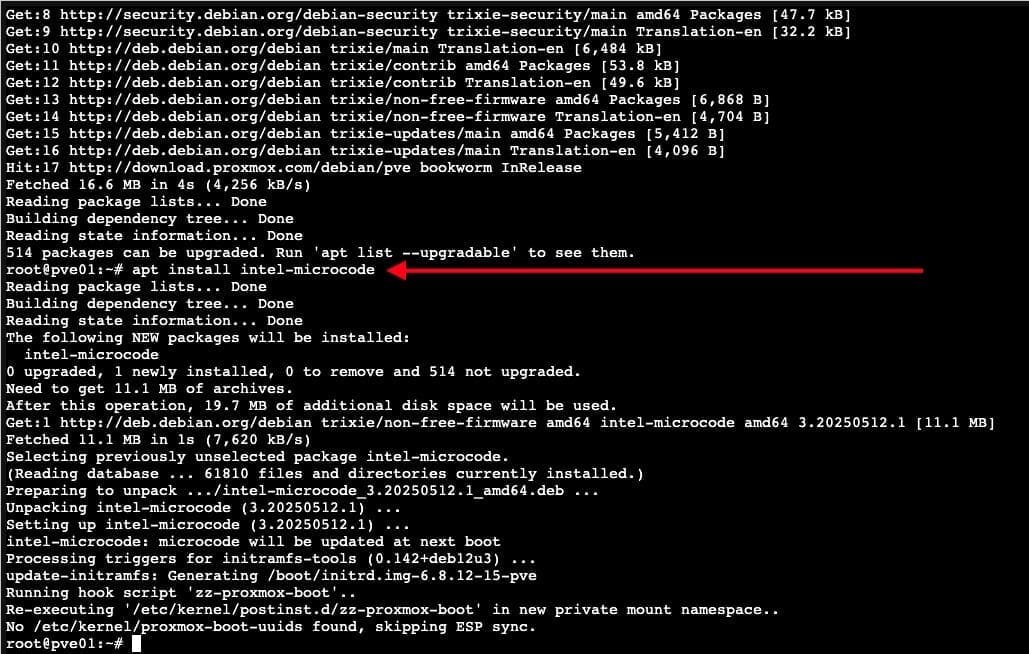
Next, reboot to apply microcode updates
Note: If there are pending updates as shown below from the upgrade script. Depending on how you install these updates, you might already performed an in-place upgrade to PVE 9.0.

Please, see Protect your Windows Devices with MFA with SystoLOCK, how to install Windows Server unto ACEMAGICIAN Mini PC, and Fix Windows Server frequent disconnects and shutdown.
Run full Checks
Now, I would like to run it with all checks enabled with the command below. Proxmox recommends to run the full checks at least once before the upgrade. This script only checks and reports things. By default, no changes to the system are made and thus, none of the issues will be automatically fixed. You should keep in mind that Proxmox VE can be heavily customized, so the script may not recognize all the possible problems with a particular setup!
It is recommended to re-run the script after each attempt to fix an issue. This ensures that the actions taken actually fixed the respective warning.
pve8to9 --full

Please, see Install Veeam ONE and Add VBR: Fix failed to connect to VBR, and how to Shrink and Compact Virtual Hard Disks in Hyper-V.
Upgrade the system to Debian Trixie and Proxmox VE 9.0
You will need to refresh the repo meta data and upgrade installed packages, dependencies, renames, removals, and kernel/initramfs updates. I will be using the modern APT equivalent to the below “apt dist-upgrade”.
apt update
apt full-upgrade
Do not forget to reboot after this step.
As you can see below, we have successfully upgraded to the latest release of Proxmox VE at the time of writing this guide.

So, when you run the apt dist-upgrade which can also be used to upgrades all packages while resolving dependencies, and can remove packages if necessary. Proxmox VE major upgrade changes the kernel version. Therefore, old signed kernel as obsolete.

Conclusion
Proxmox VE 9.0 is a major leap forward, combining a modern foundation (Debian 13 + Kernel 6.14.8) with enterprise-grade features like vendor-agnostic snapshots, better HA rules, and advanced SDN fabrics. The polished mobile web interface makes it even easier to manage on the go.
I hope you found this guide on “how to update Proxmox VE 9.0 now Supported by Veeam” very useful. Please, feel free to leave a comment below.