Windows 11 is in high demand by many who desire to have a feel of the amazing great features that come with it Oracle VirtualBox. To those who desired to do so and had their hope cut off when Microsoft released the official requirements for systems that can install Windows 11. In this article, we shall discuss installing Windows 11 without TPM Support. Please see How to Grant Local Admin Permissions to a Group [Part 1], and Security researchers bypass Windows Hello with fake fingerprints with Raspberry Pi 4.
This requirement also particularly requires that you have a system with TPM 2.0 support. But in a situation where your PC doesn’t have the supported TPM nor the processor that meets the official requirement.
You will definitely want to fall back to running Windows 11 on a Virtual Machine Manager solution like Oracle VirtualBox Manager. To get started, what you need is to download and install the Oracle VirtualBox.
It’s so unfortunate that even with the plan-B option, that is using the VirtualBox Manager, you will not still be able to run Windows 11 because the resources that are required by the VirtualBox to run Windows 11 are dependent on that of your host Machine.
So definitely, if your host machine doesn’t have the supported TPM you cannot install Windows 11 in VirtualBox because Oracle VirtualBox is yet to support TPM. I guess that might be done in the future which is not predictable right now!
Let’s Get started
Before I go on, you may likely want to upgrade your host system to Windows 11. In like manner, check out this guide on how to upgrade Windows 10 with an unsupported CPU and TPM 1.0 to Windows 11.
Meanwhile, if you had recently upgraded your VirtualBox Manager v6.1.28 from v6.1.26 and got an error of your Oracle VirtualBox failing to launch, see the guide on how to fix “Failed to open session in VirtualBox to install Windows 11 Image” .
Now let’s do the real work for today. Having downloaded and installed your VirtualBox, do the following to create your Windows 11 VM. However, if you haven’t downloaded the Windows 11 ISO file.
Create a Windows 11 VM in Oracle VirtualBox
The steps to create a Windows 11 VM in Oracle VirtualBox are as follows:
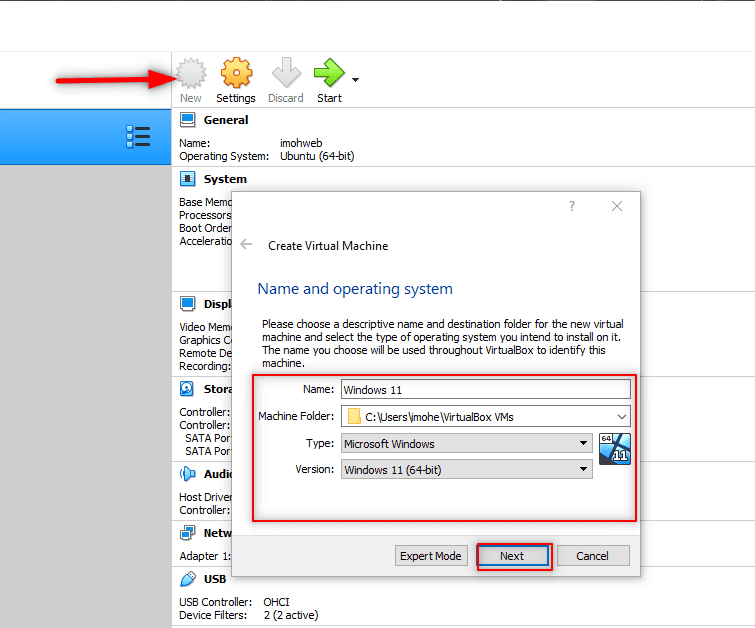
Launch the VirtualBox, and Click on NEW. At this point, you will give your VM a name. Here, I name it Windows 11. Therefore, leave the version as 64-bits.
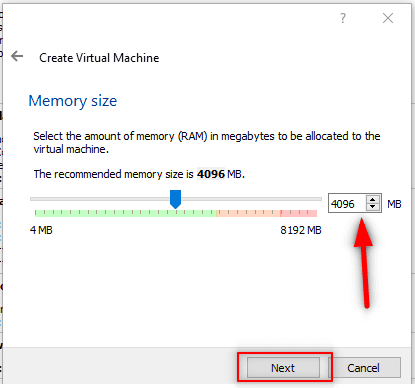
2. Click Next to set the Memory Size, bear in mind that the minimum required RAM size is 4096MB
3. Click Next & Select the Create a Virtual hard disk now!
4. Click Create & Select the VDI (Virtual Disk Image) option and set it to Dynamically allocated and not Fixed size.
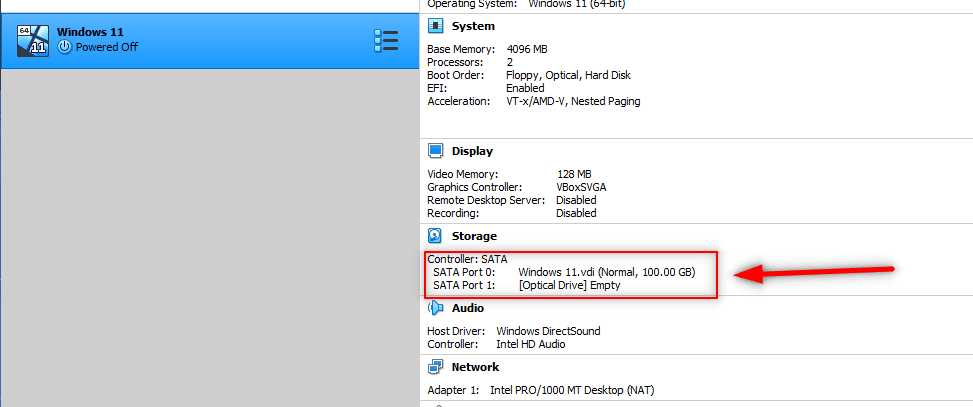
You can specify any size of virtual hard disk you wish but bear in mind that this will take from the size of your host PC hard disk. I will recommend 100GB. That’s what I’m using for this demonstration Oracle VirtualBox.
Mount Windows 11 ISO File Within Oracle VirtualBox
Now that we have successfully created the Windows 11 VM without starting it, let’s go over to the settings option within the Oracle VirtualBox to mount the Windows 11 ISO file we downloaded earlier. Follow the steps below to do so:
Click on Settings > Storage > Empty > Select the Live CD/DVD > Click the Disk Icon

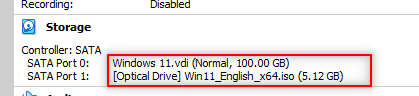
As you can see the ISO file has been mounted. Next is for us to start the Virtual Machine by clicking on Start.
When you click Start to start the Virtual Machine, you will be prompted to press any KEY to boot from CD ROM just as you would while loading it on your host PC. The interface similar to the screenshot below will appear.

Click Next
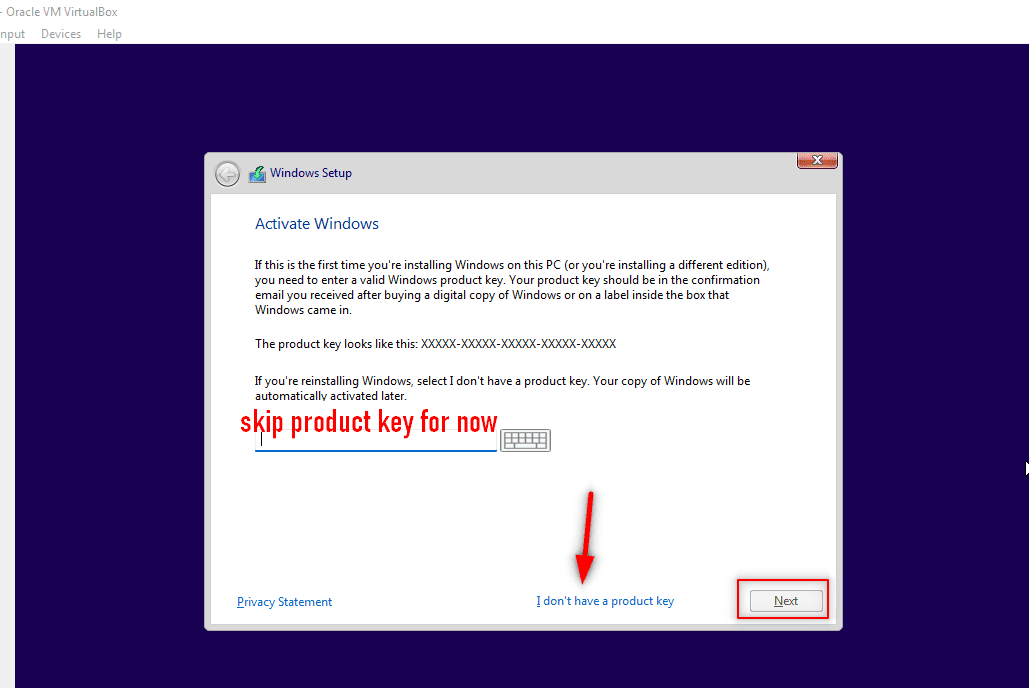
At this point, Click on I don't have a Product Key to take you to the next screen as shown below.
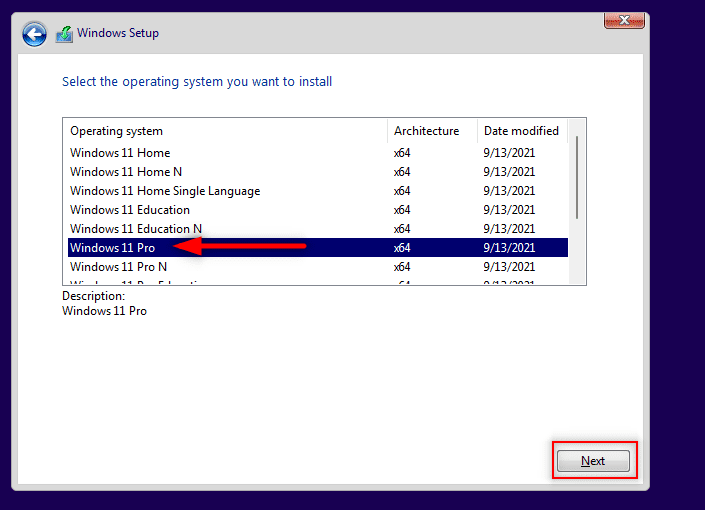
Select the version most desired for you. Here, we’re selecting Windows 11 Pro Oracle VirtualBox.
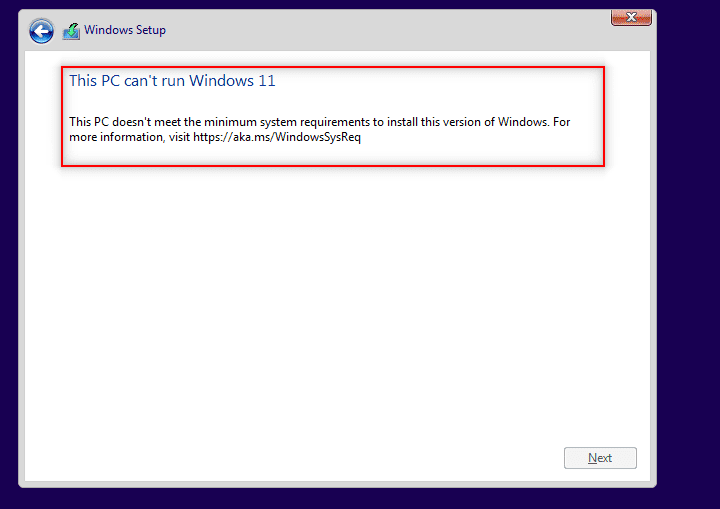
Doing so might make your excitement drop 🙄 as you will be shown the ‘This PC can’t run Windows 11’ notice on the next interface.
But you don’t have to worry that’s why this guide is here to put a smile on your face once again😂
Now what you need to do is power off the Virtual Machine.
Solve the Unsupported PC Problem by editing the Windows Registry Editor
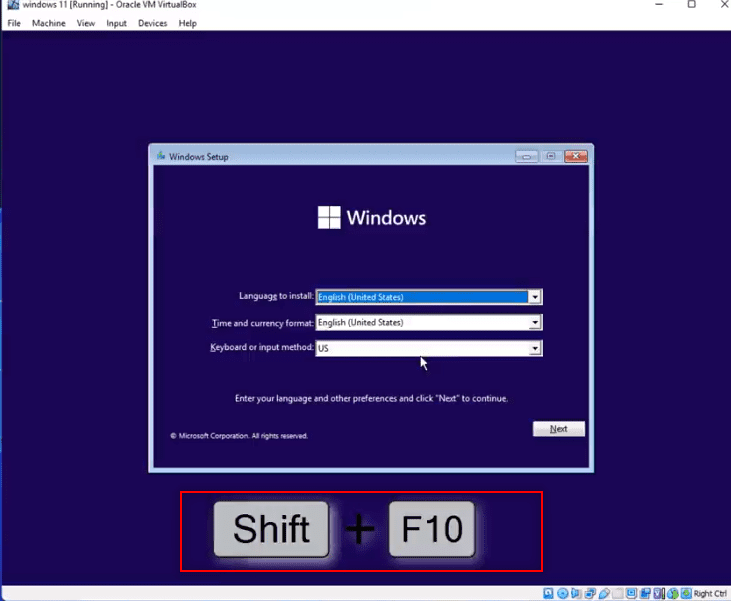
To solve this, start the Virtual Machine again. You should see a screen looking like the one we have before. But at this stage, press Shift + F10 as shown below. This will bring up the following Command Prompt (cmd) screen.
In the cmd screen, type regedit. Then, follow HKEY_LOCAL_MACHINE > System > Setup.
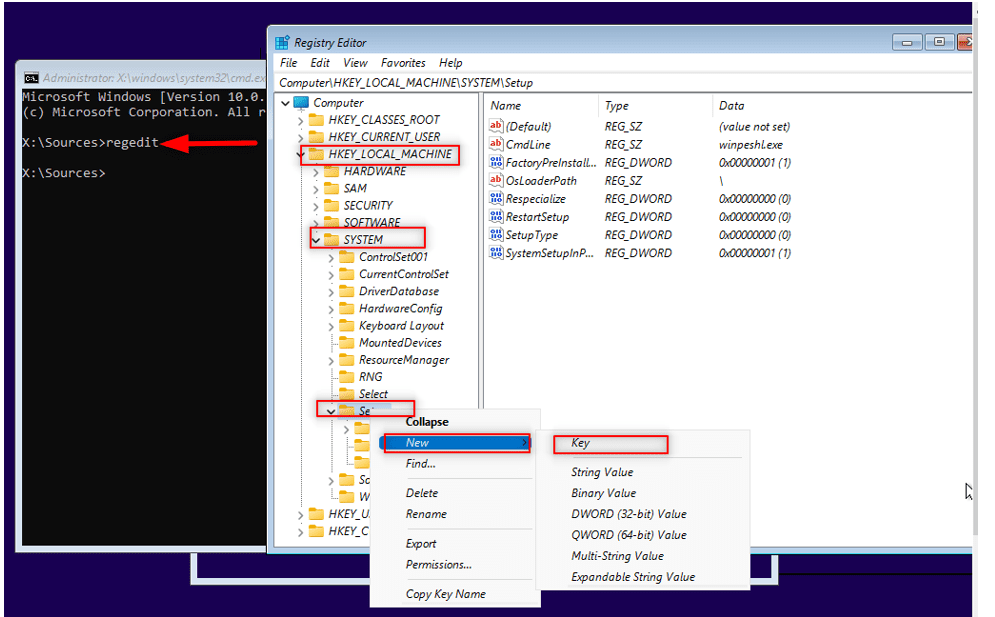
Next, Right-click on the Setup folder, and click New > Key give it a name as LabConfig. To that end, you need to type it exactly as stated here.
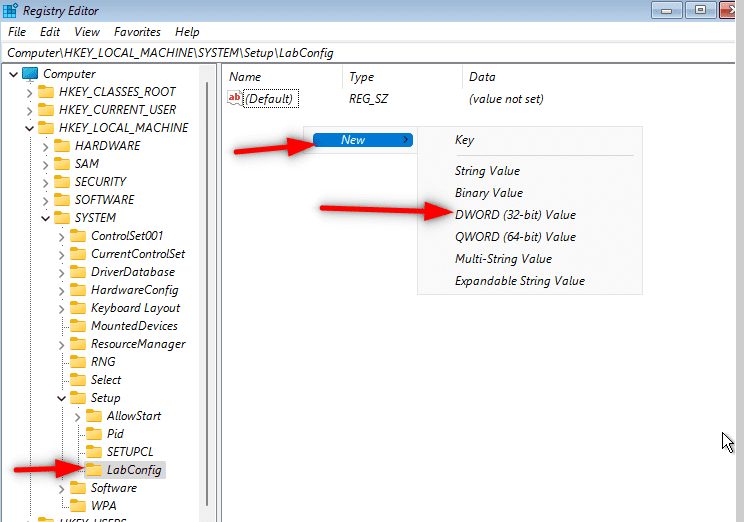
Next, select and double-click the LabConfig folder to open it. With the LabConfig folder open, click New > Dword (32-bit) Value.
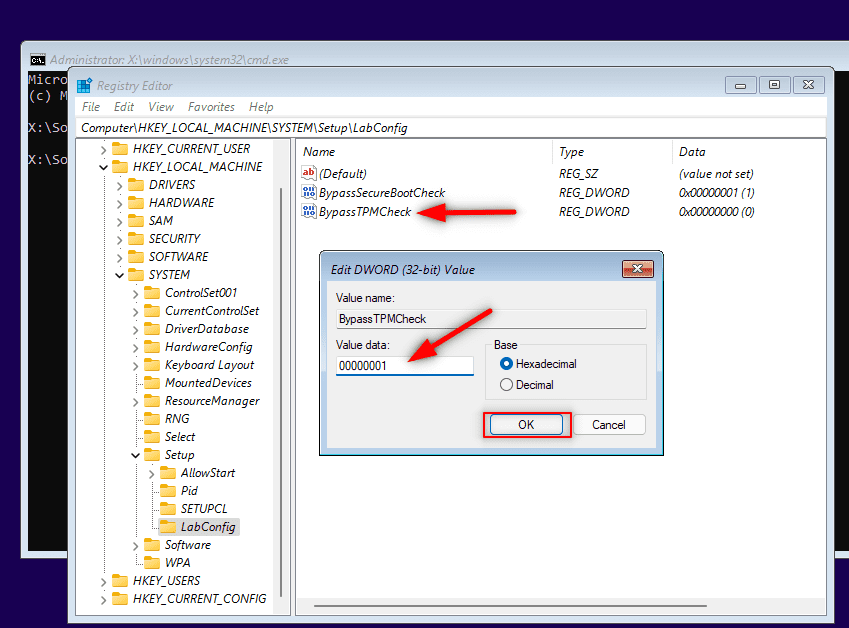
Name it BypassSecureBootCheck. Following this, double-click the BypassSecureBootCheck and edit the value data.
Afterwards, replace the initial value which is zero (0) with 7 zeros and 1 (00000001) or just put 1 only, and click Okay Oracle VirtualBox.

Secondly, we are going to create a new Dword (32-bit) value. Name it as BypassTPMCheck.
Furthermore, double-click it to rename the value to the same value as given in BypassSecureBootCheck i.e. 1 or 7 zeros and 1 (00000001)
We are now done with Registry Editor. Close both the Registry Editor and the Command Prompt, and continue with the installation Oracle VirtualBox.
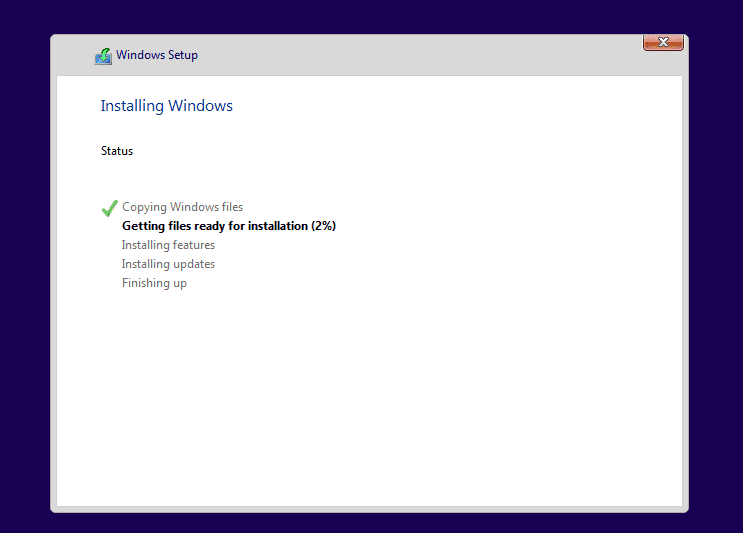

This time your smile 😂 is real because you have just succeeded in installing and running Windows 11 without TPM Support. Cheers and Congratulations!!👏


Works fine! thx
I’m glad you found this useful!
This is a very nice description with the perfect amount of detail install Win 11 in Virtual Box without all the outrageous MS requirements for CPU & TPM. Not to mention the perfect screenshots that make it a breeze to follow you directions. Thank you!
Glad to hear this!
Worked beautifully! Thanks!
I’m glad you found this useful!