This guide describes the procedure for associating a Public IP address to an Azure Virtual Machine (VM) at the network interface (NIC) level. In Azure, VMs are deployed with private IP addressing by default within an Azure Virtual Network (VNet), ensuring internal-only communication unless explicitly exposed. Please see How to Upgrade Veeam ONE to 13.0.2.6723 to Address Security Fixes, and how to Fix Vulnerable Veeam Backup and Replication 13.0.1.2067 and Earlier.
Assigning a Public IP enables inbound connectivity from external networks over the internet by binding a public endpoint to the VM’s network interface IP configuration (e.g., ipconfig1). This is required for scenarios such as direct administrative access (RDP/SSH), service exposure, or integration with external systems that cannot traverse private networking (e.g., VPN or ExpressRoute).
The Public IP resource in Azure provides a routable IPv4/IPv6 address and can be configured with properties such as SKU (Basic/Standard), allocation method (dynamic/static), and DNS label. When associated with a NIC, Azure automatically performs source NAT (SNAT) and destination NAT (DNAT) to map external traffic to the private IP.
Because this introduces a direct attack surface, it is critical to enforce strict inbound traffic filtering using Network Security Groups (NSGs) and, where applicable, additional controls such as Azure Firewall, Just-In-Time (JIT) access, or Bastion. Proper segmentation and least-privilege access policies are essential to mitigate exposure risks.
Objective and Procedure
Assign a public IP address to an existing Azure Virtual Machine (VM).
Access the Virtual Machine, and navigate to the Azure Portal. Locate and select the target Virtual Machine.

Please see How to upgrade Veeam One from v12 to v13, how to Integrate Trellix ePolicy Orchestrator with a Syslog Server, and Veeam Backup and Replication: PowerShell must be Remote Signed.
Networking
Open Network Configuration. In the VM menu, go to Networking. Click on Public IP address, and select Configure.
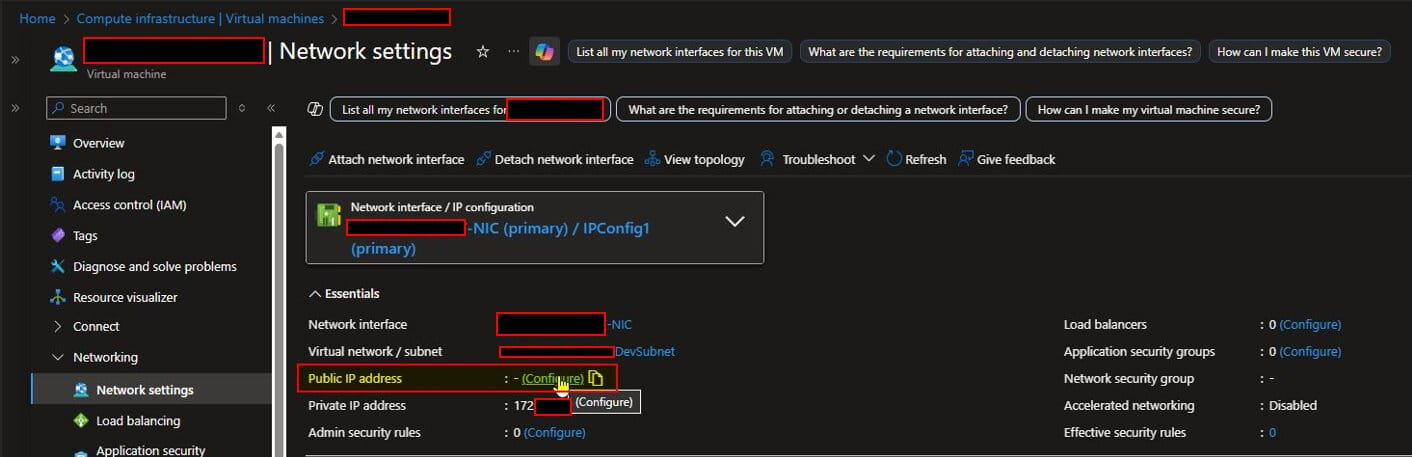
Edit IP Configuration, and click on Ipconfig1 (or the relevant IP configuration).

Please see Prevent Automatic Driver Updates in Windows and Xen-Orchestra, and how to Switch from IP Addresses to DNS for Backup Infrastructure in VBR.
Associate a Public IP
In the configuration pane, select: Associate Public IP Address, and choose an existing Public IP or create a new one.


Save Changes, and click Save to apply the configuration.

Please see How to remove a Repository from Veeam Backup and Replication, how to Update Veeam Backup & Replication to Build 13.0.1.2067, and how Fix broken Repository Path in Veeam Scale-Out Backup Repository
Result
The virtual machine is now accessible via a Public IP address.
p.s. Ensure that the Network Security Group (NSG) associated with the VM is carefully reviewed and properly configured to restrict inbound traffic to only the required ports and trusted sources, in order to prevent potential security compromises.
I hope you found this article on how to Assign a Public IP to Azure Virtual Machine (VM) very important. Please feel free to leave a comment below.