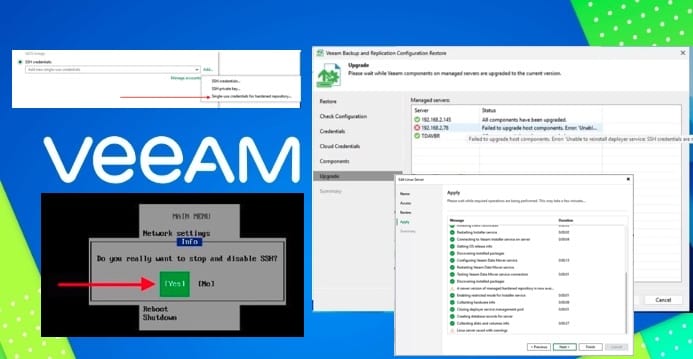
Since the move to version Veeam Backup & Replication (VBR) v13, we have seen that FQDN works more reliably in VBR/VSA due to strict reverse DNS requirements for certificate authentication, SSH, and agent deployment on Linux. IPs skip PTR lookups and often fail validation as demonstrated in this guide “Building VIHR: Ransomware-Proof Repository with Veeam JeOS“. In this article, we shall discuss how to “Switch from IP to DNS names for Backup Infrastructure in VBR cleanly”. Please see Linux System Update: Upgrade vs. Dist-upgrade Differences.
The focus of this guide is to show you the various steps to Switch from IP Addresses to DNS (shortname) to FQDN via PowerShell as documented in this KB. In this guide, we will also discuss the various steps to upgrade PowerShell to the latest version due to the alternative method we will discuss in [Part 2].
Here is how to Install and update PowerShell version 7 on Windows and Linux or follow the steps below. You may also find the following interesting “Upgrade PowerShell Core Windows or Mac and Linux System“. Here is how to update PowerShell and Package Management via GPO.
To re-emphasize, in VBR v13, using Fully Qualified Domain Names (FQDNs) is recommended for host registration and communication with backup infrastructure components. Particularly in environments involving Linux-based repositories, SSH connectivity, and certificate-based authentication.
FQDNs provide consistent name resolution across all backup components and ensure proper alignment with TLS certificate Subject Alternative Names (SAN). This in thus reduces the the risk of identity mismatches during secure communication.
Ensuring Reliable Deployment
While IP addresses and DNS (short names) are supported, they may introduce dependency on local resolution behavior, such as DNS suffix configuration or reverse DNS (PTR) availability. This can sometimes lead to validation or trust issues in stricter security configurations. For optimal reliability and compatibility across backup, agent deployment, and transport operations, FQDN-based configuration is considered the preferred approach.
As discussed above, we have ascertained that Veeam Backup & Replication requires reliable DNS resolution for all infrastructure components. due to this need, VBR environments leverage FQDNs that resolve correctly through both forward (A) and reverse (PTR) DNS lookups. This ensures consistent identification of key components such as vSphere or Hyper-V hosts, clusters, proxies, and the VBR server itself.
Please see how to setup DS923+ Synology NAS as a Backup Repository for VBR, and how to setup iSCSI Target and Storage LUN on Synology DS923+ for VBR.
Hosts File Precedence for Deterministic Name Resolution
Note: If DNS is unavailable, you can use local hosts file entries as a temporary workaround especially in a small environment. However, this approach requires manual maintenance and should include both short names and FQDNs to avoid resolution inconsistencies.
In the network resolution order, the local hosts file is checked before the system sends a query to an upstream DNS server. By mapping the IP to the DNS name locally which we will see very shortly on the VBR server:
- Veeam gets a guaranteed, instantaneous resolution.
- It completely bypasses external DNS latency, flaky forwarding, or missing records on the network.
The Local Host File Overrides Network DNS
With the above argument, we can categorically say that the local hosts file can be used to enforce deterministic name resolution for critical infrastructure components. On Windows systems, entries in the hosts file take precedence over DNS queries, allowing you to explicitly control how specific FQDNs resolve to IP addresses.
By defining static mappings for key Veeam components (FQDN to Private IP), name resolution becomes independent of external DNS availability, DNS caching behavior, or infrastructure changes during recovery scenarios. This ensures consistent resolution even when DNS services are degraded, unavailable, or being rebuilt during disaster recovery operations.
This approach is primarily used to maintain operational continuity and predictable connectivity within isolated backup fabrics. It helps ensure that Veeam components can continue to communicate using intended private network paths without relying on production DNS infrastructure.
Please see How to Find the Pathname of a Mapped Network Drive, how to Import PST file into Exchange Server 2016, and Outlook Data File: Fix PST Error – Exceeded Maximum Large Items.
Satisfying the Mutual TLS (mTLS) & Certificate Check
Modern VBR handles communication with transport services via unique self-signed certificates. When Veeam deploys an agent or communicates with a backup component, it embeds the identifier you used to add the server into the certificate’s Subject Alternative Name (SAN) field.
If you added it by a name, Veeam expects that name to resolve flawlessly during the cryptographic handshake. Your local host record bridges this gap perfectly, ensuring the name consistently points to the exact same IP.
Please see Remote Desktop can not find the computer FQDN and this might mean that FQDN does not belong to the specified network, and how to fix HyperV Virtual Machine display taking over the entire screen.
Handling the Reverse Resolution (PTR) Gap
While a local hosts file entry handles Forward Resolution (Name $\rightarrow$ IP) perfectly. it does not natively resolve reverse (lookup) resolution (IP $\rightarrow$ Name) other Veeam components or managed servers are initiating the connection. In modern Veeam architecture, security components often require valid Pointer (PTR) records to successfully complete identity validation.
To ensure full resolution consistency across the backup fabric, a properly designed DNS infrastructure is still required as shown below. This includes correctly configured forward (A) and reverse (PTR) zones, ideally hosted on redundant or dedicated DNS servers that remain available during recovery scenarios.

The hosts file should therefore be viewed as a targeted override mechanism for forward resolution consistency. While DNS remains responsible for complete bidirectional name resolution across the environment.
C:\Windows\System32\drivers\etc\hosts for Windows)

Now, I have created an host record for my standalone Hyper V host as shown below. As you can see below. It is recommended to add both short name and fully qualified domain name in the hosts file.

Please see The connection was denied because the user is not authorized for remote Login: Enable Remote Desktop Connection on Windows 11 for non-administrators or selected users, and how to fix Failed to connect to Deployer Service Error.
Part 1: Add a Managed Server to VBR
In this section, we assume that no server has yet been added. In Part B, we assume that a server has already been added and we will update its configuration by changing the hostname from an IP address or DNS (shortname) to a fully qualified domain name (FQDN).
To do this, open the Veeam Backup & Replication Console and navigate to the Backup Infrastructure view. Expand the Managed Servers node, then select Microsoft Hyper-V. From the ribbon, click Add Server to launch the wizard.
In the Add Microsoft Hyper-V Server wizard, choose one of the available deployment options. In this example, I do not have a cluster available in my lab environment. But I do have System Center Virtual Machine Manager (SCVMM). Please see how to Integrate Hyper-V: Install System Center Virtual Machine Manager.
Therefore, I select Hyper-V Server (standalone). Each option provides different advantages depending on the environment and management model.

Please see Do not use Public DNS in Prod: Change DNS Server in Windows, how to run the Cisco ASDM launcher, and how to block the Change Password Feature for All Users via the Exchange Administrative Center
Deciding on the name to use
In Veeam Backup & Replication, both IP addresses and DNS are supported for infrastructure communication. However, FQDN-based configuration is operationally preferred because it improves scalability, simplifies host management as discussed above.
IP-based designs remain functional but become harder to maintain in dynamic or large-scale environments. Where DNS-based name resolution provides more consistent and manageable infrastructure identification.
Here, I have deliberately decided to use the DNS (short name) instead of the FQDN here. I will show you in the later part of this guide how to change this with PowerShell.

But you can already use a FQDN already if you are not interested in experiments as I do. To recap, VBR does not inherently “prefer” FQDN over IP. It supports both as you can see in the above image. The difference is further broken down below.
- FQDN usage
- Triggers full DNS resolution path (forward + reverse where required)
- Aligns with TLS certificate Subject Alternative Names (SAN).
- IP usage
- Bypasses forward/reverse DNS dependency in some cases
- Still valid for transport connectivity
- But can fail in certificate validation, SSH trust establishment, and Linux agent onboarding as I have seen in some of my deployment.

Please see How to change your password in Outlook Web Access, Failed Edge Transport: Easy Guide For Removal, and Map a Network Drive: How to mount a Network Drive.
Specify Credential
In this section, we use certificate-based authentication, which requires the deployment kit to be pre-installed on the target machine. However, we perform this installation on the fly during the configuration process.
Note: If you add a server using a DNS short name and select “Connect using certificate-based authentication” and connection is made to the target server already. Veeam displays an error and prevents the Hyper-V host from being added to Veeam Backup & Replication.
To resolve this issue, switch the configuration to use the correct fully qualified domain name (FQDN) instead of the short name via PowerShell which we will discuss very shortly.

As you can see, the below components have been deployed already.

As you can see, the following server has been processed. click on next to proceed.

On the summary page, click on “Finish” to complete the integration of Hyper-V with VBR.

Why VBR Requires PowerShell to Rename Managed Servers
I have deliberately added this section and added the new managed Server with the host name (short name) which will be changed very shortly with PowerShell. I have seen that most administrators are not comfortable with scripting and as such prefers working over the console. Therefore, this article will provide you with all the needed steps to switch from IP to FQDN or DNS to FQDN correctly.
Note: Since you cannot change a managed server from IP address to FQDN (or DNS name) directly in the Veeam Backup & Replication Console. This is because the server identity is treated as a fixed registration object.
So, when a server is added, Veeam binds it to a specific identifier (IP or hostname) and uses this identity for credential association, certificate trust, transport configuration, and internal inventory mapping. Changing the resolution method would effectively alter the server identity and could break existing job dependencies, proxy relationships, and secure communication channels.
For this reason, Veeam does not allow in-place modification of the address type in the console. Instead, the supported method is to remove and re-add the server which the below steps will address. Or use PowerShell to update the managed server entry in a controlled way while preserving configuration metadata.
Please see How to add or remove email addresses from a mailbox, Email Size Limits: Boost for High Profile Users in Exchange 2010, and OpenVZ template on Proxmox Server: How to Guide.
Remove Managed Server from VBR
Similar to the behavior noticed here “How to remove a Repository from Veeam Backup and Replication‘. When there are dependencies on the managed server, you will not be able to remove it on the fly. To attempt this, select the managed server added with IP and click on “Remove Server”. On the confirmation prompt, click on Yes.

As you can see as predicted, deletion is not possible. This is because the below jobs are linked to the managed server.

Now, I will proceed and delete the jobs I do not need and edit the job I need.

Please see how to update Cisco ASA, how to setup Cisco ASA: Wiping Old Configurations, and how to Clone a Proxmox Container: CT Restoration Guide.
Adding Objects (VMs) to Backup Job
Since I have deleted two other jobs I do not need. I could as well delete the TDAConfigMgr job and recreate it. But there is absolutely no need for this since I have the Hyper-V readded via the DNS (host) name.
In the Add object wizard, I will remove the old Object from the managed server added with IP Address and re-add the VM (object) from the managed server added with the hostname as shown below.

Now, add the new VM by clicking on the Add button. The VM will be added when this is done, click on Next to continue.

Here you can perform “map backup” operation. Manually performing a Map Backup operation after changing the managed server identity is a critical step to maintain continuity of existing backup chains. This operation allows Veeam to re-associate existing backup files with the updated server reference, preventing the next backup run from failing or triggering an unintended full backup.
By mapping the backups, Veeam re-establishes the link to the existing metadata. And correctly validates the available restore points under the new DNS/FQDN-based identity. This ensures that incremental chains remain intact and that backup operations continue without disruption.

Select the Backup to Map and click on Ok.

Please see Administer Cisco ASA: Mastering CLI Management, how to convert a VHDX file to a VHD, and SSH access on Ubuntu server: Easy Guide.
Verify Connectivity and credentials
Ensure you select the “Enable Guest file system indexing and malware detection”, and click on Next. Do not forget to verify the credentials and network connectivity to ensure it works.

Connectivity and credentials added work correctly.

You can optionally set a schedule and click “Apply’ to proceed

On the summary page, click on Finish. Here you can run the backup on the fly immediately after click on Finish.

As you can see the backup job is in progress.

Remove the Managed Server
Now proceed to remove the managed server added via IP address. You should be able to remove it now as all the reference links have been removed.

As you can see, the Hyper-V host added via IP address has been removed.

Please see Install Veeam ONE and Add VBR: Fix failed to connect to VBR, how to extend Proxmox Local Container Storage, and remove Packages from a Linux: Quick Guide.
Create a New backup Job
To create a new backup job, open the Home view and navigate to the inventory pane, select Jobs or click on Backup. Right-click on the working area or Backup Job from the Ribbon as shown below.

Enter the job name and description

Select the VM to backup from the Hyper-V host (managed server) and click ok.

If you wish to select a different proxy or specify a different repository as well. You can do that here.

We have tested above and we know the credentials works. This time, we will select “Enable application-aware” processing because this is a domain controller.

Set the schedule according to your need and click on Apply.

You can choose to run the job immediately after you click on Finish.

Please see How to enable or disable User Account Control, Linux Directory Hierarchy, and Basic Cisco ASA troubleshooting Commands Guide.
Part 2: Via PowerShell
To perform the Name/FQDN/IP of a Managed Server that needs to be changed (updated) within Veeam Backup & Replication can be done via PowerShell.
Note: If MFA is enabled for your account, PowerShell commands cannot be run. To proceed with the name change, launch PowerShell from inside the Veeam Backup & Replication console.
You can find the “PowerShell” button under the Main Menu’s console, (hamburger) section as shown below.

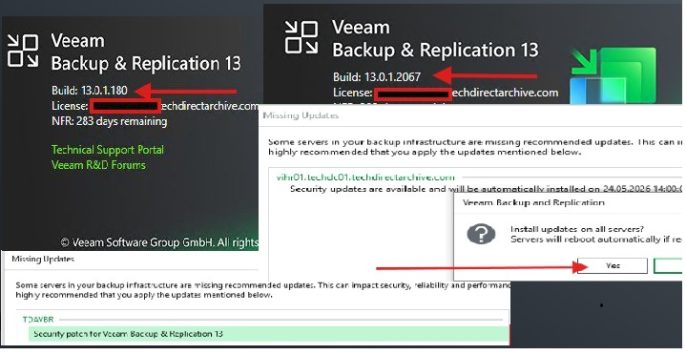
As you can see, we currently do not have the latest version of PowerShell running. To get the prompt, click on the link as shown in the image below.

Upgrade PowerShell
Run the command below to update/upgrade PowerShell.
iex "& { $(irm https://aka.ms/install-powershell.ps1) } -UseMSI

In a few seconds or minutes. This will prompt the PowerShell installer Window as shown below. Click on Next


On the destination folder, click on Next as well.

You can perform any of these optional actions as shown below.

I would like to use Windows update to keep PowerShell up to date.

On the ready to install PowerShell, click on “install”.

This will validate the installation as shown below.

I will recommend you choose the second option as the option to close the application and attempt to restart them does not work reliably.

Since I chose the first option like i said, it will not succeed.

A you can see below, the setup was unable to automatically close all the requested applications. I will click on Ok to proceed.

Select “Do not close application” a reboot will be required, and click on Ok.

Shortly, PowerShell will be updated.

Winget to update PowerShell
If you would want to avoid the above lengthy steps. You can use Winget command as shown below
winget upgrade --id Microsoft.PowerShell

Regardless of the method used, you have powershell v7.6.1 running below

Please see How to perform Password Change with OWA, Command Prompt in Windows: Creating Volumes Guide, and Classes of IP Address: Understanding IP Address Classification.
Managed Server Object Rename
Prior to running the commands below you need to identify the Name\FQDN\IP Veeam is using to communicate with the Managed Server currently. In place of Techda01, you could enter an IP address if this is what your managed server uses until now.
# Step 1: Assign the target infrastructure component object to a variable
$Server = Get-VBRServer -Name “Techda01”
$Server = Get-VBRServer -Name “192.168.2.147” (in case you have an IP address in the name field)
# Step 2: Push the new FQDN update directly into the VBR configuration database
$Server.SetName(“techda01.techdc01.techdirectarchive.com”)

After running the second command, this forces Veeam to immediately re-authenticate connections, rebuild its secure certificate handshakes, and synchronize internal catalog metadata under the new FQDN identity.

I hope you find this article on how to Switch from IP Addresses to DNS for Backup Infrastructure in VBR very useful. Please feel free to leave a comment below.