
In this article, you will learn how to fix error 0xc1510111: You do not have permission to mount and modify this image. Windows Permissions help determine which users can access, modify, and delete files and folders in your environment. Every file and folder on your Windows computer has individual permissions settings. Here are some guides relating to WDS. BOOTP Vendor Extensions and DHCP Options, and how to save and stop modification to Microsoft Management Console.
Why was this error prompted “Image Modification Error 0xc1510111”?
You may run into the following error below if you wish to mouth a boot.wim or install.wim file. In my case, it was the install.wim file.

Error: 0xc1510111 You do not have permissions to mount and modify this image
Deployment Image Servicing and Management tool
Version: 10.0.10586.0
Error: 0xc1510111
You do not have permissions to mount and modify this image.
Verify that you have Read/Write permissions or mount the image using the /ReadOnly option. Note that you cannot commit changes to an image with read-only permissions
For more details on Automatic IP Assignment: Dynamic Host Configuration Protocol (DHCP), how to install Dynamic Host Configuration Protocol on Windows Server 2019, and how to configure Post-deployment of Dynamic Host Configuration Protocol.
Resolution
To resolve this issue, follow the steps described below.
Log into Windows as an administrator or Domain Admin (or similar privilege). Right-click on the install.wim file.
Select Properties. In the file property window, as shown below, on the General tab, uncheck the Read-only option. This was checked previously.

After unchecking it, it will appear like this.

After encountering the Image Modification Error 0xc1510111 and deciding to unset the read-only file, click OK to apply changes to this folder, subfolders, and files. Finally, click OK again

Note: This steps depends on your security layout in your environment. You may also need to take ownsership and full control permission on your account.
To do this follow the steps described below.
– Click the “Security” tab. This will display a list of groups and users currently having permissions for the object, including any instances of the Image Modification Error 0xc1510111.
Click on Advanced settings. Now you can take ownership of this file and add yourself (or a user to the permission entries with adequate rights).
Click on Apply and then OK. Close all windows, and you should be able to out your Image Modification Error 0xc1510111 as shown below.
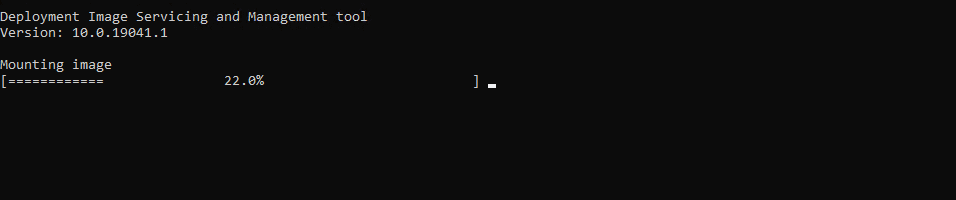
As you can see the mount process is about finishing. That is how to resolve the issue “do not have permissions to mount and modify this image”.

See how to fix “Error 740: Elevated permissions are required to run DISM“. Also see, You require permission from trustedinstaller: How to delete or rename files protected by Trusted Installer and Folder Access Denied, you require permission from SYSTEM: Unable to delete old windows folder.
I hope you found this blog post on how to fix Error 0xc1510111: You do not have permission to mount and modify this image helpful. Please let me know in the comment section if you have any questions.


