Skip to content

TechDirectArchive

Hands-on IT, Cloud, Security & DevOps Insights

  • Home
  • About
  • Advertise With US
  • Reviews
  • Contact
  • Toggle search form
Home » Mac » How to change the default screen capture format in macOS

How to change the default screen capture format in macOS

Posted on 22/02/202115/10/2024 Christian By Christian No Comments on How to change the default screen capture format in macOS
change the default screen capture format-PNG JPGconversion 2

In this article, you will learn How to change the default screen capture format in macOS. The Joint Photographic Group is also referred to as “JPG or JPEG ” and it is a format often used for photography on the internet. JPEG files are web-friendly because the files are smaller than PNG files. Please see how to convert HEIC images to JPEG format on Mac with Quick Actions, how to Create local Backup Repository and Add HyperV to VBR Inventory, and how to Install Veeam Backup and Replication with the default PostgreSQL.

Reasons to change the default screen capture format in macOS?

Here are some reasons for converting from PNG to JPG format. They are faster, they help decrease bounce rates due to faster load time thereby increasing your Google ranking, and reducing storage. Want to know how to change the default screen capture format? Read on to learn more.

The default file format for macOS is PNG and this became more of an issue to me due to the file format which led to performance degradation on my blog. Because of this, I have decided to change the default file format to JPG.

Kindly refer to this guide on “how to convert images from PNG to JPG on WordPress, Windows, and Mac“.

PNG Image Format

The PNG image file is a Portable Network Graphic file when making screenshots on Mac which is a raster image and the file builds graphics piece-by-piece.

The PNG uses lossless compression, that allows large files shrink into smaller sizes without losing resolution. If a PNG is reverted to its original size the resolution remains the same. PNG is better with limited color images, such as logos, and with images transparency.

Change the default file format

To change the default file format. Click on the “Launchpad” and from the search window, enter “Terminal”. Double-click on the Terminal to launch it.

change the default screen capture format-Terminal

Alternatively: You can launch Spotlight by hitting the Command + Space bar to open Spotlight, type in Terminal as shown below and open it.

Spotlight

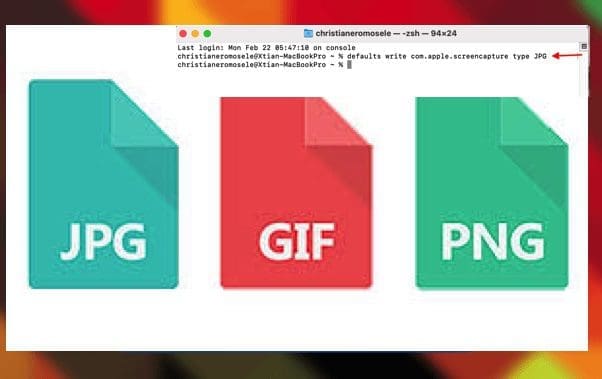
Regardless of your approach, this will open the terminal as shown below. To change default screen capture format, please run the following command below followed by your desired file format “JPG, TIFF, GIF, PDF, and PNG”.

defaults write com.apple.screencapture type JPG
PNG JPG Conv

Henceforth, your screenshots will appear in your chosen format. Peradventure, if the change does not reflect immediately, please restart your device. In my case, a restart was not necessary and my files are now in JPG format.

To convert this back to the default “simply enter the command followed by PNG as shown below.

defaults write com.apple.screencapture type PNG

I hope you found this blog post helpful. Changing the default screen capture format is easy with the steps mentioned above. If you have any questions, please let me know in the comment session.

5/5 - (1 vote)

Thank you for reading this post. Kindly share it with others.

  • Share on X (Opens in new window) X
  • Share on Reddit (Opens in new window) Reddit
  • Share on LinkedIn (Opens in new window) LinkedIn
  • Share on Facebook (Opens in new window) Facebook
  • Share on Pinterest (Opens in new window) Pinterest
  • Share on Tumblr (Opens in new window) Tumblr
  • Share on Telegram (Opens in new window) Telegram
  • Share on WhatsApp (Opens in new window) WhatsApp
  • Share on Mastodon (Opens in new window) Mastodon
  • Share on Bluesky (Opens in new window) Bluesky
  • Share on Threads (Opens in new window) Threads
  • Share on Nextdoor (Opens in new window) Nextdoor
Mac Tags:IMAGE

Post navigation

Previous Post: How to stop Zoom App from launching automatically at startup on Mac
Next Post: What are the differences between Lite-Touch and Zero-Touch installation?

Related Posts

  • how to install ms office 365 title
    How to complete Microsoft Office 365 Family Subscription Mac
  • How To Remove Takeprize50.life Redirect From Mac unboxhow
    Remove unwanted site redirects or pop-ups from Google Chrome Mac
  • Enable or Disable Mac asking for Password
    Enable or Disable Mac asking for Password after Sleep or Screen Saver Mac
  • Mendeley Error Code ACLx80sr
    Fix Mendeley Cite Error has occurred: ECITE40001 (ac1x80sr) JIRA|Confluence|Apps
  • smart
    Application in bin: You can not open this application Mac
  • maxresdefault 1
    How to locate and edit the host file on macOS Mac

More Related Articles

how to install ms office 365 title How to complete Microsoft Office 365 Family Subscription Mac
How To Remove Takeprize50.life Redirect From Mac unboxhow Remove unwanted site redirects or pop-ups from Google Chrome Mac
Enable or Disable Mac asking for Password Enable or Disable Mac asking for Password after Sleep or Screen Saver Mac
Mendeley Error Code ACLx80sr Fix Mendeley Cite Error has occurred: ECITE40001 (ac1x80sr) JIRA|Confluence|Apps
smart Application in bin: You can not open this application Mac
maxresdefault 1 How to locate and edit the host file on macOS Mac

Leave a Reply Cancel reply

You must be logged in to post a comment.

Microsoft MVP

VEEAMLEGEND

vexpert-badge-stars-5

Virtual Background

GoogleNews

Categories

veeaam100

Veeam Vanguard

  • 147913 228396 228395 rc
    Fix No bootable media found system halted: Unable to PXE boot Virtualization
  • dgfhjm
    How to fix DISM Error 87: The package is unknown Windows Server
  • Screenshot 2022 04 02 at 23.05.24
    How to apply Windows Updates with PowerShell Windows
  • DockerEn
    How to Install and Upgrade Docker Engine From Binaries Containers
  • feature image app services
    How to Migrate Azure Web Apps AWS/Azure/OpenShift
  • Windows Admin Center Apply Update
    How to Apply and Enable Automatic Windows Admin Center Update Windows
  • SUID GUID Sticky Bit 1
    Set Special File Permissions with SUID or GUID and Sticky Bit Linux
  • veeamONE integration with VBR
    Install Veeam ONE and Add VBR: Fix failed to connect to VBR Backup

Subscribe to Blog via Email

Enter your email address to subscribe to this blog and receive notifications of new posts by email.

Join 1,817 other subscribers
  • RSS - Posts
  • RSS - Comments
  • About
  • Authors
  • Write for us
  • Advertise with us
  • General Terms and Conditions
  • Privacy policy
  • Feedly
  • Telegram
  • Youtube
  • Facebook
  • Instagram
  • LinkedIn
  • Tumblr
  • Pinterest
  • Twitter
  • mastodon

Tags

Active Directory Azure Bitlocker Microsoft Windows PowerShell WDS Windows 10 Windows 11 Windows Deployment Services Windows Server 2016

Copyright © 2025 TechDirectArchive


Loading Comments...
 

You must be logged in to post a comment.