In this article, we will see how developers can create and deploy web apps using the Azure PaaS (Platform as a Service) cloud computing service without having to worry about managing the underlying infrastructure. In particular, Microsoft Azure App Service offers a completely managed platform for developing and deploying web applications. Developers can concentrate on creating code for their applications while Azure takes care of the infrastructure, operating system, and runtime environment with Azure PaaS for web apps. App services support numerous languages including python, go among others. This article will look at how to move or migrate web apps into Azure PaaS which is App Service
Finally, Azure PaaS for web apps offers developers a strong and adaptable platform for developing and deploying web applications in the cloud. This enables them to concentrate on adding value for their users rather than managing infrastructure. Other helpful guides can be found here: How to create Confidential VMs in Azure and Ways to Run PowerShell remotely on Azure VMs also How to Enable Two-Factor Authentication for SSH in Linux and Azure Monitor: Performance and Diagnostics and Ways to Run PowerShell remotely on Azure VMs. In order to satisfy the goal of this topic on how to Migrate Azure Web Apps”, kindly go through all the steps discussed below.
Step1: Get an Azure subscription to migrate web apps
A subscription is important to access Azure resources as it gives a user administrative and authorized right to create or migrate applications from other sources into Azure. Here are the steps to create a subscription:
a) Go to the Azure website: Navigate to https://azure.microsoft.com/ in your web browser.
b) Choose “Start free” or “Create a free account” by clicking on the corresponding buttons. Choose one of them by clicking.
c) Sign into it with your Microsoft account if you have one. Enter your login information. Set up a fresh account by following the instructions if you don’t already have one.
d) Try entering your account information. Your name, email address, phone number, and country or area are among the personal details you must submit.
e) Fill in your payment details: Your payment information, including credit card information, must be provided. But, during the free trial period, there are no fees.
f) Review and accept the terms and conditions. The subscription terms and conditions have been read and are accepted.
g) Click on “Sign up”: Click on “Sign up” to complete the subscription process.
Once your Azure subscription has been set up, you may visit the Azure portal and move on to the next step.
Step 2: Create an Azure App Service for migrating web apps into Azure
a) Make sure that you are logged into the portal using the details created in step 1.
b) In the search resources, service, and doc field, type App Services and from the list of search options select app services

c) I Click on the + Create button or create app services button to begin the creation process

c) enter in your project details

d) enter the instance’s details

d) Leave everything as default and click review and create and finally the create button
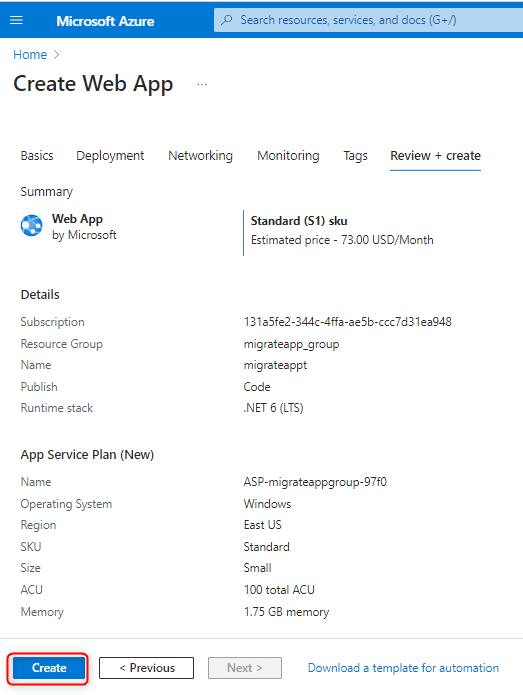

Once the App Service has been created, you can deploy your application to it using various methods such as FTP, Git, or Visual Studio. You can also configure custom domains, SSL certificates, and scaling options for your App Service.
Step 3: Upload the content of the app that you want to Migrate
a) One of the most common places to store the source code for our already deployed application that we wish to migrate to Azure is GitHub. for this exercise, we will create a new repo in GitHub
https://github.com/raphgm/techdirectarchive-sample-website

Follow these steps to download the sample HTML page from GitHub and deploy it to your web app:
A) Open the cloud shell in the Azure portal and use the following command to clone, or duplicate, the HTML sample site from GitHub:
git clone https://github.com/raphgm/techdirectarchive-sample-website
We can also get our GitHub link to Azure App Service by directly authenticating as shown below:


Git clone
We saw above another way to get our code into App services but for the purpose of this exercise, we will stick to the git clone command as shown in the screenshot below:

b) The next thing to do will be to navigate to the directory where the data is by running the command below:
cd techdirectarchive-sample-website

c) You must first initialize Git before adding and committing your files in order to prepare to submit the sample HTML page. Right now, don’t stress too much about the Git commands. You must instruct Git what files to add and track, as well as provide yourself with a means of tracking those changes later if necessary:
git init && git add . && git commit -m "sample-website"
before we run the command above, we need to associate what we are doing with identity, so we will run the following commands first
 git config --global user.email "rg79@mdx.live.ac.uk"
git config --global user.name "raphael"
d) Create your own login and strong password when creating the deployment credentials. The username needs to be distinct everywhere. A sample code is provided below:
az webapp deployment user set --user-name techdirectarc --password @azurewebapp

e) The URL for the Git repository for your web application needs to be obtained. To examine the URL for the Git repository, enter the web app name (not the username you generated in step d ) and resource group that you chose when the web app was built.
az webapp deployment source config-local-git --name migrateappt --resource-group migrateapp_group
Notes
The command = az webapp deployment source config-local-git
Name = name of the webapp you created earlier in step2 =migrateappt
resource group = the resource group created for the project = migrateapp_group
Output
"url": "https://techdirectarch@migrateappt.scm.azurewebsites.net/migrateappt.git"

f) You must inform Cloud Shell about the Git repository that your web app is set to use. You designate these places as remotes in Git. Replace the URL with the one from the output of step d
git remote add azure your-git-clone-url
with the URL
git remote add azure https://techdirectarch@migrateappt.scm.azurewebsites.net/migrateappt.git

Push your content
Git is used for uploading or transferring files, and you push them. Where does Git compel them to go? a remote like the one you established in the previous step, like Azure. The final part of the command is a branch, which is normally a master.
Git stores continuing work-in-progress models in branches. Pushing to release branches with names you pick, such as dev or staging, is recommended in production settings.
These additional branches allow you to work on new features or updates in a safe environment without compromising the real workloads that your customers use, while yet enabling your production code to continue working correctly.
Push the HTML sample site to your web app using this command:
git push azure master

The result shows that the HTML example site has been uploaded and set up to function, and the current default web app site page has been deleted.
Summary
Azure app service is Microsoft’s platform as a service offering. Developers can work, save their software resources in version control like GitHub as we saw, and easily upload this to Azure App service.
In this article, you have learned how to Migrate Azure Web Apps, where a sample HTML site was created and the data was saved in GitHub, the steps it took to upload these to the Azure app service have been documented in this article.