Install and configure Ansible on Azure Virtual Machine

Ansible is an open-source product that automates cloud provisioning, configuration management, and application deployments. When using Ansible you can easily provision virtual machines, containers, and networks and complete cloud infrastructures. Also, Ansible it allows you to automate the deployment and configuration of resources in your environment. In this article, you will be learning what is an Ansible understanding the step by step on how to install and configure Ansible on Azure Virtual Machine. Kindly refer to some of the related guides: How to install Ansible on Windows with Cygwin, how to install and configure Ansible on Ubuntu, how to configure a remote server (windows) to Support Ansible, and how to install Kerberos packages in Windows via Cygwin.
Things needed to achieve the success of configuring Ansible in Azure VM. Please see How To Check the Kernel Version in Linux / Ubuntu / CentOS.
- We will be creating a resource group. Create a CentOS virtual machine.
- Install Ansible on the virtual machine.
- Connect to the virtual machine via SSH
- Configure Ansible on the virtual machine.
- Also you will need to create an Azure service principal, where you will be making note of the following values: appId, displayName, password, and tenant.
Create an Azure Resource Group
Kindly log on to your Microsoft Portal account following this link https://portal.azure.com to create a resource group. At the top left-hand corner, click on the “Icon” and select “Create Resource Group”


Then type in the following details:
- Resource group name
- Select region
- Then click Review + Create

After creating your resource group, click to open your created resource group, you should have a similar interface below

Also see how to Automate Infrastructure Deployments in the Cloud with Ansible and Azure Pipelines, What to note when settings up Ansible to work with Kerberos, and how to fix Ansible error: Server unreachable, ssl: auth method ssl requires a password.
Create a CentOS Azure Virtual Machine for Ansible
In this case, we will be using the Azure CLI interface from the screenshot and below also using the following commands below with Bash Scripting
az vm create \
--resource-group startAnsible \
--name startAnsible-vm \
--image OpenLogic:CentOS:7.7:latest \
--admin-username azureuser \
--admin-password password@12345
Here we have successfully created the virtual machine for Ansible, using the Bash command, and we now have our Public IP address and Private IP address, which we will be used in connecting to ssh
Connect to the virtual machine via SSH
Using the SSH command, let connect our virtual machine’s public IP address.
- ssh azureuser@52.170.61.133
- Press enter key
- Type in your create password
- Press enter key
- Then you will be logged in.

Configure Ansible On The Virtual Machine
Run the following commands to configure Ansible 2.9 on Centos using bash shell in your Azure portal.
sudo yum update -y
sudo yum install -y python3-pip
sudo pip3 install --upgrade pip
pip3 install "ansible==2.9.17"
pip3 install ansible[azure]
Let Configure Ansible on CertOs
Let’s run the following commands to configure Ansible on Centos using the bash shell in your Azure portal.
sudo yum update -y
sudo yum install -y python3-pip
sudo pip3 install --upgrade pip
ansible-galaxy collection install azure.azcollection
wget https://raw.githubusercontent.com/ansible-collections/azure/dev/requirements-azure.txt
sudo pip3 install -r requirements-azure.txt
Note: The ansible control node requires Python 2 (version 2.7) or Python 3 (versions 3.5 and higher) installed. Ansible 4.0.0 and ansible-core 2.11 have a soft dependency on Python 3.8, but function with lower versions. However, Ansible 5.0.0 and ansible-core 2.12 will require 3.8 and newer.
Let Create Azure credentials
In other to create Azure Ansible credentials, you need the following information:
- Azure subscription ID and tenant ID
- The service principal applicationID, and secret.
Create and Configure Ansible Credentials File
Let configure and create local credentials to the Ansible. This is for security reasons, credential files should only be used in development environments, to achieve this you need to be connected to the host virtual machine, create and open a file named Credentials by running the following commands in your azure bash environment.
mkdir ~/.azure
vi ~/.azure/credentials
Create Azure Service Principal
We will be creating a service principal using the bash in the Azure portal
- Login to your Azure portal account
- Click on the CLI terminal at the top of the screen
- Select bash, and type the following command: az ad sp create-for-rbac –name ansible
- Copy and save the data’s provided for reference use

Create A Role ID
Create a role, using the following commands in your bash environment in the Azure portal
az role assignment create --assignee <appId number> --role contributor- Press enter key
- Copy and save the data’s provided for reference use

hence insert the following lines into the file by replacing the placeholders with the service principal values provided
[default]
subscription_id=<your-subscription_id>
client_id=<security-principal-appid>
secret=<security-principal-password>
tenant=<security-principal-tenant>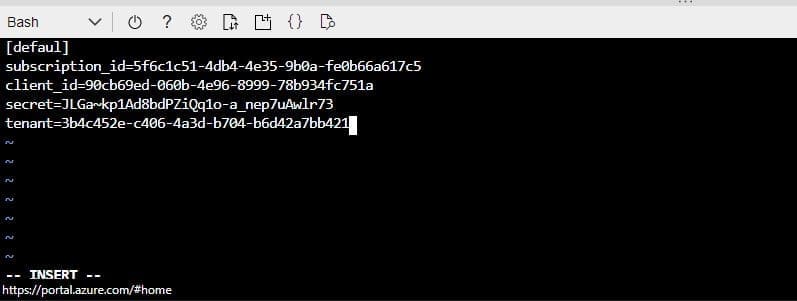
After replacing the placeholders with the service principal values provided in the vi editor via the bash environment, save and close your job following the below information
Press Esc to enter Command mode, and then type :wq to write and quit the file.Usecase 1 – Create a resource in Azure using Ansible
Let create a resource in Azure by run testing our Ansible Installation within the new Ansible configuration that we just created. Check to confirm ansible version installation. ansible --version
isaac@Azure:~$ ansible --version
ansible 2.10.2
  config file = None
  configured module search path = ['/home/isaac/.ansible/plugins/modules', '/usr/share/ansible/plugins/modules']
  ansible python module location = /opt/ansible/lib/python3.7/site-packages/ansible
  executable location = /opt/ansible/bin/ansible
  python version = 3.7.3 (default, Jul 25 2020, 13:03:44) [GCC 8.3.0]
Let create a resource in Azure using the Ansible installation
- name: Create Azure VM
  hosts: localhost
  connection: local
  vars:
    resource_group: "{{ resource_group_name }}"
    resource_group_secondary: createvmsubnetin2ndrg2
    vm_name: testvm
    location: eastus
From the cloud shell, run this command to deploy resources in Azure using Ansible-playbook
ansible-playbook ./create_virtualmachine_with_subnet_in_different_resource_group.yml -e "resource_group_name=ansible-test-rg01"
With Ansible playbook, we have been able to deploy resources in Azure such as:
- Create a resource group
- Create a Virtual machine
- Deploy network interface
- Deploy network security group
- Public IP Address
- Create a storage account
Usecase 2- Patch and Install Windows Updates With Ansible
Let patch and install windows updates using our Ansible Installation. Check to confirm that you have successfully install Ansible by checking the ansible version installation. ansible --version
isaac@Azure:~$ ansible --version
ansible 2.10.2
  config file = None
  configured module search path = ['/home/isaac/.ansible/plugins/modules', '/usr/share/ansible/plugins/modules']
  ansible python module location = /opt/ansible/lib/python3.7/site-packages/ansible
  executable location = /opt/ansible/bin/ansible
  python version = 3.7.3 (default, Jul 25 2020, 13:03:44) [GCC 8.3.0]
Here I’ll show you a playbook that installs Windows updates on a managed Windows machines without needing to use WSUS. The playbook installs Security, Definition, critical, and rollup updates and restarts the machine if needed.
Below you can see the code to patch and install windows updates with Ansible. Run the following code on your CLI
- name: "Windows Updates"
  hosts: windows
  tasks:
    - name: Install Windows updates
      win_updates:
        category_names:
         - SecurityUpdates
         - CriticalUpdates
         - UpdateRollups
         - DefinitionUpdates
        reboot: yes
Note: To install all the update types use the following list.
 - SecurityUpdates
         - CriticalUpdates
         - UpdateRollups
         - DefinitionUpdates
         - updates
         - FeaturePacks
         - Servicepacks
         - Tools
         - Application
We have seen the step by steps on how to Install and configure Ansible on Azure Virtual Machine, create a resource group, deploy a CentOS virtual machine, install Ansible on the virtual machine, able to connect to the virtual machine via SSH. Configure Ansible on the virtual machine. Lastly able to create an Azure service principal with the following values: appId, displayName, password, and tenant.