
This article provides a comprehensive guide on how to install Let’s Encrypt on Apache HTTP Web Server on Ubuntu 20.04 LTS. The process involves using Certbot to acquire a free SSL certificate specifically for Apache on Ubuntu 20.04 LTS, ensuring seamless automatic renewal. Please see How to integrate ObjectFirst OOTBI Appliance with VBR, and how to Configure Object First OOTBI Appliance.
For a more in-depth understanding of the Apache HTTP Web Server, you can refer to our previous guide detailing how to install Apache HTTP Server on Ubuntu 20.04 LTS. Accommodating multiple domains on the Apache HTTP Web Server becomes imperative, especially when an organisation necessitates hosting numerous business-critical applications or websites.
By default, Apache provides a single content directory,/var/www/html. To host many websites, instead of modifying the existing default directory, you need to create a new directory and configure the Virtual Host.
To do so, we recommend that you review the article. You might also find interest in the following articles: How to install Let’s Encrypt Certificates with IIS on a Windows Server, how to install Let’s Encrypt Wildcard SSL Certificate in cPanel using Certify The Web,
What is Let’s Encrypt?
Let’s consider what Let’s Encrypt is all about for a better understanding; Let’s Encrypt is a Certificate Authority (CA) that makes it easy to get and install free TLS/SSL certificates. This aids in the implementation of encrypted HTTPS on web servers.
It simplifies the procedure by providing Certbot, a software client that seeks to automate the majority of the essential steps. The entire process of obtaining and installing Let’s Encrypt on Apache Web Server is totally automatic.
Prerequisite for Installing Let’s Encrypt on Apache Web Server
To begin the Let’s Encrypt installation, you need to meet certain prerequisites. For example,
- You should have Ubuntu 20.04 LTS Version Installed on your system
- You should have apache installed just as explained in this article .
- You must have a fully registered domain name through an authorized domain registrar. You can purchase a domain from Namecheap, Godaddy or get one for free at zzz.com.ua. Here we will make use of
techdirectarchive_comas an example throughout. - Ensure DNS records are set up for your server.
- An A record with
techdirectarchive_compointing to your server’s public IP address. - An A record with
techdirectarchive_compointing to your server’s public IP address.
- An A record with
If you’ve met the requirements to start installing Let’s Encrypt, proceed with the following straightforward step-by-step guide.
Step 1 – Installing Certbot on Apache Web Server
We’ll need to install the Certbot software on our Apache server before we can get an SSL certificate from Let’s Encrypt. To do so, we’ll use the default Ubuntu package repositories.
Two packages are required: certbot and python3-certbot-apache. The latter is a plugin that first updates the Ubuntu system’s cache repository by running the following command:
Sudo apt update integrates Certbot with Apache, allowing you to use a single command to obtain a certificate and configure HTTPS on your web server. To do so, use sudo privileges on your Terminal and type the command below:
sudo apt install certbot python3-certbot-apache
You will be prompted to confirm the installation by pressing Y, and then the ENTER key. The Certbot is successfully and the version can be verified by typing the command given below:
certbot --version
From the screenshot, you can see that the version we have just installed is the 0.40.0 version.
Now that you have installed Certbot on your server. In the next step, we’ll verify Apache’s configuration to make sure your virtual host is set appropriately.
This will ensure that the certbot client script will be able to detect your domains and reconfigure your Apache Web Server to use your newly generated SSL certificate automatically.
Step 2 – Checking your Apache Virtual Host Configuration
When installing Let’s Encrypt on Apache web server, to be able to automatically obtain and configure SSL for your web server, Certbot needs to find the correct virtual host within your Apache configuration files.
Your server domain name(s) will be retrieved from the ServerName and ServerAlias directives defined within your VirtualHost configuration block.
In our previous article, we have a Virtual Host block set up for our domain at /etc/apache2/sites-available/techdirectarchive_com.conf with the ServerName and also the ServerAlias directives already set appropriately.
To check this up, open the virtual host file for your domain using nano or any other preferred text editor of your choice:
sudo nano /etc/apache2/sites-available/techdirectarchive_com.conf Find the existing ServerName and ServerAlias lines as indicated below:

Remember to replace the domain name with yours!
If you already have your ServerName and ServerAlias set up like this, you can exit your text editor and move on to the next step. If you’re using nano, you can exit by typing CTRL+X, then Y and ENTER to confirm.
We have already done the entire preparation but for the sake of those who might just want to understand the steps better, we will go through a few tips.
If your current virtual host configuration doesn’t match the example, update it accordingly. When you’re done, save the file and quit the editor. Then, run the following command to validate your changes:
sudo apache2ctl configtestYou should get a Syntax OK as a response. If you get an error, reopen the virtual host file and check for any typographical or missing characters. Once your configuration file’s syntax is correct, reload Apache so that the changes take effect:
sudo systemctl reload apache2With these changes, Certbot will be able to find the correct Virtual Host block and update it. Next, we’ll update the firewall to allow HTTPS traffic.
Step 3 – Allowing HTTPS Through the Firewall
If you have the UFW firewall enabled, as recommended by the prerequisite guides, you’ll need to adjust the settings to allow HTTPS traffic. Upon installation, Apache registers a few different UFW application profiles.
We can leverage the Apache Full profile to allow both HTTP and HTTPS traffic on your server. To verify what kind of traffic is currently allowed on your server, you can use:
sudo ufw statusYour output should look something like this, meaning that only HTTP traffic on port 80 is currently allowed:

To additionally allow HTTPS traffic, allow the “Apache Full” profile and delete the redundant “Apache” profile, run the following:
sudo ufw allow “apache full”
sudo ufw delete allow 'Apache'
Now recheck the status using $sudo ufw status, your output should look similar to this:

All is set and you are now ready to run Certbot and obtain your certificates.
Step 4 – Obtaining an SSL Certificate to install Let’s Encrypt on Apache
The last step to install Let’s Encrypt on your Apache web server involves obtaining an SSL certificate. Certbot provides a variety of ways to obtain SSL certificates through plugins.
The Apache plugin will take care of reconfiguring Apache and reloading the configuration whenever necessary. To use this plugin, type the following:
sudo certbot --apacheThis script will prompt you to answer a series of questions in order to configure your SSL certificate. First, it will ask you for a valid e-mail address. This email will be used for auto-renewal notifications and security notices:

Agree to Let’s Encrypt Terms of service
Immediately after providing your valid email address, press the ENTER Key to proceed to the next step. The next step will prompt you to confirm if you agree to Let’s Encrypt terms of service. You can confirm by pressing A and then ENTER:

Confirm Subscription
Next, you’ll be asked if you would like to share your email with the Electronic Frontier Foundation (EFF) to receive news and other information. If you do not want to subscribe to their content, type N. Otherwise, type Y. Then, hit ENTER to proceed to the next step.

Select Domains to activate HTTPS for
The next step will prompt you to inform Certbot of which domains you would like to activate HTTPS for. The listed domain names are automatically obtained from your Apache virtual host configuration, that’s why it’s important to make sure you have the correct ServerName and ServerAlias settings set up and configured in your virtual host. If you would like to enable HTTPS for all listed domain names (recommended), you can leave the prompt blank and proceed by pressing ENTER. Otherwise, select the domains you want to enable HTTPS for by listing each appropriate number, separated by commas or spaces, then press ENTER
You should have an output similar to the one below:

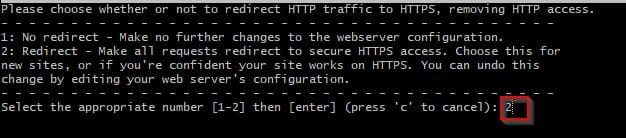
Redirect HTTP traffic to HTTPS
In the next screen, you’ll be prompted to select whether or not you want HTTP traffic redirected to HTTPS.
In real-world scenarios, it means when guests visit your website through an unencrypted HTTP channel, they will be automatically redirected to the encrypted HTTPS address of your website. Choose 2 to enable the redirection, or 1 if you want to keep both HTTP and HTTPS as separate methods of accessing your website.
After completing this step, Certbot’s configuration is finalized. You’ll receive final remarks on your new certificate, guidance on locating generated files, and instructions to test configuration using an external authenticity analysis tool:

Your certificate has now been successfully installed and loaded into the Apache configuration files. As such you have successfully installed Let’s Encrypt on Apache web server.
Reload your webpage with https:// instead of http:// and carefully observe your browser’s security indicator. Also, pay attention to any changes. It should display a padlock icon in the address bar to indicate that your site is properly secured.
From the perspective of an external service, you can use the SSL Labs Server Test to validate your certificate’s grade and acquire more specific information about it.
We’ll test Certbot’s auto-renewal feature in the next and final phase of this post. This feature ensures that your certificate is automatically renewed before it expires.
Step 5 – Verifying Certbot Auto-Renewal After you have installed Let’s Encrypt on Apache
Let’s Encrypt certificates have a ninety-day validity period. This is to encourage users to automate their certificate renewal process. As such it ensures that certificates that have been misused or stolen keys expire sooner than planned.
The certbot package we just loaded handles renewals by adding a renewal script to /etc/cron.d, which is managed by the certbot.timer systemctl service. This script runs twice a day and will automatically renew any certificate that is about to expire in the next thirty days.
You may use the following command to verify the status of this service and ensure that it is active and running:
sudo systemctl status certbot.timerYou’ll get output similar to what we have below:

To test the renewal process, you should simply do a dry run with certbot:
sudo certbot renew --dry-runIf there are no mistakes, you’re good to go. Certbot will renew your certificates as needed and reload Apache for the modifications to take effect. If the automated renewal procedure fails.
Let’s Encrypt will send you an email notifying you that your certificate is about to expire, using the email address you provided. As per the output we have below, there have not been any renewal attempts yet for our domains.

In this post, you’ve learned how to install and configure the Let’s Encrypt client certbot, as well as installed an SSL certificate for your domain, and confirmed that Certbot’s automatic renewal service is active within the systemctl. Congratulations!!
I hope you found this article useful on how to install Let’s Encrypt on Apache Web Server. Please feel free to leave a comment below.


