Skip to content

TechDirectArchive

Hands-on IT, Cloud, Security & DevOps Insights

  • Home
  • About
  • Advertise With US
  • Reviews
  • Contact
  • Toggle search form
Home » AWS/Azure/OpenShift » How to Deploy Dynamic Website to AWS EC2
  • powerpoint 1280x720 1
    How to change the speller and proofing language in PowerPoint Microsoft Exchange/Office/365
  • WAMP errors
    Apache errors associated with WAMP installation for TeamPass Web Server
  • How to Decrypt Files and Folders Encrypted with EFS in Windows 10
    How to decrypt Files and Folders Encrypted with an Encryption File System (EFS) in Windows Windows
  • Norton 360 Error
    Norton Autofix identified an issue: Fix Norton 360 Installation has encountered an error 8404 on Windows Anti-Virus Solution
  • 0318 4
    Active Directory Authentication methods: How do Kerberos and NTLM work Windows Server
  • xxxxxx 1
    Display Windows system information via the Windows registry Windows
  • Windows10 as a Service Waas
    Windows 10 Feature and Quality Updates Windows
  • banner 6
    How to Set a Static IP Address in Windows 11 Windows

How to Deploy Dynamic Website to AWS EC2

Posted on 25/09/202128/08/2023 Temitope Odemo By Temitope Odemo 2 Comments on How to Deploy Dynamic Website to AWS EC2
Deploying Dynamic Website

A dynamic website is a type of website that contains dynamic pages that keep changing on different sessions, unlike static pages that require manual updating before the contents change. It supports both server-side scripting and client-side scripting in making the content of the website dynamic. A dynamic website display different content each time the website is opened. On a dynamic website, you can create user accounts, and delete accounts and you can log in with the correct credentials to a dynamic website. Therefore, Amazon Elastic Compute Cloud (Amazon EC2) is a secure web service provided by AWS that has a computing capacity that can be resizable. It is also known as virtual machines designed to make cloud computing easier for solution architects. Similarly, With EC2 there is no stop in your configuration capacity. Nevertheless, It provides you with complete control of available computing resources.

If you want a guide on how to host a static website on S3 click here. In this guide, we will be discussing how easy it is to deploy a dynamic website to AWS EC2.

Setting up your AWS Account

Create an account via https://portal.aws.amazon.com/billing/signup

AWS EC2 Deployment
AWS Account Sign up

Consequently, Log in to the AWS management console: https://signin.aws.amazon.com/

Website Hosting
AWS Account Login

Moreover, After you have successfully created an AWS account and logged in, then navigate to S3 under the services→storage option. However, The next step is to create an S3 Bucket where you will upload your dynamic website files. Nonetheless, If you want to know how to create an S3 bucket read this Hosting Static Website and Versioning on AWS S3

Follow the below steps as we create our EC2 and upload our dynamic files from the S3 bucket we created. Furthermore, But note that when one service needs another service there is a need to create a role.

In addition, Let’s create a role first in IAM before creating EC2.

  1. Under access management in IAM, click on Roles.
  2. Click on Create role
Elastic Compute Cloud
Creating Roles

3. Additionally, Select AWS Service as the type of trusted service, we are picking this because we need a role for EC2. Therefore, Under the common use cases click on EC2 and click on Next:Permissions.

image-59
Creating Roles

4. Nevertheless, Since we need access to files on S3 search for AmazonS3FullAccess, select it, and click next.

image-60
Adding S3 Full Access Role

5. Similarly, On the review page, enter the Role name and click Create role.

image-61
Creating S3 Full Access Role

Now our Role is created

image-62
Role Created

Nonetheless, Now let’s go ahead to configure our EC2.

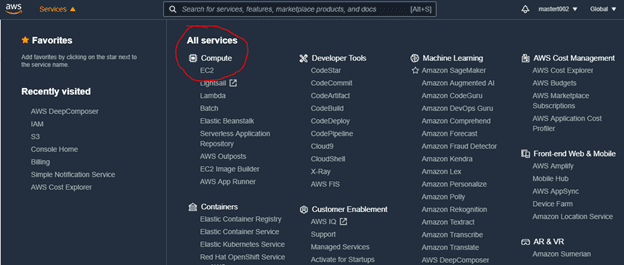
6. Consequently, Under compute services, click on EC2

image-63
EC2 Compute Service

7. In addition, Click on Instances (running) and Launch instances

image-64
Instances Running

8. Now select your Amazon Machine Image. Moreover, But in this guide, we will be using Amazon Linux 2 free tier.

image-65
Selecting Amazon Machine Image

9. Click Next: Configure Instance Details.

Furthermore, This is the page you configure your instances by entering all needed details to launch your VM. However, Confirm that you select the IAM role we created earlier. Click Next: Add Storage. If you want you can add tags in the next page after adding storage.

image-66
Configuring your Instance

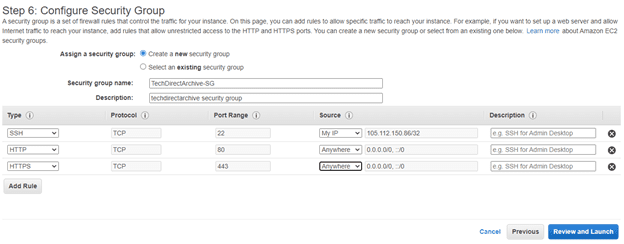
10. Therefore, Click on Configure Security Group. This is a firewall that helps you to control the traffic to your instance. Additionally, Add all the rules shown in the image below: click Review and Launch.

image-67
Configuring Security Group

11. Similarly, Create a new key pair that is authorized for connecting securely to the EC2. This is very necessary for secured access to your instance. Nevertheless, Save it and keep it secret to yourself. After saving the key go ahead and launch the instance.

image-68
Creating a Key Pair

12. Nonetheless, you need to download an application to SSH into the instance. Consequently, I will recommend either AWS System Manager or MobaXterm, but in our case, we will be making use of the latter in this guide. Download MobaXterm from here get the installer edition.

image-69
MobaXterm Setup

13. Make sure you copy the Public IPv4 address or Public IPv4 DNS. Moreover, It will be useful in the MobaXterm for SSH connection to the instance. In addition, Click on settings on the MobaXterm.

image-70
Mobaxterm Setup for Access into EC2 Instance

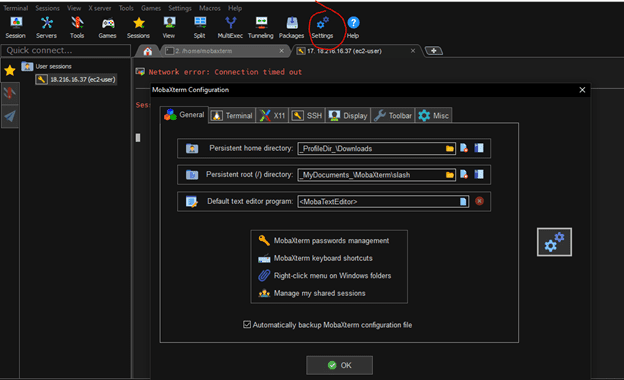
14. Furthermore, On the Persistent home directory location where you have the key pair. Click ok. It will request you restart the application and grant the request.

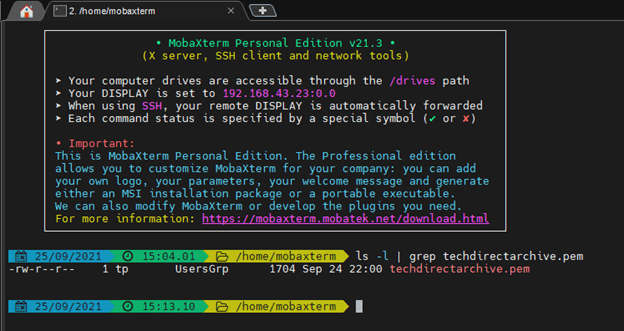
15. However, Click on Start local terminal and on the terminal type ls –l | grep “name of key pair” to confirm if the key exists on MobiXterm.

image-71
MobaXterm Key Pair Setup

16. Therefore, Let’s connect to our instances from MobiXterm. Additionally, Select the instances and make sure its running. Click on Connect.

image-72
Connecting your Instance

17. Nevertheless, Click on SSH and copy the command shown as an example and paste to your MobiXterm terminal and enter.

image-73
Connecting Via SSH

18. Consequently, you should get something like the image below that will confirm you are inside the EC2 Instance. Similarly, The private IP of our EC2 Instance 172.31.43.39 now display on the terminal.

image-74
Successful Connection to EC2 Instance

19. In addition, Is time to start entering the below commands one after the other to set up the web server environment on our instance. Nonetheless, also copy the dynamic files into the /var/www/html/ folder. You can cd to this directory to confirm the directory exists and use ls to confirm all the files in it.

image-75
Commands needed to install webserver and copy your files from S3

20. Moreover, Copy the Public IPv4 DNS ec2-18-216-16-37.us-east-2.compute.amazonaws.com from the EC2 Console and paste it into a browser.However, Congratulations you just deployed a dynamic website to AWS EC2.

image-76
Webpage Displayed Successfully

I hope you found this blog post on How to Deploy a Dynamic Website to AWS EC2 very interesting and helpful. Furthermore, If you have any questions do not hesitate to ask in the comment section.

Rate this post

Thank you for reading this post. Kindly share it with others.

  • Click to share on X (Opens in new window) X
  • Click to share on Reddit (Opens in new window) Reddit
  • Click to share on LinkedIn (Opens in new window) LinkedIn
  • Click to share on Facebook (Opens in new window) Facebook
  • Click to share on Pinterest (Opens in new window) Pinterest
  • Click to share on Tumblr (Opens in new window) Tumblr
  • Click to share on Telegram (Opens in new window) Telegram
  • Click to share on WhatsApp (Opens in new window) WhatsApp
  • Click to share on Pocket (Opens in new window) Pocket
  • Click to share on Mastodon (Opens in new window) Mastodon
  • Click to share on Bluesky (Opens in new window) Bluesky
  • Click to share on Threads (Opens in new window) Threads
  • Click to share on Nextdoor (Opens in new window) Nextdoor
AWS/Azure/OpenShift Tags:AWS, AWS s3

Post navigation

Previous Post: Delivering System Utilization Report on a Linux based OS
Next Post: Openstack Deployment with Devstack

Related Posts

  • S3 Bucket 1
    How to delete AWS S3 Bucket and Objects via  AWS CLI from Linux AWS/Azure/OpenShift
  • chamedk8s featured
    Install CNF Certified Kubernetes in AWS AWS/Azure/OpenShift
  • New OpenShift Featured Image
    OpenShift common Commands AWS/Azure/OpenShift
  • Microsoft Enterprise Root Certification Authority and Forest Domain to Azure migration
    Migrate Microsoft Enterprise Root Certification Authority and Forest Domain to Azure AWS/Azure/OpenShift
  • Unable to ping an EC2 Instance
    Unable to Ping an EC2 Instance AWS/Azure/OpenShift
  • Microsoft LAPS
    Configure Windows LAPS Management with Microsoft Intune AWS/Azure/OpenShift

More Related Articles

S3 Bucket 1 How to delete AWS S3 Bucket and Objects via  AWS CLI from Linux AWS/Azure/OpenShift
chamedk8s featured Install CNF Certified Kubernetes in AWS AWS/Azure/OpenShift
New OpenShift Featured Image OpenShift common Commands AWS/Azure/OpenShift
Microsoft Enterprise Root Certification Authority and Forest Domain to Azure migration Migrate Microsoft Enterprise Root Certification Authority and Forest Domain to Azure AWS/Azure/OpenShift
Unable to ping an EC2 Instance Unable to Ping an EC2 Instance AWS/Azure/OpenShift
Microsoft LAPS Configure Windows LAPS Management with Microsoft Intune AWS/Azure/OpenShift

Comments (2) on “How to Deploy Dynamic Website to AWS EC2”

  1. Avatar photo Dantes says:
    16/11/2022 at 9:43 AM

    Hi,

    It seems the bucket for dynamic web files doesn’t exist, could you please help?

    Best,

    Dantes

    Log in to Reply
    1. Temitope Temitope Odemo says:
      16/11/2022 at 10:19 PM

      you can upload your dynamic files from the S3 bucket you created. you can create S3 bucket and dump your files there.
      

      Log in to Reply

Leave a Reply Cancel reply

You must be logged in to post a comment.

Microsoft MVP

VEEAMLEGEND

vexpert-badge-stars-5

Virtual Background

GoogleNews

Categories

veeaam100

sysadmin top30a
 
  • powerpoint 1280x720 1
    How to change the speller and proofing language in PowerPoint Microsoft Exchange/Office/365
  • WAMP errors
    Apache errors associated with WAMP installation for TeamPass Web Server
  • How to Decrypt Files and Folders Encrypted with EFS in Windows 10
    How to decrypt Files and Folders Encrypted with an Encryption File System (EFS) in Windows Windows
  • Norton 360 Error
    Norton Autofix identified an issue: Fix Norton 360 Installation has encountered an error 8404 on Windows Anti-Virus Solution
  • 0318 4
    Active Directory Authentication methods: How do Kerberos and NTLM work Windows Server
  • xxxxxx 1
    Display Windows system information via the Windows registry Windows
  • Windows10 as a Service Waas
    Windows 10 Feature and Quality Updates Windows
  • banner 6
    How to Set a Static IP Address in Windows 11 Windows

Subscribe to Blog via Email

Enter your email address to subscribe to this blog and receive notifications of new posts by email.

Join 1,841 other subscribers
  • RSS - Posts
  • RSS - Comments
  • About
  • Authors
  • Write for us
  • Advertise with us
  • General Terms and Conditions
  • Privacy policy
  • Feedly
  • Telegram
  • Youtube
  • Facebook
  • Instagram
  • LinkedIn
  • Tumblr
  • Pinterest
  • Twitter
  • mastodon

Tags

AWS Azure Bitlocker Microsoft Windows PowerShell WDS Windows 10 Windows 11 Windows Deployment Services Windows Server 2016

Copyright © 2025 TechDirectArchive


Loading Comments...
 

You must be logged in to post a comment.