Skip to content

TechDirectArchive

Hands-on IT, Cloud, Security & DevOps Insights

  • Home
  • About
  • Advertise With US
  • Contact
  • Reviews
  • Toggle search form
Home » Linux » Openstack Deployment with Devstack

Openstack Deployment with Devstack

Posted on 27/09/202128/08/2023 Christian By Christian No Comments on Openstack Deployment with Devstack
openstack-ola

OpenStack is a free, open standard cloud computing platform that hat uses pooled virtual resources to build and manage private and public clouds. Here we will be deploying OpenStack with an Ubuntu server for Lab purposes. Openstack controls large pools of compute, storage, and networking resources, all managed through APIs or a dashboard. Beyond standard infrastructure-as-a-service functionality, additional components provide orchestration, fault management, and service management amongst other services to ensure high availability of user applications.

In this tutorial, we willl be using 2 VMs (1 cluster node and 1 compute nodes)

Configuring Cluster Node.
Install Ubuntu and update packages (Please take note of the network settings and compute IP Address).

image-83

Then install Missing Packages

apt-get install git openssh-server (use sudo if not logged in as root)
image-84

We will use git to pull Openstack packages the configure the openstack user account that can sudo without password Authentication.

groupadd stack
useradd -g stack -s /bin/bash -d /opt/stack -m stack
image-85
image-86
vi /etc/sudoers
then add 
%stack ALL=(ALL) NOPASSWD: ALL
set the stack user account passwd
passwd stack

Now log out and log in as the user stack to test.

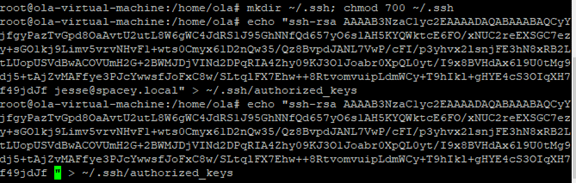
Next step is to configure ssh keys. To be able to access other nodes remotelt without the need to log in or authentication.

mkdir ~/.ssh; chmod 700 ~/.ssh
image-87
Pull Openstack via git
git clone https://git.openstack.org/openstack-dev/devstack
image-88

Do the above steps on all cluster nodes also.
Next is to configure all cluster nodes local DNS settings by mapping the hostnames to the IP address on each server.

image-89

cd to the devstack director on the controller node

cd /opt/stack/devstack

and create the below files

touch local.conf 
touch stack.sh
vim stack.sh and add the line
for i in `seq 2 10`; do /opt/stack/nova/bin/nova-manage fixed reserve 10.0.0.$i; done

now execute the stack.sh script and wait

NOTE- this must be run as stack user and also change the owner of the devstack folder to the stack user

Got the error 'error cannot uninstall simplejson' during the instalation. To fix, do the following;
sudo apt purge python3-simplejson
pip install pyasn1-modules
Then execute the script again
image-90

Below is the Openstack login page

image-91

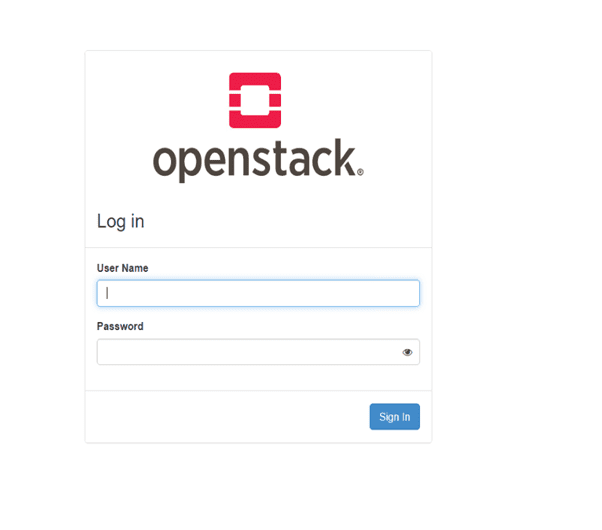
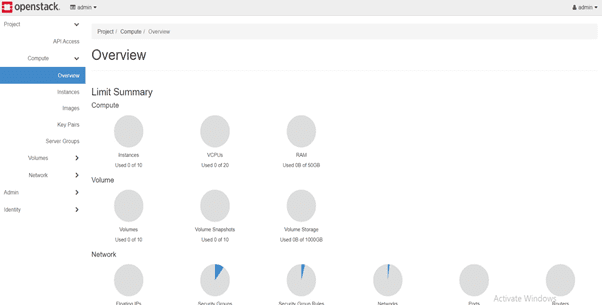
Now log in and access your dashboard

image-92
image-93

INSTALLING COMPUTE NODES

Now, OpenStack is installed, let’s configure and add compute nodes. Edit the following lines on the compute nodes x.

NOTE; You should have the stack user and openstack packages on the compute nodes before starting this process

cd /opt/stack/devstack
touch local.conf
nano local.conf

And set the following file as

[[local|localrc]]
HOST_IP=172.18.14.218 # change this per compute node
FLAT_INTERFACE=ens33
FIXED_RANGE=10.0.0.0/24
FIXED_NETWORK_SIZE=4096
FLOATING_RANGE=172.18.14.144/28
MULTI_HOST=1
LOGFILE=/opt/stack/logs/stack.sh.log
ADMIN_PASSWORD=redhat
DATABASE_PASSWORD=redhat
RABBIT_PASSWORD=redhat
SERVICE_PASSWORD=redhat
DATABASE_TYPE=mysql
SERVICE_HOST=172.18.14.219
MYSQL_HOST=$SERVICE_HOST
RABBIT_HOST=$SERVICE_HOST
GLANCE_HOSTPORT=$SERVICE_HOST:9292
ENABLED_SERVICES=n-cpu,n-net,n-api-meta,c-vol
NOVA_VNC_ENABLED=True
NOVNCPROXY_URL="http://$SERVICE_HOST:6080/vnc_auto.html"
VNCSERVER_LISTEN=$HOST_IP
VNCSERVER_PROXYCLIENT_ADDRESS=$VNCSERVER_LISTEN

Fill in your host and service IP address to match your servers.

cd /opt/stack/devstack
./stack.sh

Once completed, you now have more compute resources added to your cluster.

Rate this post

Thank you for reading this post. Kindly share it with others.

  • Share on X (Opens in new window) X
  • Share on Reddit (Opens in new window) Reddit
  • Share on LinkedIn (Opens in new window) LinkedIn
  • Share on Facebook (Opens in new window) Facebook
  • Share on Pinterest (Opens in new window) Pinterest
  • Share on Tumblr (Opens in new window) Tumblr
  • Share on Telegram (Opens in new window) Telegram
  • Share on WhatsApp (Opens in new window) WhatsApp
  • Share on Mastodon (Opens in new window) Mastodon
  • Share on Bluesky (Opens in new window) Bluesky
  • Share on Threads (Opens in new window) Threads
  • Share on Nextdoor (Opens in new window) Nextdoor
Linux

Post navigation

Previous Post: How to Deploy Dynamic Website to AWS EC2
Next Post: Cost Management in Azure Using Cost Analysis Tool

Related Posts

  • cryptsetup
    How to encrypt a partition with Cryptsetup Linux
  • LAMP
    How to setup and configure a Lamp stack on CentOS Linux
  • featuredpkg
    How to solve /var/lib/dpkg/lock Error in Ubuntu Linux Linux
  • ubuntu 1479782 1280
    Ubuntu Linux post installation of Network Properties, Guest Integration and Web Administration using Cockpit Linux
  • Generate SSH Keys
    Associate SSH Public key with Azure Linux VM AWS/Azure/OpenShift
  • PlayF
    How to Install PlayonLinux on a Linux System Linux

More Related Articles

cryptsetup How to encrypt a partition with Cryptsetup Linux
LAMP How to setup and configure a Lamp stack on CentOS Linux
featuredpkg How to solve /var/lib/dpkg/lock Error in Ubuntu Linux Linux
ubuntu 1479782 1280 Ubuntu Linux post installation of Network Properties, Guest Integration and Web Administration using Cockpit Linux
Generate SSH Keys Associate SSH Public key with Azure Linux VM AWS/Azure/OpenShift
PlayF How to Install PlayonLinux on a Linux System Linux

Leave a Reply Cancel reply

You must be logged in to post a comment.

Microsoft MVP

VEEAMLEGEND

vexpert-badge-stars-5

Virtual Background

GoogleNews

Categories

veeaam100

Veeam Vanguard

  • requestedlogon
    Error 1385: The user has not been granted the requested logon type at this time Network | Monitoring
  • sdgfdhx
    MDT Warning: Unable to set working directory, the application returned an unexpected code 2 Windows Server
  • ssl
    SSL Encrypted Communications explained Web Server
  • VBR Console on a Jump Server
    How to install Veeam Backup Console on a Jump Server Backup
  • Windows10 SCCM 20161
    What is ADK, MDT, Microsoft Endpoint Configuration Manager (SCCM), Intune, Autopilot, and WSUS Windows Server
  • BitLocker MBAM Frequently Asked Questions
    Disable the Sleep Mode: UEFI and TPM and BitLocker FAQs Windows
  • Reduce VMDK dile defragment and compact
    Analyse Disks with Treesize: Defragment and Shrink VMware Workstation VM Disks Virtualization
  • Screenshot 2021 01 22 at 23.27.30
    How does Bitlocker Network Unlock work? Windows Server

Subscribe to Blog via Email

Enter your email address to subscribe to this blog and receive notifications of new posts by email.

Join 1,817 other subscribers
  • RSS - Posts
  • RSS - Comments
  • About
  • Authors
  • Write for us
  • Advertise with us
  • General Terms and Conditions
  • Privacy policy
  • Feedly
  • Telegram
  • Youtube
  • Facebook
  • Instagram
  • LinkedIn
  • Tumblr
  • Pinterest
  • Twitter
  • mastodon

Tags

Active Directory Azure Bitlocker Microsoft Windows PowerShell WDS Windows 10 Windows 11 Windows Deployment Services Windows Server 2016

Copyright © 2025 TechDirectArchive


Loading Comments...
 

You must be logged in to post a comment.