The Microsoft Remote Desktop Protocol (RDP) provides remote display and input capabilities over network connections for Windows-based applications running on a server. RDP is designed to support different types of network topologies and multiple LAN protocols. Remote Desktop Protocol or just RDP allows a user to establish a connection between two computers and access the Desktop of a remote host. See the following guide on how to remove saved RDP credentials entries in Windows 10 and How to remove RDP connection entries. RDP is based on, and an extension of, the ITU T.120 family of protocols. How to allow saved credentials for RDP connection, How to change a password on a Remote Desktop session, and How to fix Windows 11 Remote Desktop Connectivity issues.
Having tried connecting to a Windows 11 device, the following error below was prompted. RDP was enabled and connection wasn't possible as shown from the image below. This is basically because, the user account that was trying to connect remotely does not have sufficient permissions. Kindly see "How to enable and disable Remote Desktop in Windows 10 for all users or selected users via CMD, PowerShell, Control Panel, and Windows Settings".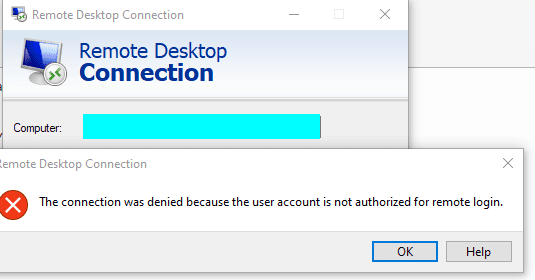
Resolution 1: Enable RDP for selected users
You have got so many options to launch the Remote Desktop Connection Settings windows. Here is a link to all troubleshooting guides relating to RDP.
– You can click on the Start Menu and click on settings as shown below.
– You can use the Windows Search button and type Remote Desktop Connection and select Settings for Remote Desktop.


Ensure Remote Desktop is enabled as shown below

If you wish to add or enable selected users only, click on the Remote Desktop Users as shown below.

This will open the Remote Desktop Users wizard as shown below. Click on Add to add a user. As you can see, I can only connect to this device via RDP as I already have RDP access granted.

In the Select Users window, type the name of the user and click on check names. When found, click on Ok. You will be required to click on Okay to complete the settings.

Resolution 2: Add the User to the Remote Desktop Users Group
I would personally use this method to enable Remote Desktop Connection. In this method, you will not have to select selected users that can connect to your server (PC). When these steps are completed, the specific user should be able to connect via RDP without any further issues.
_ To do this, launch the Computer Management and
– Expand Local Users and Groups
– Click on Groups
– Click on Remote Desktop Users

This can also be done via the following shortcut. – Press Winkey + R to open Run (or just search for it from the search window). – Type in lusrmgr.msc and press Enter.

Moreover, Add the selected users to this group as shown below. You may also want to see “how to install and configure VPN on a Windows Server 2016, 2019, and 2022: Allow remote VPN Access for Domain or local users“.
Note: In an Active Directory environment, you can also use this similar method to enable remote Desktop Connection.
- I used the word "similar" because, after the server has been promoted to a domain controller, you cannot manage the users via the Computer Management (mmc console) anymore. Therefore, you will not be able to use the "local users and groups" from the Computer Management. The Domain Controller uses the built-in domain group Remote Desktop Users (located in the Builtin container). You can manage this group from the ADUC console or from the command prompt to manage your Domain Cntroller.
Furthermore, I hope you found this blog post helpful. However, If you have any questions, please let me know in the comment session