Skip to content

TechDirectArchive

Hands-on IT, Cloud, Security & DevOps Insights

  • Home
  • About
  • Advertise With US
  • Reviews
  • Contact
  • Toggle search form
Home » Windows » Upgrading from Windows 10 with Unsupported CPU and TPM 1.0

Upgrading from Windows 10 with Unsupported CPU and TPM 1.0

Posted on 07/11/202113/01/2024 Imoh Etuk By Imoh Etuk No Comments on Upgrading from Windows 10 with Unsupported CPU and TPM 1.0
How-to-Upgrade-Windows-10-with-an-Unsupported-CPU-TPM-1.0-to-Windows-11

In this post, I will show you the steps in upgrading from Windows 10 with an unsupported CPU and TPM 1.0 to Windows 11 even if your PC has an unsupported CPU with a TPM below the 2.0 recommended version by Microsoft. Certainly, a lot of us became panicked when Microsoft released the minimum requirements for installing Windows 11 on our PCs. Please see Installing Windows 11 without TPM Support, How to install Windows Server 2022 on VirtualBox, and how to bypass unsupported CPU and Processor by upgrading to Windows 11 via Windows Update.

Nonetheless, there is always a walkaround. Before you even think of installation, you should manually check the PC health check to see if your PC qualifies. If your PC is not qualified, don’t worry it is not the end of life. You can still hold on to your Windows 10 as Microsoft said they will still support Windows 10 through 2025.

You may decide to use the VirtualBox Manager. But if you face the issue of the Windows 11 Image failing to startup as expected, you can check out my previous post on how to fix “Failed to open session in VirtualBox to install the Image. If you’re a Linux user, can check out most of my last post on A brief Introduction to Linux and how to create disk partition in Ubuntu Linux.

Backup Your PC for Windows 11 Upgrade

When you upgrade to Windows 11, you don’t keep all the files and apps you have to back up your PC. You can use external hard drive storage or Flash drive storage. Or probably use the easiest and cloud-based approach which is Microsoft OneDrive to back up your PC.

Hence, if you’re interested in learning how OneDrive works, you can learn about it here. With that now out of the way. Let’s talk about how you can upgrade to Windows 11 in a few simple steps.

Free Upgrade

To get started with the upgrade, these simple steps below will help you!

  • Click Start Menu
  • Select Settings
  • Then select, Updates & Security
  • If your PC is qualified and the "Download and Install Windows 11" updates notice shows up or your PC is not qualify, head to download Windows 11 . On this website, you have three different options for upgrading and installing Windows 11. The first one uses Windows 11 installation assistant which is probably the easiest one to use. (I recommend this approach if your PC support Windows 11 by default). The second option allows you to create Windows 11 installation media. The third option gives you an option to download the ISO installation file. Let’s say your PC doesn’t support Windows 11 and you can’t wait to have it installed, then the Download Windows 11 Disk Image approach is the best option for you.

Modifying PC Registry

Alternatively, you can upgrade or install Windows 11 on an unsupported CPU or TPM by modifying your PC Registry. Then add a new DWORD value to it.

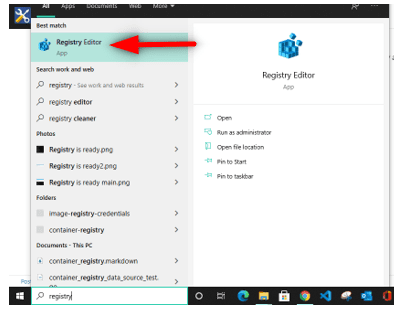
To do so, press the Windows Key + S and search for the term Registry Editor

Registry-Editor
PC Registry Editor

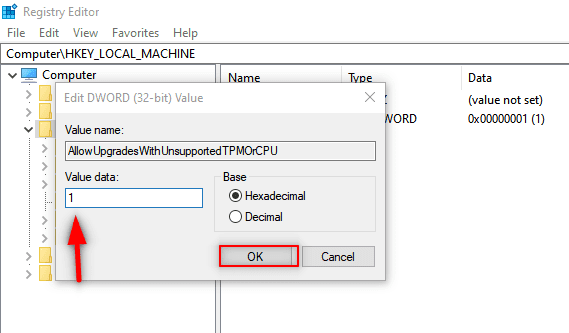
Then, click the path with the "HKEY_LOCAL_MACHINE"

CREATING-DWORD-IN-REGISTRY
Modifying PC Registry

Next, Right-Click anywhere on the screen -> New -> DWORD (32-bit) Value as shown on the screenshot above.

Afterwards, rename the new registry with "AllowUpgradesWithUnsupportedTPMOrCPU"

Renaming-the-new-registry
Rename the New Registry

Then, modify the DWORD Value from 0 to 1 and Click Ok, and close out the registry Window

Modify-DWORD-Value

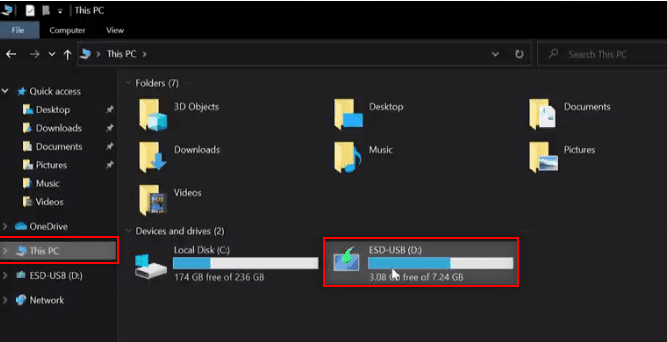
Locate Windows 11 installation media

Next, locate Windows 11 installation media under the “This PC” to run it from either a USB installation media or CD/DVD disk media

Windows-11-Installation-Media
Windows 11 Installation Media File

Then, double click to open the installation files and locate the Setup files.

Setup-files-for-Windows-11
Windows 11 Setup Files

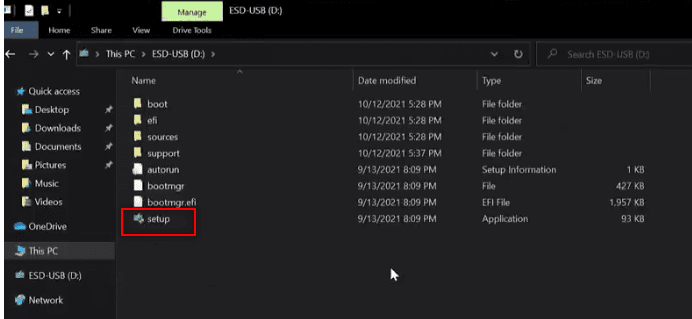
Wait for the installation files to get populated.

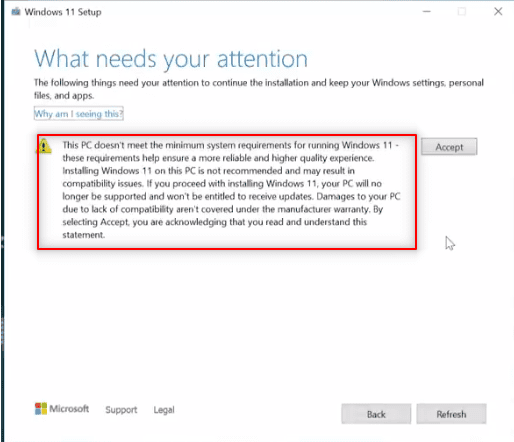
This will take to a warning screen by Microsoft stressing that your PC doesn't meet the minimum system requirements for running Windows 11. 

Furthermore, you won’t be getting security updates. So, if you are satisfied with it that way, proceed to click the "Accept" and continue with your installation.

Microsoft-Warning

Security Updates Warning!

Note: Microsoft has seriously warned that if you install Windows 11 on a PC that doesn’t meet the minimum requirements your PC will no longer receive security updates!

So by this warning by Microsoft, if you go ahead with the option stated in this article you’re doing so at your own risk as Microsoft or your PC manufacturer will NOT be held responsible for any security breaches that happen to your PC!

I hope you found this article useful on upgrading from Windows 10 with Unsupported CPU and TPM 1.0. Please feel free to leave a comment below.

Rate this post

Thank you for reading this post. Kindly share it with others.

  • Share on X (Opens in new window) X
  • Share on Reddit (Opens in new window) Reddit
  • Share on LinkedIn (Opens in new window) LinkedIn
  • Share on Facebook (Opens in new window) Facebook
  • Share on Pinterest (Opens in new window) Pinterest
  • Share on Tumblr (Opens in new window) Tumblr
  • Share on Telegram (Opens in new window) Telegram
  • Share on WhatsApp (Opens in new window) WhatsApp
  • Share on Mastodon (Opens in new window) Mastodon
  • Share on Bluesky (Opens in new window) Bluesky
  • Share on Threads (Opens in new window) Threads
  • Share on Nextdoor (Opens in new window) Nextdoor
Windows Tags:TPM, Trusted Platform Module, Windows 11

Post navigation

Previous Post: Create, list, lock, deploy, and delete Azure Resource Group via Azure CLI
Next Post: Azure Virtual Networks: Preparing Azure and On-Premises Virtual Networks with Azure CLI Commands

Related Posts

  • Printer
    How to rename a Printer in Windows 10 Windows
  • Migrate RDS CALs
    How to Migrate RDS CALs Windows
  • uninstall installed Windows Update from Windows
    How to uninstall installed Windows Update Windows
  • Featured image externaldis
    How to fix the external display not working on Windows 11 Windows
  • maxresdefault
    How to fix Error reading setup initialization file Windows
  • vcx
    Fix Error code 0x4 Session disconnected: Your session ended because of an error, if this keeps happening, contact your system administrator Windows

More Related Articles

Printer How to rename a Printer in Windows 10 Windows
Migrate RDS CALs How to Migrate RDS CALs Windows
uninstall installed Windows Update from Windows How to uninstall installed Windows Update Windows
Featured image externaldis How to fix the external display not working on Windows 11 Windows
maxresdefault How to fix Error reading setup initialization file Windows
vcx Fix Error code 0x4 Session disconnected: Your session ended because of an error, if this keeps happening, contact your system administrator Windows

Leave a Reply Cancel reply

You must be logged in to post a comment.

Microsoft MVP

VEEAMLEGEND

vexpert-badge-stars-5

Virtual Background

GoogleNews

Categories

veeaam100

Veeam Vanguard

  • Various Msiexec.exe Command Line Switches
    Various Msiexec.exe Command Line Switches Windows Server
  • Prevent Windows from Saving RDP Connection
    Prevent Windows from Saving RDP Connection History Windows
  • 7164 1024x575 1
    How to install MDT PowerShell module on Windows Scripts
  • windows1019h2
    Synchronize your Domain Controller with an external time source Windows Server
  • Synology Wi Fi CC400W
    Review of the Synology CC400W Installation and Configuration Network | Monitoring
  • check and assign privileges to a MySQL User
    How to check and assign privileges to a MySQL User Oracle/MSSQL/MySQL
  • Installgrafana
    Install Grafana on Windows and Windows Server Network | Monitoring
  • Featured image System Tray icons
    How to Fix System Tray Icons not showing in Taskbar on Windows 11 Windows

Subscribe to Blog via Email

Enter your email address to subscribe to this blog and receive notifications of new posts by email.

Join 1,814 other subscribers
  • RSS - Posts
  • RSS - Comments
  • About
  • Authors
  • Write for us
  • Advertise with us
  • General Terms and Conditions
  • Privacy policy
  • Feedly
  • Telegram
  • Youtube
  • Facebook
  • Instagram
  • LinkedIn
  • Tumblr
  • Pinterest
  • Twitter
  • mastodon

Tags

Active Directory Azure Bitlocker Microsoft Windows PowerShell WDS Windows 10 Windows 11 Windows Deployment Services Windows Server 2016

Copyright © 2025 TechDirectArchive


Loading Comments...
 

You must be logged in to post a comment.