If you just heard of the term “Azure Virtual Network (Azure VNet)”, it might sound strange to you particularly if you’re not coming from the background of Microsoft Azure Cloud but trust me, it will no longer be strange to you after reading this post and practicing along with your computer. Getting started with Azure Virtual Network is easy just the same way you would purchase networking equipment such as switches, routers, access points, and repeaters to build a network station to enable you to establish connections between your office or home computers in order for them to interact, communicate and share data with each other, is the same way you also need to set up Azure Virtual Network in a few clicks or issuing of few commands to enable the Virtual Machines hosted on Azure to communicate and exchange information with each other.
Before I proceed, I will like to point you to some of my previous posts on how to fix “Failed to open session in VirtualBox to install Windows 11 Image”. If you’re a Linux user, you can check out most of my last post on A brief Introduction to Linux and how to create disk partition in Ubuntu Linux, how to create, edit, save a file and quit Vim Editor in Linux, Locate, Find, and Grep: How to search for files and patterns in Linux/Unix-like OS and How to Save Read-Only Files in VIM Editor in Linux/Unix-like OS
Before I proceed, I will like to point you to some of my previous posts on how to fix “Failed to open session in VirtualBox to install Windows 11 Image”. If you’re a Linux user, you can check out most of my last post on A brief Introduction to Linux and how to create disk partition in Ubuntu Linux, how to create, edit, save a file and quit Vim Editor in Linux, "how to Locate, Find, and Grep: How to search for files and patterns in Linux/Unix-like OS", and how to Save Read-Only Files in VIM Editor in Linux/Unix-like OS
What is Azure Virtual Network?
The simple difference is you’re responsible for purchasing and managing all aspects of your on-premises network while Azure is responsible for providing you with the infrastructure you need to create and set up your Virtual Network on Azure. So, Azure Virtual Network is classified as one of the components of an Infrastructure as a Service (IaaS) cloud model. You can learn more about PaaS and SaaS. Below is the brief meaning of Azure Virtual Network according to Microsoft:
So, an Azure Virtual Network (VNet) is a representation of your own network in the cloud. It is a logical isolation of the Azure cloud dedicated to your subscription.
Looking to get started with Container solutions like Docker and Kubernetes, Azure, PowerShell, and Azure DevOps?
You can check out these related posts on:
- Azure DevOps and GitHub integration for Docker and Kubernetes deployment,
- How to create and deploy a local Registry Server with Docker Image,
- How to Stop, Remove and Name a Docker Container,
- How to Pull your first Nginx Container Image from Docker Hub and deploy it to your local machine,
- Azure DevOps and GitHub integration for Docker and Kubernetes deployment,
- How to create an App Service Plan with Continuous Deployment to deploy a .NET Application from GitHub, and
- How to configure email notifications for Azure CI/CD build Pipeline on Azure DevOps Project.
Virtual Network Preparation
Back to the business of the day, to be able to set up a network connection between Azure and on-premises virtual networks, you need to, first of all, prepare the Virtual Network on Azure. In this post, you will learn how to prepare Azure and on-premises virtual networks using Azure CLI commands. After setting up this, you will then be able to start to securely establish connections between your on-premises servers and the resources hosted in Azure across your organization.
Prerequisites to Preparing Azure Virtual Network
To follow along, you need:
- an Azure account with an active subscription. Create one for free.
- to sign into Azure Portal
- to click on the Azure Cloud Shell icon at the right side of the portal screen as shown in the diagram below:

We will start by creating the Azure-side resources and setting up the simulated on-premises network and supporting resources like Subnets, Gateway Subnets, and so on. Follow through;
Creating the Azure-side resources
This is where resources like the Resource Group (where all the resources will be held), Azure VNet, and define the subnet name services. To do so, run the command below:
az network vnet create \
    --resource-group [name of your resource] \
    --name Techdirectarchive-VNet-01 \
    --address-prefixes 10.0.0.0/16 \
    --subnet-name Services \
    --subnet-prefixes 10.0.0.0/24
We need to create a Resource Group before creating the resources stated above with the command shown below:
az group create -l eastus -n [YourResourceGroup]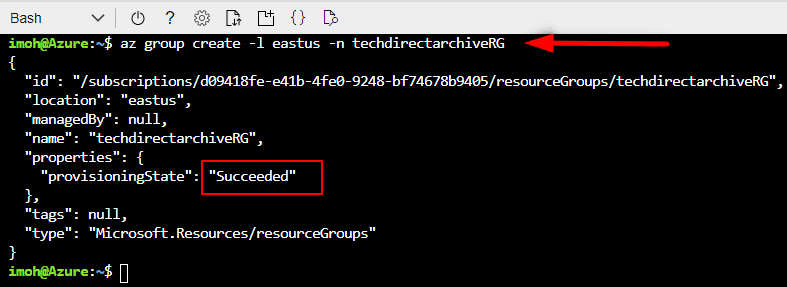
Few things to note in the screenshot above, the name of the resource group, and the provisioningState. The name will be required to create the Azure-side resources while the provisioning state simply tells us the creation of the resource group was successful if it shows “Succeeded”. Now let’s go ahead and run the commands above to create Azure-Side resources. Remember to replace the resource group name with the appropriate name of your resource group.
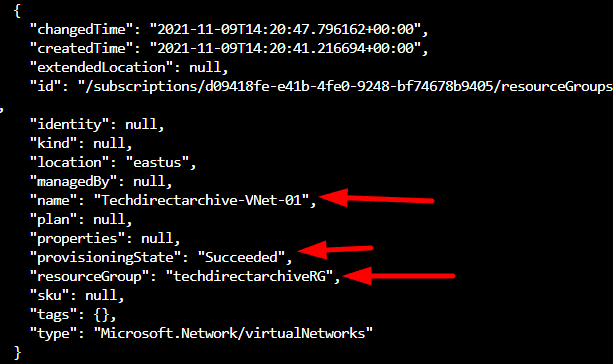
From the screenshot, you can see that the VNet name is shown as Techdirectarchive-VNet-01, the provisioning state is succeeded and the VNet is held in the Resource Group named techdirectarchiveRG
Add the Gateway Subnet
Next step, let’s run the following command in the Cloud Shell to add the Gateway Subnet to Techdirectarchive-VNet-01. To do so run the command below:
az network vnet subnet create \
    --resource-group techdirectarchiveRG \
    --vnet-name Techdirectarchive-VNet-01\
    --address-prefixes 10.0.255.0/27 \
    --name GatewaySubnet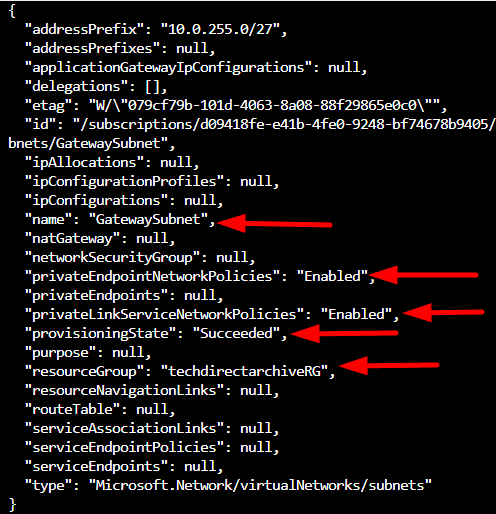
All set with adding the Gateway Subnet as shown above.
Create On-premise Network
The next step will be to run the following command in the Cloud Shell to create the TechDirectArchive-HQ-Network that’s the local network gateway. To do so, let’s run:
az network local-gateway create \
    --resource-group techdirectarchiveRG \
    --gateway-ip-address 94.0.252.140 \
    --name TechDirectArchive-HQ-Network \
    --local-address-prefixes 172.16.0.0/16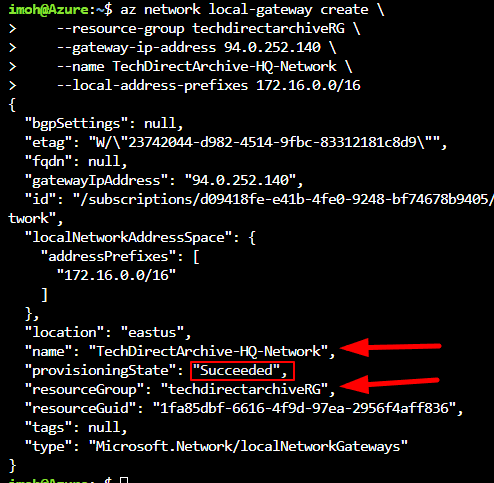
The local network gateway as shown above for TechDirectArchive Headquarters represents the on-premises network that you’re connecting to. The IP address specified as the remote gateway (which is the simulated on-premises network) will need to be updated later because it doesn’t exist yet in our scenario.
Next, let’s simulate the TechDirectArchive on-premises network by running the following command in the Cloud Shell to create the TechDirectArchive headquarter Network virtual network and the Applications subnet with the command below:
az network vnet create \
    --resource-group techdirectarchiveRG \
    --name TechDirectArchiveHQ-Network \
    --address-prefixes 172.16.0.0/16 \
    --subnet-name Applications \
    --subnet-prefixes 172.16.0.0/24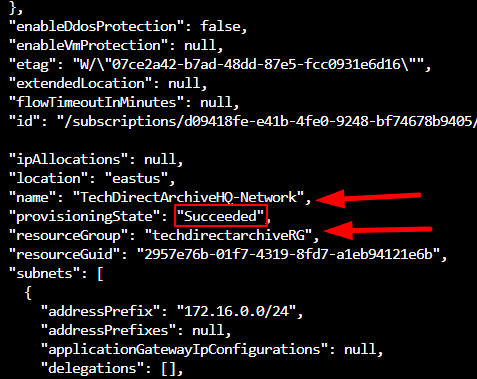
Create a Local Network Gateway
Next, Let’s run the following command in the Cloud Shell to add Gateway Subnet to Headquarter Network. Run:
az network vnet subnet create \
    --resource-group techdirectarchiveRG \
    --address-prefixes 172.16.255.0/27 \
    --name GatewaySubnet \
    --vnet-name TechDirectArchiveHQ-Network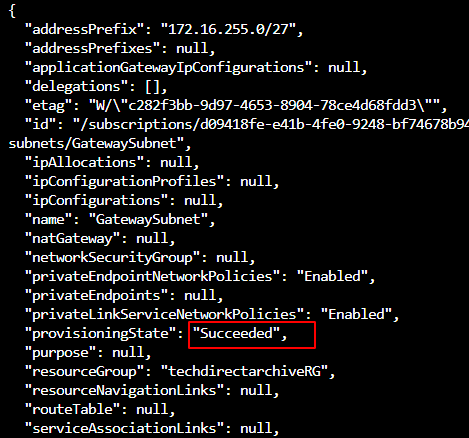
Now let’s run the following command in the Cloud Shell to create the TechDirectArchive-Techdirectarchive-VNet-01 local network gateway
az network local-gateway create \
    --resource-group techdirectarchiveRG \
    --gateway-ip-address 94.0.252.140 \
    --name TechDirectArchive-Techdirectarchive-VNet-01 \
    --local-address-prefixes 172.16.255.0/27
The gateway above describes the Azure network that you’re connecting to. You will need to update the IP address specified as the remote gateway (which is in Azure) later. Now let’s verify the topology
Verifying topology
To verify that we’ve created the virtual networks, we’ll need to run the command below in the Cloud Shell:
az network vnet list --output table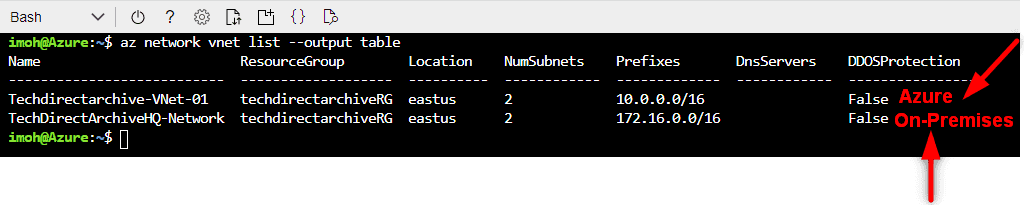
From the screenshot, we created all our VNets for both Azure and On-Premises.
Verify Local Network Gateways
Lastly, we’ll need to also verify that the local network gateways have been successfully created by running the command below in the Cloud Shell:
az network local-gateway list \
    --resource-group techdirectarchiveRG \
    --output table
Go back and refresh Azure Portal to see that all the resources created above are all there!
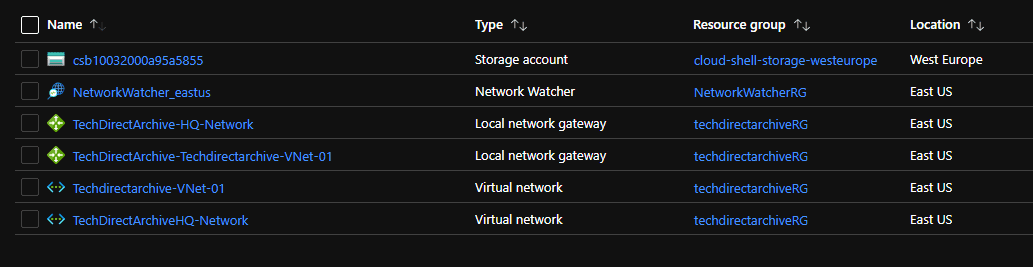
Notice that all the resources created are all in the East-US location. This is because the location we chose for the resource group was East-US so they inherited the location of the resource group.
Clean Up
Now that we’ve completed deploying and tested that everything works fine, it’s time to clean up in order to avoid Azure charging for leaving your resource running. To do so, go to the Azure Portal and click on all resources, and delete the resource group. In our case, the name of the resource group is TechdirectarchiveRG. Why do you need to delete only the Resource Group? It’s because it is the logical folder that holds all the resources we have created so far. SO deleting it will delete all the resources at once instead of having to delete them one after the other. This will save time!🤞
The diagram below shows the network we have just deployed. You may also want to see the following guides: how to build your first CI/CD Pipeline in Azure DevOps using ASP.Net Core Application, how to secure access to your Virtual Machine with Just-in-Time (JIT) VM Access, and how to provision Azure Resources using Azure Az PowerShell Cmdlet from Cloud Shell

Summary
Congratulations! You have just learned about how to prepare Azure and on-premises virtual networks using Azure CLI commands.


