This topic discusses Docker, which is a great container tool for building and deploying your application. Docker Hub stores public Docker images. You can use the Docker command-line interface (Docker CLI) for login, push, pull, and other container image operations on your container registry. Docker simply makes it easy for you to package the image you build locally and deploy it to a server that has a docker runtime environment. Once you build an image and it works on your local environment, it will definitely work well when you push it to a server with a docker runtime environment. In this article, you will learn how to Pull and Deploy Nginx Container Images from Docker Hub. Please see how to fix Auto Logon Error “The username and password specified is not valid”.
In the meantime, you can refer to my previous articles on Azure DevOps and GitHub integration for Docker and Kubernetes deployment to have pre-knowledge of how Kubernetes work with Docker. You can also learn about how to Create an App Service Plan with Continuous Deployment to deploy a .NET Application from GitHub. Without wasting time, let’s quickly move on to explaining what exactly Docker is.
What is Docker?
Docker is a tool for running applications in an isolated environment. It is much similar to a Virtual Machine but it’s much faster because it doesn’t require a lot of memory and the entire operating system to run. The good thing about Docker is that your app runs in the exact same environment that is if it works on my machine, it will definitely work on your machine, if it works in the staging environment, it will also work in the production environment. So, this is one of the benefits of Docker. Put simply, Docker just works!
It is a standard for software deployment. Almost all organizations are adopting Docker for their software deployment because it makes it easier to package applications. With Docker, Organizations don’t have to deal with different Windows OS, or different distributions of Linux OS and everything you package in Docker will work in production.
Having taken an overview of what Docker is, it’s time to move on to learn about the differences between Containers and Virtual Machines.
Containers VS Virtual Machines (VMs)
Containers are an abstraction at the application layer that packages code and dependencies together. Multiple containers can run on the same machine and share the OS kernel with other containers, each running as an isolated process in user space. From the diagram below, we could see that containers don’t require a full operating system and it simply shares the underlying operating system and run it in isolation with other containers.
In contrast, Virtual Machines are an abstraction of physical hardware turning one server into many servers. The hypervisor allows multiple VMs to run on a single machine. Each VM includes a full copy of an Operating System, the application, necessary binaries and libraries taking up tens of thousands of Gigabytes (GBs). VMs can also be slow to boot. Take a look at the diagram below to further understand the differences between Containers and Virtual Machines.

As you can see from the diagram, under the containers component we have multiple apps and underneath we have the container engine (Docker) and nothing else so Docker manages all the containers that you spin up using the container. Then looking at the diagram again we have a single Operating System before the actual infrastructure.
When you look at the VM component, you realize that each server requires an underlying Guest Operating System that allows it to run followed by a hypervisor environment before the actual Infrastructure. So, this is a typical difference between Containers and VMs.
What are the benefits of using Docker?
The following are the benefits of using Docker. They are:
- Run container in seconds instead of minutes. With this, to spin a complete OS on VM can take a while
- Less resources results less disk space and memory
- Doesn’t need full OS to run
- Deployment – what you deploy in one deployment stage will work on other stages
- Testing – It makes it easy to carry out local testing before deploying to a real-environment
How to Pull and Deploy Nginx Container Images from Docker Hub
Now is the time to Install Docker on our local machine. Go ahead and navigate to docs.docker.com/get-docker/ to download Docker Desktop. When you are there, you will see that you can download docker for MacOS, Windows or Linux. Installing it on any Operating System of your choice is the exact same thing. Since I am on Windows, let me go ahead and show you how to install it on Windows.
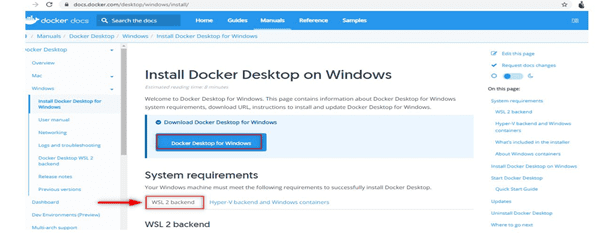
Apply the following steps to install Docker on your local machine: Select the Docker Desktop for Windows option

Click on the blue button below Download Docker Desktop for Windows and select the WSL 2 backend tab as clearly shown in the screenshot below. Why do you need WSL 2 as the backend? The reason is that with Docker Desktop running on WSL 2, users can leverage Linux workspaces and avoid having to maintain both Linux and Windows build scripts. In addition, WSL 2 provides improvements to file system sharing and boot time. It also allows access to some cool new features for Docker Desktop users.
Note! Docker only supports Docker Desktop on Windows for those versions of Windows 10 that are still within Microsoft’s servicing timeline.
What’s included in the installer?
These are the things included in the Docker Desktop installation. They’re Docker Engine, Docker CLI client, Docker Compose, Docker Content Trust, Kubernetes, and Credential Helper. I have already had Docker Desktop installed on my system so I won’t need to do a fresh installation again. If you have it as well installed already, open to your terminal. Here, I am using Git for Windows as my terminal. If you don’t have it installed, download it here. You can use your Windows command line tool (cmd). After installing Git for Windows, go ahead and run the docker ps command to see that docker is installed and it is running.

From the screenshot, you will see the Container ID, Image, Command, Created, Status, Ports and Names listed out. These are the details that will display when you pull your first Docker Image from Docker Hub.
Now go ahead and quit/close Docker on your Window and try to run the docker ps command again on your terminal. You will see that you cannot connect to Docker daemon again. See the screenshot below.

Install Docker on Windows
If you do not have docker installed already on your local machine, below are the steps to Install it after downloading it
- Double-click Docker Desktop Installer.exe to run the installer. If you haven’t already downloaded the installer (Docker Desktop Installer.exe), you can get it from Docker Hub or Docker Registry. It typically downloads to your Downloads folder, or you can run it from the recent downloads bar at the bottom of your web browser.
- When prompted, ensure the Enable Hyper-V Windows Features or the Install required Windows components for WSL 2 option is selected on the Configuration page.
- Follow the instructions on the installation wizard to authorize the installer and proceed with the installation.
- When the installation is successful, click Close to complete the installation process.
- If your admin account is different to your user account, you must add the user to the docker-users group. Run Computer Management as an administrator and navigate to Local Users and Groups > Groups > docker-users. Right-click to add the user to the group. Log out and log back in for the changes to take effect.
Launch Docker for Windows Runtime Environment
After the Installation, double-click on the Docker Desktop Icon on your Desktop or the tray menu icon to open Docker for Windows Runtime Environment to inspect it before pulling a Docker image into it.

From the screenshot above you can see that we do not have any containers running yet. The next thing is to click on the setting gear icon to check the settings option based on your preference. Here I left everything at default. You can do the same as well. See the screenshot below:

Please see How to stop Docker from automatically starting on Mac, How to manually update Docker desktop, How to install a Windows server container host, How to Create a Linux Virtual Machine Via Azure CLI, how to Install an Nginx Web-Server and Configure TCP Port, and how t stop Docker from automatically starting on Mac.
Note, you have to sign into Docker Hub with your Docker ID and password to have the image created published to the official docker hub that is, if you’re publishing a locally created container image to Docker Hub.
Sign up for a Docker Hub Account
In our case today, we are only going to pull a container image and deploy the same to our local system. To sign into docker hub, do so by clicking on the sign in option as shown in the screenshot above if you have already had an account on Docker Hub if not, click here to sign up for an account. The below screenshot shows the login interface.

Before we begin pulling our first Nginx image from the docker hub, let me show you some important commands in Docker.
- Running
dockeron your terminal displays other commands - Run
docker --versionto see the current version of Docker you are running on your system. The version you have might be different but the command is the same. - Run
docker pull {image}– Pulls an image from Docker hub - Run
docker images– To see a list of all images in your Docker Desktop environment. - Run
docker run– To start an image. - Run
docker psordocker conatiner ls– To see a list of running containers.
There are many other commands you can use in Docker. Navigate here to see the complete list.
What container image are we pulling?
In this article as promised, I will show you how to Pull and Deploy Nginx Container Images from Docker Hub pull (download) to your local system, add a tag, map the TCP port 8080 to TCP port 80 for Nginx container Images to have your Image run locally from your system using Docker Desktop.
Let’s go ahead and learn about how Docker Image is different from Docker Container. Please see how to install and uninstall Docker Desktop on Windows 10 and Windows Server.
Docker Image – An image is a template for creating an environment of your choice. It contains everything your app needs to run that’s the OS, Software and the Application codes. In contrast, Container comes into play after you have created your image. So, a Container is simply a running instance of an image. What you need to do is to have an image first and then from that image you run a container. See the diagram below for more information:
Pull an Nginx Image
Now let’s go again and pull an Nginx Image and run a container from it. To do so, visit docker hub to pull the image. While on Docker Hub, you will see a list of tons of other public images. Search for a Nginx Image as shown in the screenshot below:

Run the command docker pull an nginx on your terminal. Remember our docker runtime environment is currently empty.

From the screenshot above, you can see that image has been pulled successfully. Let’s go ahead to check it in our docker runtime environment. The screenshot below shows that the Nginx Image has been pulled into my local machine and the status is not running.

Display available Docker Images
Let’s run the command docker images on the terminal as well to see the image available. See the screenshot below.

From the screenshot, the name of the image is Nginx, tag is latest which shows that the image is the latest version, the image Id, the date it was created which is 2 days ago and the Image size. Next, let’s go ahead and run a container from the Nginx Image we have just pulled. To do so, run the command docker run nginx:latest on your terminal. The latest added to the command simply means the latest version of the container will run.
Next, run docker container ls to see a list of all running containers. After that go back to the Docker Desktop environment to see that your container is running. The screenshot below shows that my container image.

From the screenshot, the four icons highlighted at the right corner of the screen specifies Docker CLI, stopping containers, restarting containers and deleting containers. Note, before you can delete a container, you must first stop the container from running. You can run as many containers as you want. See the screenshot of the terminal showing a running container.

Display the details of the running container
The above screenshot shows that my container is still running in the background. I will run the docker container ls command in a new terminal tab to display details for the running containers. This shows that the container running process is running on the background.
The only way to see the running process is by running it in a detached mode. So, let’s go ahead and run docker run -d nginx:latest. See the screenshot below for details.

Now you will see that the process is no longer hanging and you got the Id. Now you see the list of all the running containers. By simply running docker container ls or docker ps commands. We have successfully managed to run our first containers. Checking the docker runtime environment now will show us that we have two container images with different names with both created from a Nginx Container Image. See the screenshot below.

Next, let’s go ahead and learn how we are going to be able to use the container.
Exposing Ports
So far, we have our host which has docker running on our local computer. Right now, we have two containers running Nginx. These containers are running on TCP Port 80 as shown in the screenshot below.

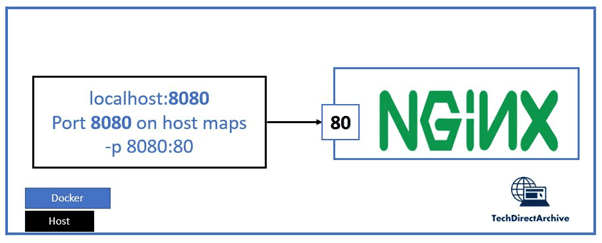
So, what we are going to do is from the host we will issue a request to our container running port 80 so we will be able to access it on our local web browser through localhost: 8080. This port 8080 on our host should be mapped to the TCP port 80 on Nginx container and the only way to do this is by adding -p to TCP port 8080 before running the container. See the diagram below to understand better.
Now, let’s go ahead and open up our terminal or command line. Before we start, we will need to stop all running containers. To do that simply run docker stop and pass the container ids. From the screenshot below my container ids are 29001d8793b3 and eb7b9f5467a2, and I have them stopped by running docker stop 29001d8793b3 eb7b9f5467a2. Notice the containers shutting down gracefully from the screenshot below.

Map host to the TCP Port
Now, we are going to map TCP port 8080 on our host to the container TCP port 80. To do so, let’s run docker run -d -p 8080:80 nginx:latest. Here, we are simply saying map port 8080 on local host to port 80 on the container.

Finally, let’s go and browse the container web interface on our browser throughlocalhost:8080.

Congratulations! You have successfully pulled an Nginx public image from Docker Hub, installed Docker Desktop, and mapped TCP port 8080 on your host to the TCP port 80 on the Nginx container to run the first Docker Container Image on our local machine. On a final note, you can map any port number which could be 5000, 3000, or any number at all.
I hope you found this blog post helpful on how to Pull and Deploy Nginx Container Images from Docker Hub. If you have any questions, please let me know in the comment section.