BitLocker is an encryption feature that can be used to encrypt your hard disk to protect your data against unauthorized access or being stolen. It is a native security feature built into most versions of Windows PCs including Windows 11 Pro, Education, and Enterprise editions, but not available in the Home edition. In this article, you shall learn about “Manage TPM Protector: How to encrypt additional drives on an MBAM-protected device using the manage-bde command”. Please see how to uninstall your current version of MBAM and run setup again, and Microsoft Desktop Optimization Pack [MDOP] at a glance (AGPM, MBAM, App-V, DaRT, MED-V, and UE-V).
Once a drive is encrypted by BitLocker, it can only be unlocked or decrypted with a Bitlocker password or the Bitlocker Recovery Key. And anyone without proper authentication will be denied access even if the computer has been stolen or the hard disk is taken.
It uses Advanced Encryption Standard (AES) encryption algorithm with 128-bit or 256-bit keys for encrypting data in the entire drive or only used space of the drive.
Kindly refer to these related guides: How to unlock a fixed drive protected by BitLocker, how to deploy Microsoft BitLocker Administration and Monitoring Tool, how to correctly disable Microsoft BitLocker Administration and Monitoring encrypted devices.
BitLocker Encryption Options
There are two types of BitLocker encryption options available to you on Windows 11. They are
- BitLocker Drive Encryption: This encryption method is used to
encrypt fixed hard drives (internal hard disk)including operating system drives. - BitLocker To Go: This encryption method lets encrypt external drives, such as USB flash drives and external hard drives. You will need to enter the password or recovery key to unlock the device when you connect the drive to a computer.
You may also want to see these guides: How to create MBAM Enterprise and Compliance, and Recovery Audit reports, and how to determine why an MBAM protected device is non-compliant.
Encrypt additional drives on an MBAM-protected device
Before proceeding to discuss how this is done correctly without you having an issue that the drive is not being protected.I will show you how to encrypt a drive without any password, recovery key, or any other protection. To do this, use this command.
manage-bde -on E: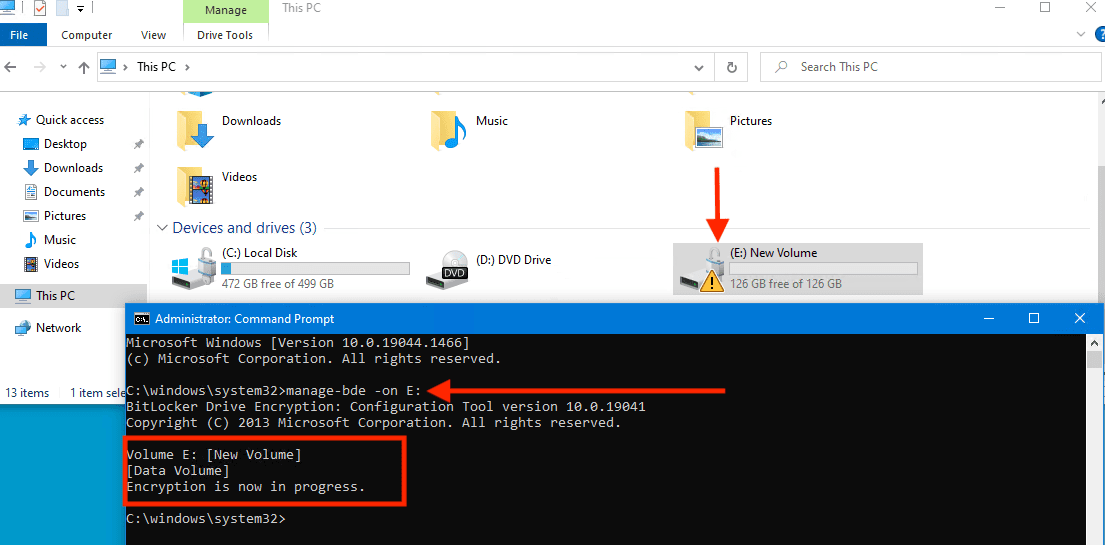
As you can see in the image above. The drive has been encrypted and the icon associated with the drive simply means that the drive is encrypted without any password, recovery key, or any other protections.
Note: However, you can also add protections to a drive after you encrypted it. After encryption is completed, you can also add a password, add a smart card, and back up your recovery key in the BitLocker Drive Encryption control panel.How can we fix this issue?
The easiest way to fix this issue is to ensure that the drive is encrypted with a randomly generated recovery password. The right protection, etc. To do this, we will have to disable encryption on the drive. Kindly use the command below to do this.
manage-bde -off E:As you can see, decryption is currently in progress.


To turn on encryption and generate a random recovery password
Now that we have decrypted the drive, we will have to encrypt the drive and have it generate a random recovery key. To do this, please use the command below.
manage-bde -on E: -RecoveryPassword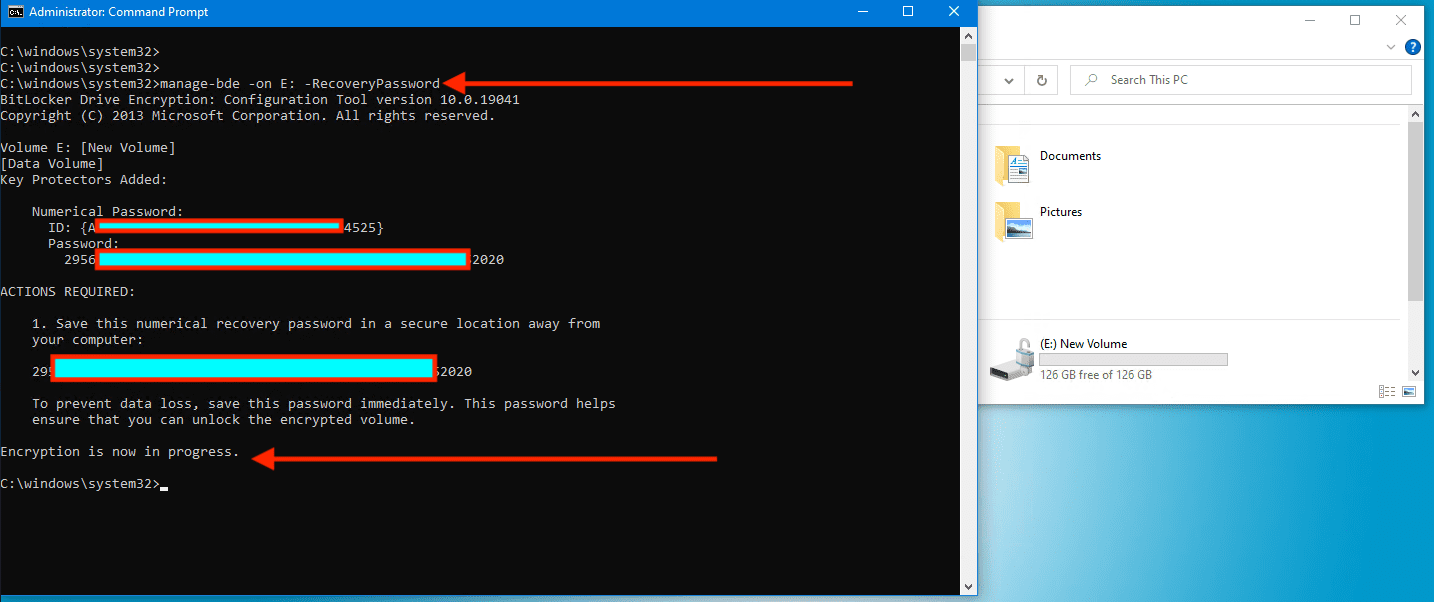
Note: The drawback with this method is that they keys are not escrowed to the MBAM database but ONLY to Active Directory.
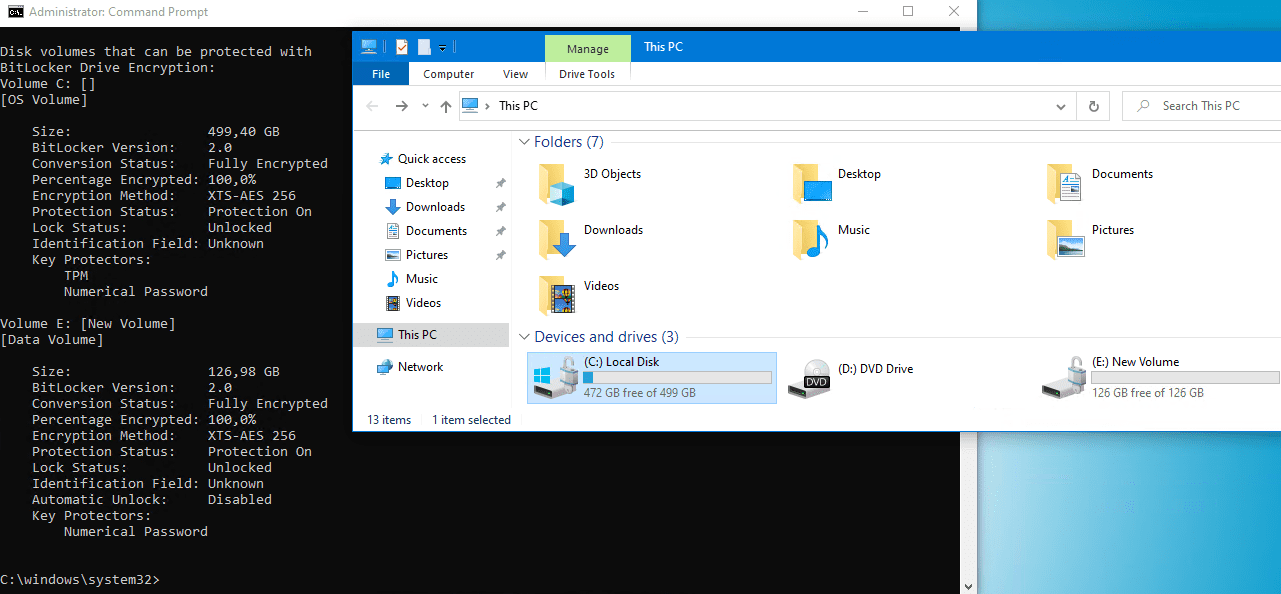
As you can see from the image below. The Drive has been encrypted and corrected without having an icon associated with it portraying possible non-protection of the drive.
Note: To turn on encryption, generate recovery password, and save recovery key on another drive, type the following command:
manage-bde -on E: -RecoveryPassword -RecoveryKey C:To list all key protectors for drive E or C, type the following command
manage-bde -protectors -get C:
manage-bde -protectors -get E:
Manage-bde Protectors to manage drives on Windows device
Below are some of the manage-bde protectors’ parameters. They can be used in managing the protection methods used for the BitLocker encryption key.
manage-bde -protectors [{-get|-add|-delete|-disable|-enable|-adbackup|-aadbackup}] <drive> [-computername <name>] [{-?|/?}] [{-help|-h}]| Parameter | Description |
|---|---|
| -get | Displays all the key protection methods enabled on the drive and provides their type and identifier (ID). |
| -add | Adds key protection methods as specified by using additional -add parameters. |
| -delete | Deletes key protection methods used by BitLocker. All key protectors will be removed from a drive unless the optional -delete parameters are used to specify which protectors to delete. When the last protector on a drive is deleted, BitLocker protection of the drive is disabled to ensure that access to data is not lost inadvertently. |
| -disable | Disables protection, which will allow anyone to access encrypted data by making the encryption key available unsecured on drive. No key protectors are removed. Protection will be resumed the next time Windows is booted unless the optional -disable parameters are used to specify the reboot count. |
| -enable | Enables protection by removing the unsecured encryption key from the drive. All configured key protectors on the drive will be enforced. |
| -adbackup | Backs up recovery information for the drive specified to Active Directory Domain Services (AD DS). Append the -id parameter and specify the ID of a specific recovery key to back up. The -id parameter is required. |
| -aadbackup | Backs up all recovery information for the drive specified to Azure Active Directory (Azure AD). Append the -id parameter and specify the ID of a specific recovery key to back up. The -id parameter is required. |
<drive> | Represents a drive letter followed by a colon. |
| -computername | Specifies that manage-bde.exe will be used to modify BitLocker protection on a different computer. You can also use -cn as an abbreviated version of this command. |
<name> | Represents the name of the computer on which to modify BitLocker protection. Accepted values include the computer’s NetBIOS name and the computer’s IP address. |
| -? or /? | Displays brief help at the command prompt. |
| -help or -h | Displays complete help at the command prompt. |
Additional -add parameters to encrypt additional drives
The -add parameter can also use these valid additional parameters. I have added these parameters to enable you to learn more about this command.
manage-bde -protectors -add [<drive>] [-forceupgrade] [-recoverypassword <numericalpassword>] [-recoverykey <pathtoexternalkeydirectory>]
[-startupkey <pathtoexternalkeydirectory>] [-certificate {-cf <pathtocertificatefile>|-ct <certificatethumbprint>}] [-tpm] [-tpmandpin]
[-tpmandstartupkey <pathtoexternalkeydirectory>] [-tpmandpinandstartupkey <pathtoexternalkeydirectory>] [-password][-adaccountorgroup <securityidentifier> [-computername <name>]
[{-?|/?}] [{-help|-h}]| Parameter | Description |
|---|---|
<drive> | Represents a drive letter followed by a colon. |
| -recoverypassword | Adds a numerical password protector. You can also use -rp as an abbreviated version of this command. |
<numericalpassword> | Represents the recovery password. |
| -recoverykey | Adds an external key protector for recovery. You can also use -rk as an abbreviated version of this command. |
<pathtoexternalkeydirectory> | Represents the directory path to the recovery key. |
| -startupkey | Adds an external key protector for startup. You can also use -sk as an abbreviated version of this command. |
<pathtoexternalkeydirectory> | Represents the directory path to the startup key. |
| -certificate | Adds a public key protector for a data drive. You can also use -cert as an abbreviated version of this command. |
| -cf | Specifies that a certificate file will be used to provide the public key certificate. |
<pathtocertificatefile> | Represents the directory path to the certificate file. |
| -ct | Specifies that a certificate thumbprint will be used to identify the public key certificate |
<certificatethumbprint> | Specifies the value of the thumbprint property of the certificate you want to use. For example, a certificate thumbprint value of a9 09 50 2d d8 2a e4 14 33 e6 f8 38 86 b0 0d 42 77 a3 2a 7b should be specified as a909502dd82ae41433e6f83886b00d4277a32a7b. |
| -tpmandpin | Adds a Trusted Platform Module (TPM) and personal identification number (PIN) protector for the operating system drive. You can also use -tp as an abbreviated version of this command. |
| -tpmandstartupkey | Adds a TPM and startup key protector for the operating system drive. You can also use -tsk as an abbreviated version of this command. |
| -tpmandpinandstartupkey | Adds a TPM, PIN, and startup key protector for the operating system drive. You can also use -tpsk as an abbreviated version of this command. |
| -password | Adds a password key protector for the data drive. You can also use -pw as an abbreviated version of this command. |
| -adaccountorgroup | Adds a security identifier(SID)-based identity protector for the volume. You can also use -sid as an abbreviated version of this command. IMPORTANT: By default, you can’t add an ADaccountorgroup protector remotely using either WMI or manage-bde. If your deployment requires the ability to add this protector remotely, you must enable constrained delegation. |
| -computername | Specifies that manage-bde is being used to modify BitLocker protection on a different computer. You can also use -cn as an abbreviated version of this command. |
<name> | Represents the name of the computer on which to modify BitLocker protection. Accepted values include the computer’s NetBIOS name and the computer’s IP address. |
| -? or /? | Displays brief help at the command prompt. |
| -help or -h | Displays complete help at the command prompt. |
I highly recommend you to take a look at these guides: Disable BitLocker (MBAM): How to correctly disable Microsoft BitLocker Administration and Monitoring encrypted devices, and how to deploy Microsoft BitLocker Administration and Monitoring Tool.
I hope you found this blog post on “Manage TPM Protector: How to encrypt additional drives on an MBAM-protected device using the manage-bde command” helpful. If you have any questions, please let me know in the comment session.