

The RD Web Client supplements, but does not replace, Microsoft’s native Remote Desktop Protocol (RDP) clients. It can be installed on Windows Server 2016 and 2019, and all that is required is a modern browser on the user’s device. Microsoft has added RDP support to various platforms in recent years. Native clients for macOS, iOS, and Android, as well as a Universal Windows Platform (UWP) app for Windows 10 and Windows 11 devices, are now available. Previously, anyone wanting to run remote desktop apps in a web browser had to use third-party software. With the release of the Remote Desktop Web Client, this has changed. Kindly refer to these related guides: How to remove a Remote Desktop Service collection on Windows Server. In this guide, you will learn how to install RDS via Quick Start Deployment: Install, Publish, Update, and Uninstall Remote Desktop Web Client.
With Remote Desktop Web Client, users can use a compatible web browser to access your organization’s Remote Desktop infrastructure. They’ll be able to interact with programs running remotely or on desktops in the same way that they would with a local PC, regardless of where they are. Once you’ve set up your Remote Desktop web client, all your users need is the URL to access it, their credentials, and a supported web browser to get started. Please refer to this interesting guide for more information. The connection was denied because the user account is not authorized for remote login: How to add and remove Remote Desktop Users, and how to fix Remote Desktop can’t connect to the remote computer for one of these reasons.
Make sure you're using per-user client access licenses (CALs) rather than per-device CALs before installing the Web Client. Otherwise, because the HTML client is incompatible with this form of licensing, it would seize all per-device CALs. During installation, it will display a related warning once more.Remote Desktop Services Architecture
To install the Remote Desktop Web Client, the first thing we will do is install the Remote Desktop Service using the quick start deployment method. To learn how to install RDS using the standard deployment, see this post. Below is the core architecture of RDS.

Note: RDS can be deployed using Standard or QuickStart. The difference between Standard and QuickStart Deployment is that with QuickStart, all components are deployed on a single server. Quick Start is a shortcut that allows you to get RDS up and running in minutes. The collection and the remote app will be set up automatically. Whilst in the Standard Deployment type, 3 core roles Connection Broker, RDWeb, and RDSH will be installed on three distinct servers. When you choose the Standard deployment type, you’ll have to manually configure Remote Apps and configuration. The Connection Broker should be used for all RDS session deployment installation, configuration, and maintenance.
In the next session, you will learn “How to install RDS via Quick Start Deployment: How to Install, Publish, Update, and Uninstall the Remote Desktop Web Client Via the QuickStart Deployment”. For a guide on how to publish the Remote Desktop Web Client, click here. Also, learn how to set up and configure Remote Desktop Services via Standard Deployment on Windows Server.
Install RDS Via the Quick Start Deployment
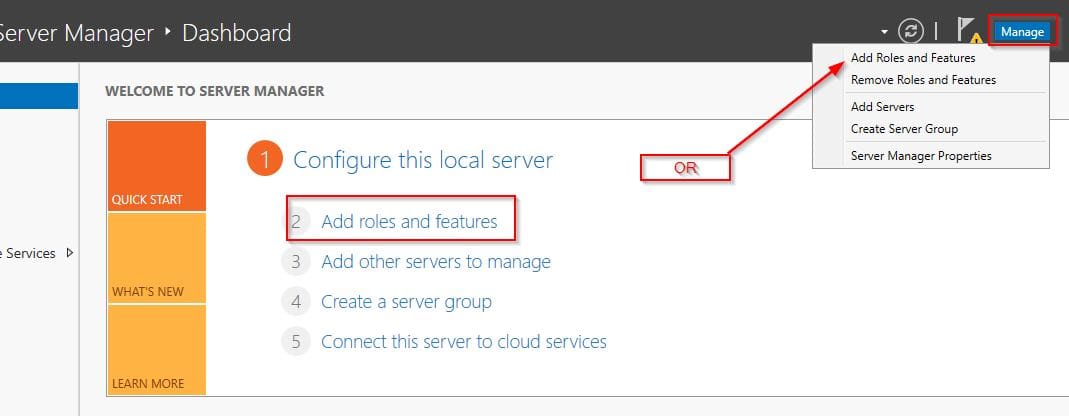
Now, to install the Remote Desktop Service, click on the Start Menu or Windows Logo + Q and search for Server Manager in the search bar:

While in Server Manager Dashboard as shown below, click on Add Roles and Features or click on Manage to access the Roles and Features tab
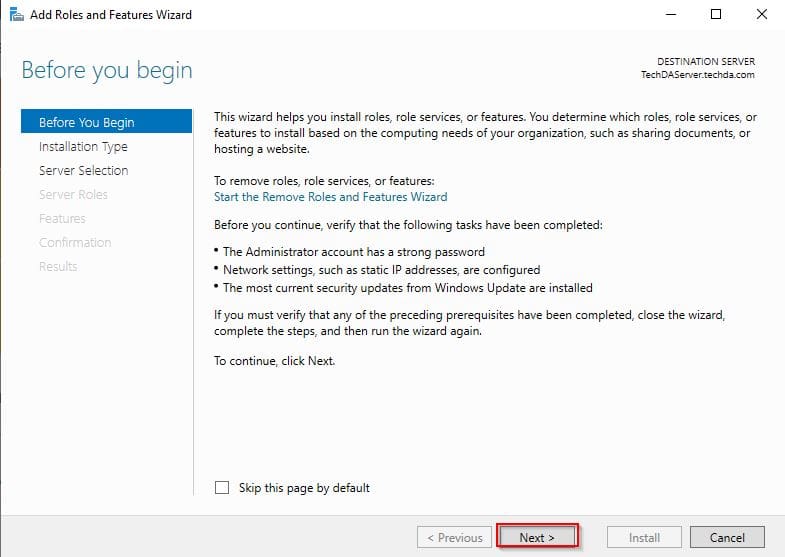
In the “Before You Begin” window, click on Next
In the Installation Type tab, select Remote Desktop Services installation

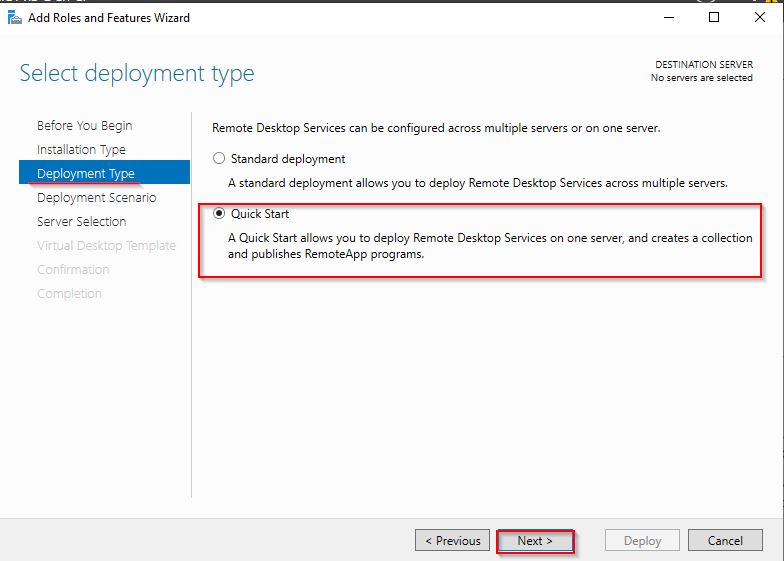
In the Deployment Type tab, select “Quick Start”
In the Deployment Scenario tab, select Session-based desktop deployment

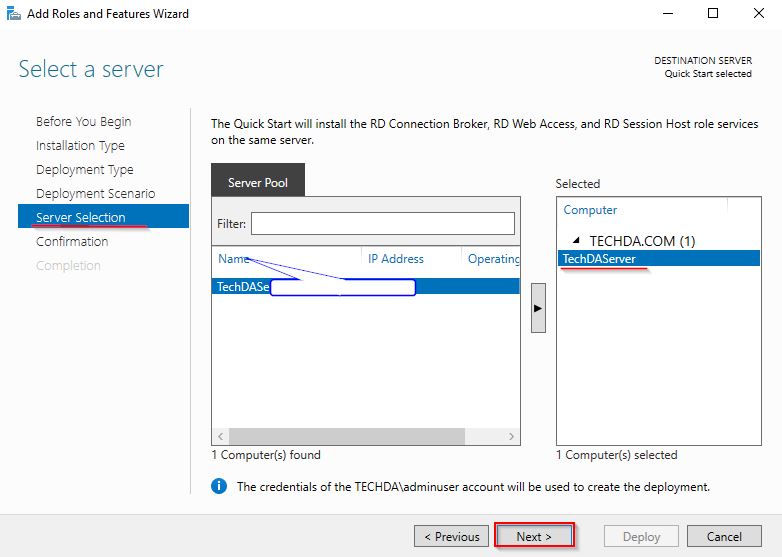
In the Server Selection tab, select the name of your server. Here are Server name is TechDAServer
Now, it’s time to confirm your installation in the Confirmation tab. As seen from the screenshot below, the names of role services to be installed are listed. Note, you will be required to restart your server for the RDS to take effect. Here, I selected the Restart destination server automatically if required at once.

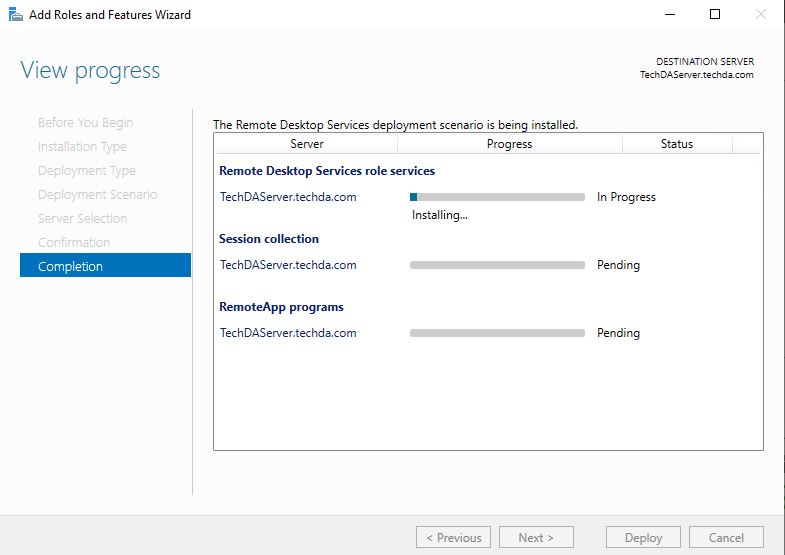
In the Completion tab, you will see the RDS installation in progress.
Finally, the windows screen that shows that the RDS installation has succeeded will surface. The URL to the RD Web Access will be shown below. This is the URL, your users will use to access their individual desktops and programs on your server remotely anywhere they’re located. Here, the URL is https://techdaserver.techda.com/rdweb

Navigate to the RDWeb URL
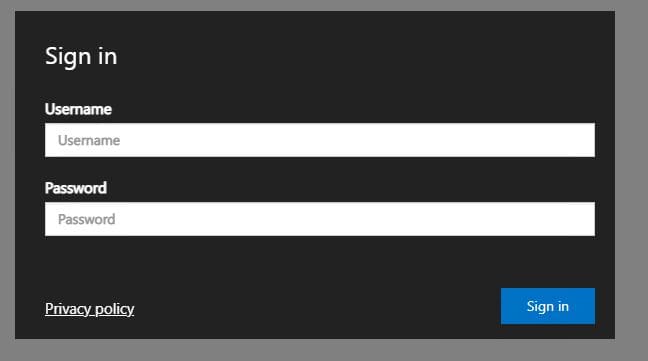
After a successful deployment of the RDS, when clicked on the RDWeb URL you will be taken to the web interface where you will need to log in with your username and password. As required, you must have your create and set up an account for your users on the destination server. In our case, the username is adminuser. You can select either public or private computer depending on your organizational needs.

After the user has logged in, the Remote Desktop app will be shown to each user on his personalized desktop on their local PC. Below is how to access the RemoteApp programs on the RD Web Access Server.

By default, only 3 apps will show up. You can add more apps according to each user’s needs.

Installing the RDS Web Client
Microsoft has been developing a Remote Desktop Services add-on, the Remote Desktop Web Client, since the release of Windows Server 2016.
This add-on can be placed on top of an existing Remote Desktop farm and allows users to access the organization’s Remote Desktop infrastructure via a web browser. They can then engage with remote apps or desktops in the same way as they would with a local PC, regardless of their location. Once you’ve set up your Remote Desktop web client, all your users need is the client’s URL, their credentials, and a supported web browser to get started.
Prerequisite for Installing RD Web Client
What you’ll need to set up the web client. Before getting started, keep the following things in mind:
- Make sure your Remote Desktop deployment includes a Windows Server 2016 or 2019 RD Gateway, RD Connection Broker, and RD Web Access.
- Ensure that your deployment is set up to use per-user client access licenses (CALs) rather than per-device licenses; otherwise, all licenses will be used up because the HTML client is incompatible with this form of licensing, it would seize all per-device CALs.
- Make that the RD Gateway and RD Web Access roles have public trustworthy certificates configured.
- Ascertain that any computers to which your users will connect are running one of the following operating systems:
- Windows 10 or 11
- Windows Server 2008R2 or later
We have already deployed our Remote Desktop Services as shown in the screenshot below:

To install RD Web Client, first of all, obtain the certificate for Remote Desktop connections from the RD Connection Broker server and save it as a.cer file in the location that will be easy for you to access the file path.
Installing and Importing SSL Certificate for RDS Deployment
When you newly deploy the RD Web Access in RDS, the SSL certificate will report an error until you install and import it. To do so, on the RD Web Access Window, click on the “Certificate Error” in the right-hand corner of the screen as shown below:

A screen showing Welcome to the Certificate Import Wizard appears. Select the certificate store location as either current user of local machine. Click on Install Certificate and click next.

Next, choose either “Automatically select the certificate store based on the type of certificate or Place all certificates in the following store" and click on browse to select your preferred Certificate store

Click on Next to successfully import the certificate.

Locating and Exporting the RDS Connection Broker Certificate
To locate the certificate and export it, type this command in an elevated PowerShell prompt or the built-in Windows Command Prompt:
certlm.msc
As shown above, click on Trusted Root Certification Authorities (the path you imported the certificate to) -> Certificates -> right-click on your Server Name (in this case it’s TechDAServer.techda.com) -> All Tasks -> Export.
Next, you will be taken to the Welcome to the Certificate Export Wizard, click on Next to continue

Select the certificate format in the next screen as shown below. Here, we selected "DER encoded binary X.509 (.CER)" format

Now, browse to the path you wish to export the certificate to and specify the file name for your certificate.

You can highlight then right-click and copy the path to a text editor because it will be required in the next step when installing the RD web Client using PowerShell cmdlet.

Click on Next as shown as shown on the screenshot above to complete the certificate export wizard.

Installing RD Web Client using PowerShell Cmdlet
Next, we will run the RD Web Client using PowerShell cmdlet to update the PowerShellGet module since the inbox version doesn’t support installing the web client management module. Although this is applicable to Windows Server 2016, you must update the PowerShellGet module on Server 2019. To update PowerShellGet, run the following cmdlet:
Note: To do this, you must launch PowerShell prompt in an elevated mode.
Install-Module -Name PowerShellGet -ForceNote: Before the upgrade takes effect, PowerShell must be restarted; otherwise, the module may not work.To install the Remote Desktop web client management PowerShell module from the PowerShell gallery, type:
Install-Module -Name RDWebClientManagement
Type “Yes” to allow the installation when prompted. Also, type “Yes” again to accept the license

Then, to get the newest version of the Remote Desktop web client, run the following cmdlet:
Install-RDWebClientPackage
Next, with the bracketed value substituted with the path to the.cer file you copied from the RD Broker, run this cmdlet:
Import-RDWebClientBrokerCert <.cer file path>
Finally, run the following cmdlet to make the Remote Desktop web client available:
Publish-RDWebClientPackage -Type Production -Latest
Even if your deployment is configured for per-user CALs, you may encounter a warning when running the Publish-RDWebClientPackage cmdlet that claims per-device CALs are not supported. If your deployment makes use of per-user CALs, you can disregard this warning. This is prompted to ensure that you are aware of the configuration restriction.Check that you can access the web client using the web client URL, which should be https://server FQDN/RDWeb/webclient/index.html. It is critical to use the server name that corresponds to the RD Web Access public certificate in the URL (typically the server FQDN). In this case, our Fully Qualified Domain Name (FQDN) is accessible at https://techdaserver.techda.com/rdweb/webclient/index.html
When you’re ready for users to utilize the web client, simply send them the URL you created. Now, we have fulfilled how to install RDS via Quick Start Deployment: Install, Publish, Update. But we have to learn also how to uninstall Remote Desktop Web Client
Uninstall RDS Web Client
As the last step in the guide, you will learn how to uninstall the Remote Desktop Web Client both in online and offline mode.
To uninstall the RD Web Client, type the below command and then type Yes to confirm your option.
Uninstall-RDWebClient
Next, uninstall the Remote Desktop web client management PowerShell module with the below cmdlet:
Uninstall-Module -Name RDWebClientManagement
In this post, we have taken a deep dive into what RDS is all about and how to install, configure and uninstall RD Web Client. On how to use a Remote Desktop, please click on this link.
I hope you found this blog post helpful on how to install RDS via Quick Start Deployment: Install, Publish, Update, and Uninstall Remote Desktop Web Client. If you have any questions, please let me know in the comment session.