Skip to content

TechDirectArchive

Hands-on IT, Cloud, Security, Veeam & DevOps

  • Home
  • About
  • Advertise With US
  • Reviews
  • Contact
  • Toggle search form

Remote Desktop Services Setup on Windows Server

Posted on 24/05/201817/08/2026 Christian By Christian No Comments on Remote Desktop Services Setup on Windows Server
  1. Home
  2. Windows Server
  3. Remote Desktop Services Setup on Windows Server
Remote Desktop

Remote Desktop Services, known as Terminal Services in Windows Server 2008 and earlier, is one of the components of Microsoft Windows that allow a user to take control of a remote computer or virtual machine over a network connection. Here are the step-by-step guide for installing Remote Desktop Services Setup on Windows Server. Kindly refer to these related guides: Changed expired RDP password: How to change a password on a Remote Desktop session, how to fix “the logon attempt failed for the remote desktop connection“, and how to Resolve Microsoft RDP Connection Black Screen.

Step 1: Prerequisite Remote Desktop Services Setup on Windows Server

  • Users need to be created in AD
  • You need a User Access group and
  • Computer groups are all created in AD to access this Terminal server.

Kindly stay put! I will be creating two new guides on how to deploy RDS using Quick Start and Standard deployment using Windows Server 2019. Please see this guide on Publish Remote Desktop Web Client: How to install HTML 5 Web Client for Microsoft RDS Server. Below is the core architecture of RDS.

RDS configuration

We have to add the Server we wish to configure RDS as shown below. Select the DNS name and search using the FQDN of the VM. Here is a comprehensive guide on “how to install RDS via Quick Start Deployment: Install, Publish, Update and Uninstall Remote Desktop Web Client“

Windows Server remote access

Click on the arrow and click on OK. Now on the Server Manager, navigate to the All Servers tab and click on it. Then it would display the two added servers.

Note: This server must be added with the domain administrator’s right if joined to the domain where special permissions are assigned and not the local administrator’s password.

Since we have all servers necessary for configuring the RDS, now let’s add the Remote Desktop Services role and features to the Terminal server itself.

You may be interested in these guides: How to change a password on a Remote Desktop session, How to Activate and Press Ctrl+Alt+Del in Anydesk for Remote Access Connection to Windows system, and how to Deploy MVC Application to AWS EC2 Using RDP Connection and Web Deploy.

Step 2: Installing the Remote Desktop Services Roles on the Test-RDPServer

Click on Manage,
Select add Roles and Features wizard,
The installation type is Remote Desktop Services Installation.

Remote Desktop setup

The deployment type chosen is a standard deployment

Screenshot displaying options for selecting deployment type in a Remote Desktop Services setup, featuring 'Standard deployment' and 'Quick Start' with descriptions for each.

Deployment Scenario is a Session-based desktop deployment 

Remote Desktop

Below are the roles services tat will be installed

RDS configuration

The RD connection Broker, select the Test-RDP Server VM and click on next

Windows Server remote access

For RD Web Access select the added server in step 1 which is the test-VM from the server pool.

Note:  By selecting this option, the web access role services are being installed to the test-VM server (which will act as our RD gateway)

Remote Desktop setup

For the RD Session Host, select the RDP from the Pool of servers

Remote Desktop

In the confirmation option, select restart the destination server automatically if required, or else you can’t proceed.

RDS configuration

Note: The server restarts afterward and continues with the installation and if completed successfully it displays success.

From the Server Manager, open Remote Desktop Services, and Test-RDP VM
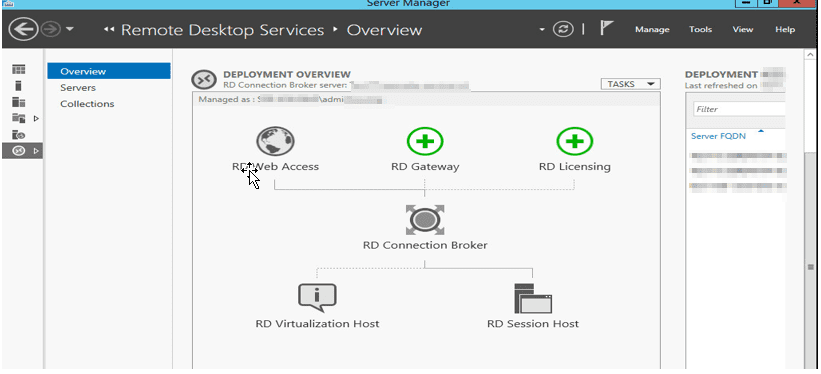
Windows Server remote access

Part 3: Here we currently have the RD Licensing option missing  

Add the licensing Server as the Terminal Server itself.

Remote Desktop setup

Click on next and select add and after it succeeds, click on close.

Remote Desktop

Now install RD Gateway server, this would be added server in step 1.  This is the test-VM
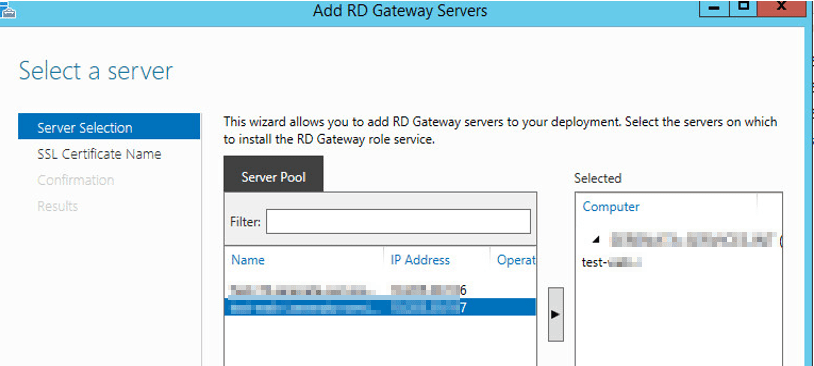
RDS configuration

Click on next and then Install the SSL certificates. This is needed to encrypt the communication between the RD Gateway server and remote desktop services clients.

Windows Server remote access

The entered URL will be used by the clients to access the remote gateway server.  Ensure you have an A record created for this in your DNS server.

Screen displaying the confirmation selections for adding RD Gateway servers, including server details and SSL certificate information.

And click on Add

Progress screen showing the installation of Remote Desktop Gateway role service on a server, indicating the installation status as 'In Progress.'

After this step, still on the Terminal Server (locate). Open the Remote Desktop Services
Navigate to the deployment overview and select Edit deployment Properties
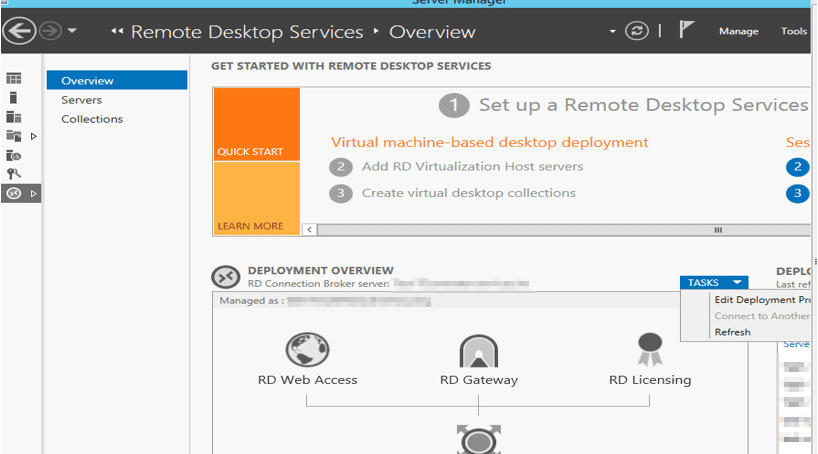
Screenshot of the Remote Desktop Services Overview interface, displaying options for virtual machine-based desktop deployment and details on RD Web Access, RD Gateway, and RD Licensing.

And Modify the deployment of these configurations
– Remote Desktop Gateway
– RD Licensing,
– RD Web Access:
– Certificates

Now type https://xxxxxxxxxx.com/rdweb to any web browser and access.
RDweb

For the certificates, we can see they are not configured
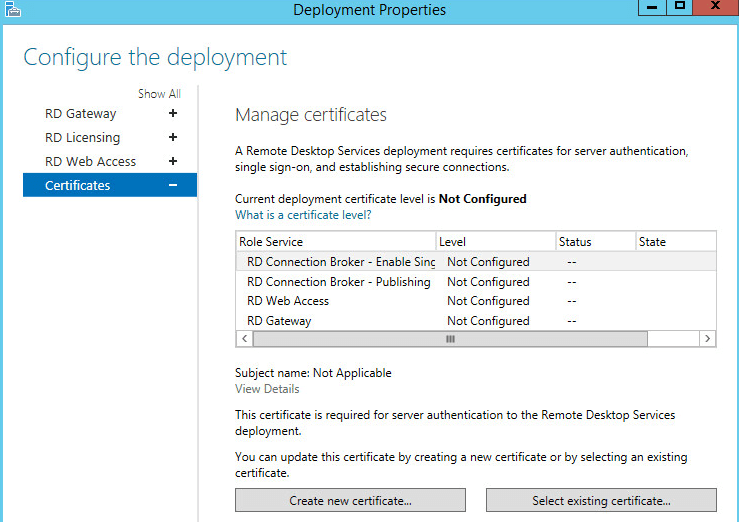
Screenshot of Remote Desktop Services deployment properties showing the certificate management section. The current deployment certificate level is 'Not Configured' for various role services, including Connection Broker and Gateway, with options to create or select existing certificates.

Click on select existing certificates and enter the password for all the role services not configured.

Create Collections

This is necessary to have users that are allowed to access the Remote Desktop Services and to let the RDS Know what to publish.

Open Server Manager,
- Click on Remote Desktop Services,
- Click on Session Collections,
- Click Tasks and
- Click Create Session Collection.
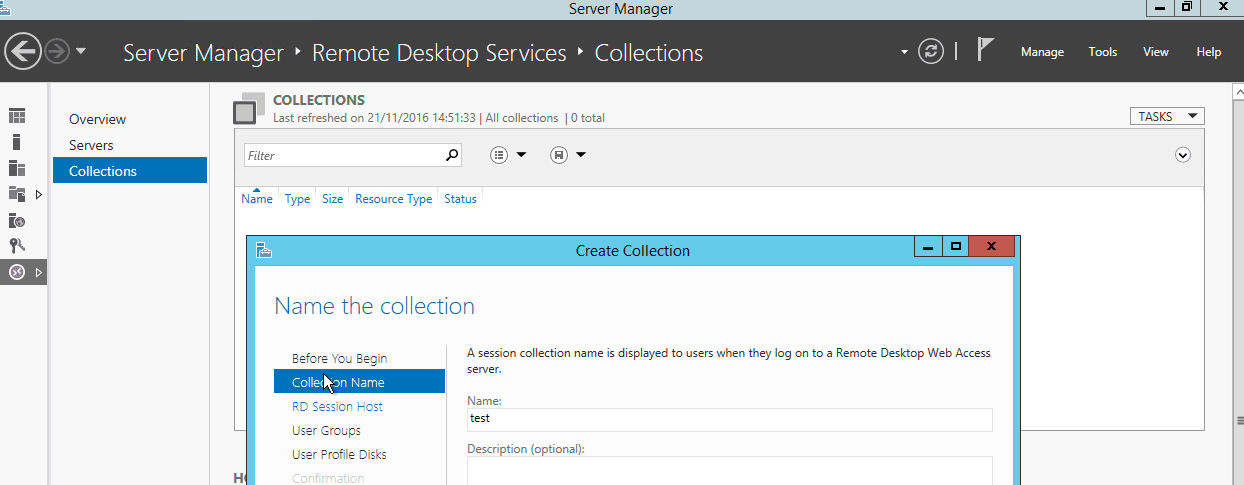
Screenshot of the Server Manager interface displaying the Remote Desktop Services collections section, with a focus on creating a new collection and naming it.

Specify the Collection name e.g. Test representing the Customer or user, and select the RD Session Host servers by click the add (arrow) button to add the users
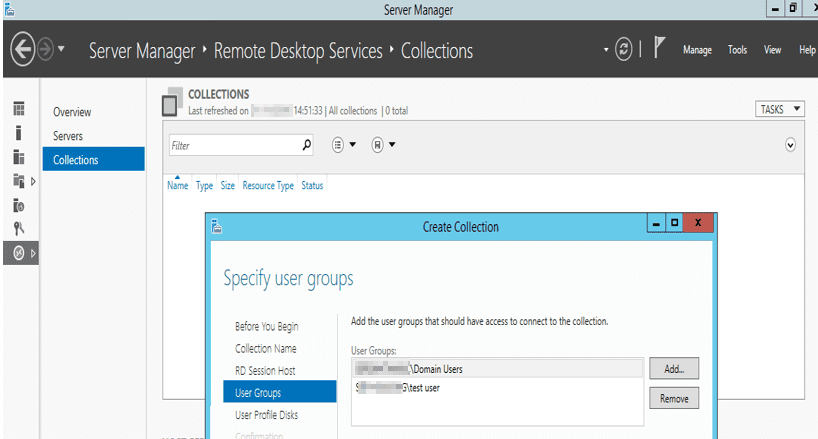
Screenshot of Windows Server Manager showing the Remote Desktop Services Collections section. The interface displays a 'Create Collection' dialog with options to specify user groups for connection.

Add the user group created to access the RDS Server to restrict access to the specified groups only.
And deselect User Profile Disks.

Screenshot of Windows Server Manager displaying Remote Desktop Services Collections settings, with a focus on user profile disk configuration.

Verify that all entered information is valid and click on create a collection as shown below.

Screenshot of the Server Manager interface, displaying the 'Confirm selections' section for creating a Remote Desktop Services collection. It includes fields for the collection name, user groups, and additional settings.

And finally if succeeded, you will be prompted with the screen below
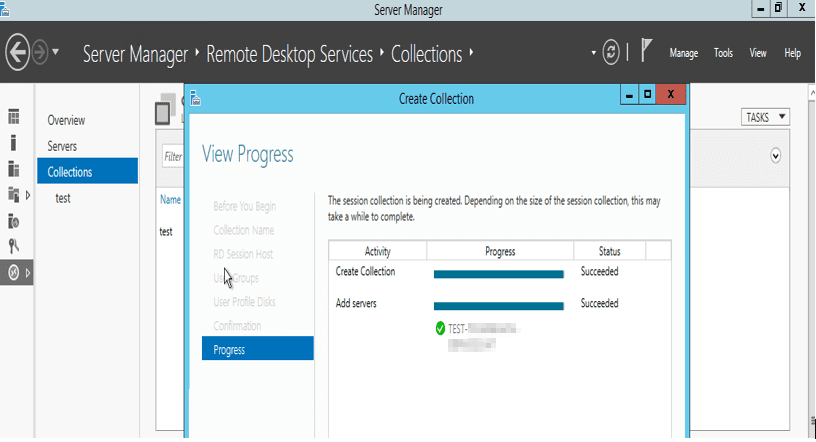
Server Manager interface showing the progress of creating a Remote Desktop Services collection.

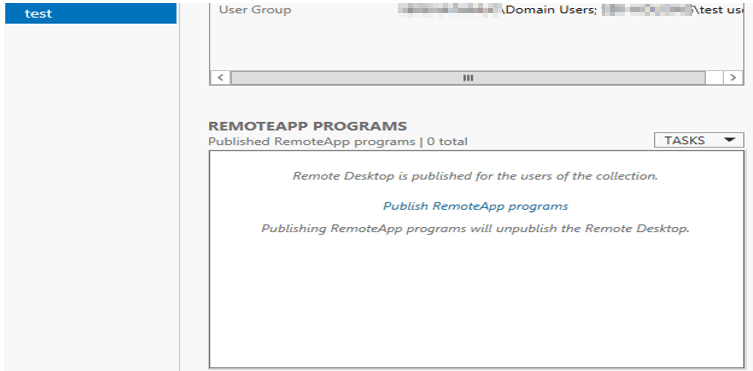
After completion, you should have your collection displayed as below.

Screenshot of Server Manager showing Remote Desktop Services collection properties and connections for the 'test' collection.

Now to publish Remote app programs

Screenshot of a software interface showing 'RemoteApp Programs' with options to publish Remote Desktop programs.

Select the created Collection
Navigate to remote App Programs
Select Tasks,
Click on publish Remote App as shown below
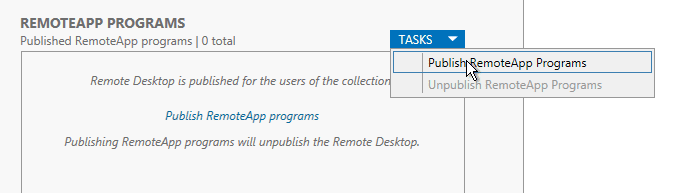
Screenshot of a user interface titled 'RemoteApp Programs', showing a task dropdown with options to 'Publish RemoteApp Programs' and 'Upload RemoteApp Programs'.

Select the Programs you wish to publish or add additional programs you wish to publish.
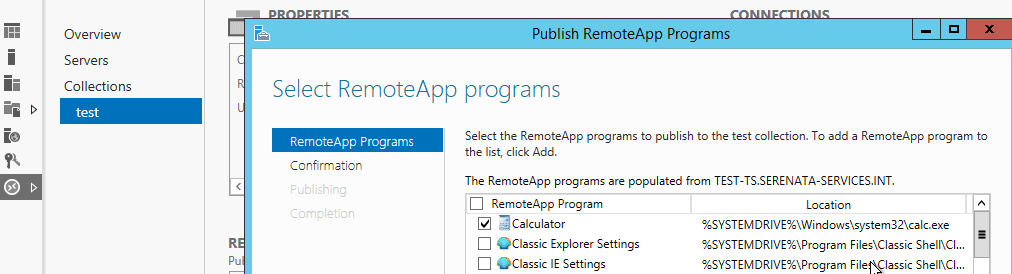
Screenshot of a software interface showing the 'Select RemoteApp programs' window with options for publishing applications including 'Calculator' and 'Remote Desktop Settings'.

Here we have the Calculator and WordPad selected as shown below

Screenshot of a software interface showing the 'Confirmation' step for publishing Remotely Accessed Programs, including a list of programs and their locations.

And click on publish and when completed it shows
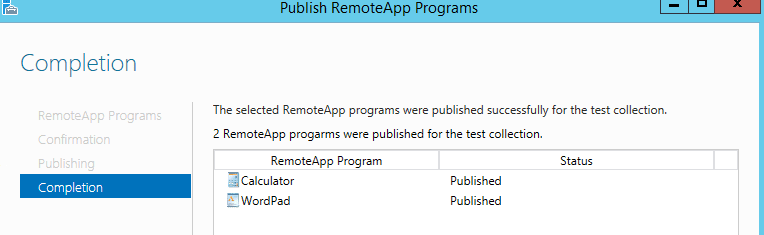
Completion screen showing successful publication of RemoteApp programs, including Calculator and WordPad, with their status listed as 'Published'.

Now you have the programs published under RemoteApp Programs

Part 4: On the test Web Server, (Acting as the RD Gateway)

Add both Servers to the Sever pool, which are test-TS and Test VM as well.
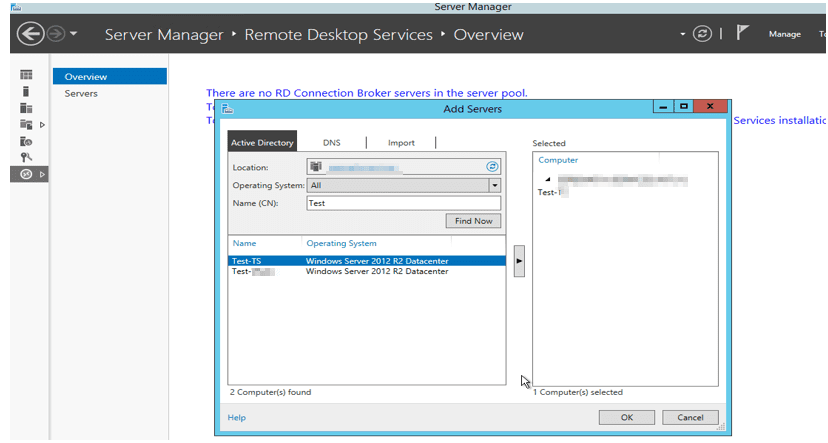
Screenshot of the Server Manager interface showing the Remote Desktop Services Overview, with options to add servers and details about server configuration.

Remote Desktop Services: Access the RD Gateway manager

Now access the RD Gateway manager to assign the user and computer group that can access the Terminal Server.
– Connect to the Test-Web-I server
– Open Remote Desktop Services,
– Click on Servers as shown below
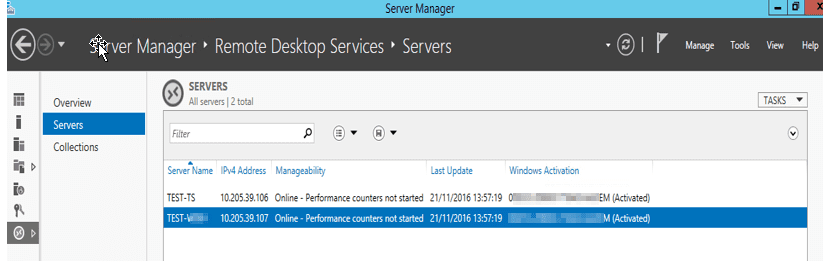
Screenshot of Windows Server Manager showing Remote Desktop Services with a list of server details including names, status, and last updates.

Select from the Server pool the Test VM and right-click on it
Select RD Gateway Manager
Expand the Test VM
Expand the Policies node and Select the  Connection Authorisation Policies as shown below. It allows you to specify users who can access the Server.
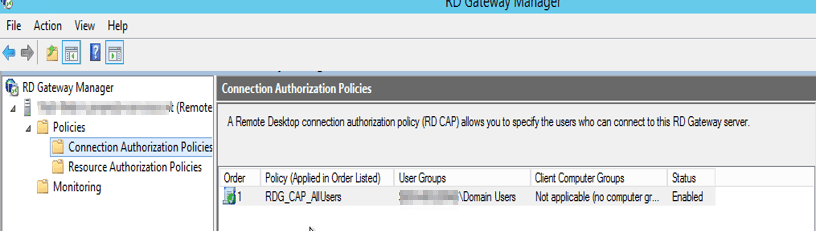
Screen capture of Remote Desktop Connection Authorization Policies in Windows Server, displaying configuration options and user groups.

On the connection Authorization Tab, double click on the Policy or right-click and select properties

Note: You can create new policies and disable the existing ones or modify the existing one. Here we are modifying it.
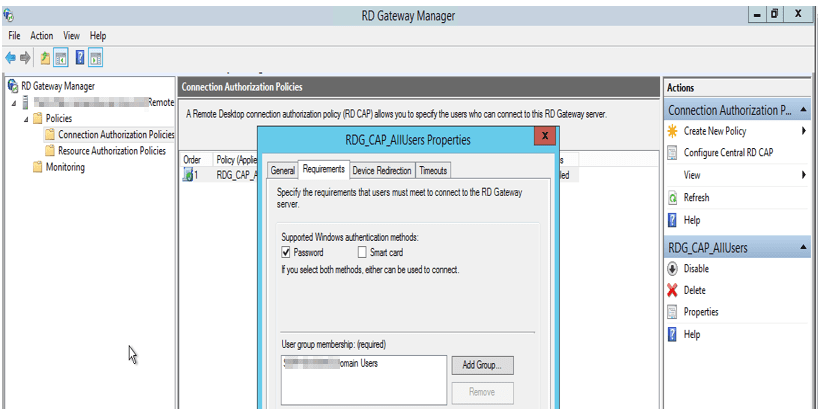
Screenshot of the RDS Gateway Manager interface, displaying the properties settings for the RDS CAP (Connection Authorization Policy) with options including device authentication methods.

Here navigate through the various properties TAB
Under General: You can give the policy whatever name you want
Requirements: Add the user group from the Active Directory. Here we have the test-User-Access group created (populated with the users) that can access this Terminal Server.
Navigate through the Device Redirection and Timeout to define the required idle timeout.  Click on apply and close.

Now select the second Resource Authorization Policies.
Here you also have to add the Remote User group,
And under Network resource, select the test-RDGW-Acc_Computer group created.  Click on apply and finish.
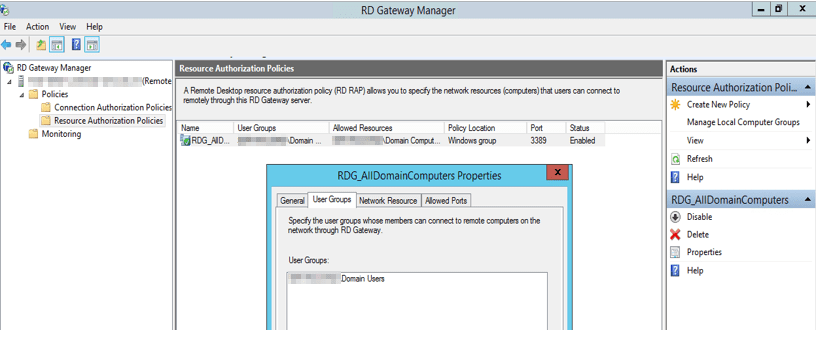
Screenshot of the RD Gateway Manager interface, displaying Resource Authorization Policies and a dialog for configuring computer properties.

Note: You can get details of connected users here from the Monitory as shown in the diagram.

I hope you found this blog post helpful on the steps to install Remote Desktop Services Setup on Windows Server. If you have any questions, please let me know in the comment session.

Thank you for reading this post. Kindly share it with others.

  • Share on X (Opens in new window) X
  • Share on Reddit (Opens in new window) Reddit
  • Share on LinkedIn (Opens in new window) LinkedIn
  • Share on Facebook (Opens in new window) Facebook
  • Share on Pinterest (Opens in new window) Pinterest
  • Share on Tumblr (Opens in new window) Tumblr
  • Share on Telegram (Opens in new window) Telegram
  • Share on WhatsApp (Opens in new window) WhatsApp
  • Share on Mastodon (Opens in new window) Mastodon
  • Share on Bluesky (Opens in new window) Bluesky
Windows Server Tags:RDP, rds, Remote Desktop Services, RemoteConnection, Terminal, Windows 10, Windows 11, Windows Server 2016

Post navigation

Previous Post: Configuring SimpleSAMLPHP
Next Post: How to launch an EC2 instance

Related Posts

  • Screenshot 2020 05 19 at 18.54.21
    Unable to find File Explorer in the Group Policy Editor when resolving the security tab missing under properties Windows Server
  • windows10update 1
    License file was not found in the specified path (Error 0xc1570103) Windows Server
  • fix frequent shutdown due to licensing issues Windows
    Fix Windows Server frequent disconnects and shutdown Windows Server
  • fix 0x00400d error
    Fix the request to add or remove features failed 0x00400d Windows Server
  • screenshot 2020 03 13 at 20.24.17
    How to install Cygwin packages from the command line Windows Server
  • Disable Open File Security Warnings on Windows
    How to Disable Open File Security Warnings on Windows Security | Vulnerability Scans and Assessment

More Related Articles

Screenshot 2020 05 19 at 18.54.21 Unable to find File Explorer in the Group Policy Editor when resolving the security tab missing under properties Windows Server
windows10update 1 License file was not found in the specified path (Error 0xc1570103) Windows Server
fix frequent shutdown due to licensing issues Windows Fix Windows Server frequent disconnects and shutdown Windows Server
fix 0x00400d error Fix the request to add or remove features failed 0x00400d Windows Server
screenshot 2020 03 13 at 20.24.17 How to install Cygwin packages from the command line Windows Server
Disable Open File Security Warnings on Windows How to Disable Open File Security Warnings on Windows Security | Vulnerability Scans and Assessment

Leave a Reply Cancel reply

You must be logged in to post a comment.

Microsoft MVP

vexpert-badge-stars-5

Virtual Background

VEEAMLEGEND

Categories

veeaam100

Veeam Vanguard

  • Invalid OS GUID e1781959302769
    Steps to Fix the “Invalid OS GUID” Error in MDT Windows
  • sync
    AD Connect Sync Service Not Running: Start ADSync to Continue AWS/Azure/OpenShift
  • Screenshot 2021 03 16 at 21.14.05
    Unable to locate the account: Fix call to DsGetDcNameWithAccount failed with return value 0x0000054B Windows Server
  • image 36
    Keepalive Settings: Understanding keepalive configuration Linux
  • azurv2 1
    How to scale up and scale out on Azure AWS/Azure/OpenShift
  • How to Decrypt Files and Folders Encrypted with EFS in Windows 10
    How to decrypt Files and Folders Encrypted with an Encryption File System (EFS) in Windows Windows
  • downloadzoom recording
    How to download a shared ZOOM recording JIRA|Confluence|Apps
  • Banner
    How to enable or disable Firefox Network Captive Portal Service Network | Monitoring

Subscribe to Blog via Email

Enter your email address to subscribe to this blog and receive notifications of new posts by email.

Join 1,757 other subscribers
  • RSS - Posts
  • RSS - Comments
  • About
  • Authors
  • Write for us
  • Contact
  • Advertise with us
  • General Terms and Conditions
  • Privacy policy
  • Feedly
  • Telegram
  • Youtube
  • Facebook
  • Instagram
  • LinkedIn
  • Tumblr
  • Pinterest
  • Twitter
  • mastodon
  • Bsky

Tags

Active Directory Azure Bitlocker Microsoft Windows PowerShell WDS Windows 10 Windows 11 Windows Deployment Services Windows Server 2016

Copyright © 2026 TechDirectArchive

Loading Comments...

You must be logged in to post a comment.