
To ensure compatibility with older applications, it’s essential to enable DotNet Framework in Windows 11, particularly version 3.5. While these framework versions, 2.0 and 3.5, may be considered outdated, they remain necessary for running programs developed with them. It’s crucial to enable these frameworks to handle potential compatibility issues that might arise on Windows 11. Please see the various methods to Install .NET Framework in Windows. Please see how to install Windows Subsystem for Linux on Windows 11 via the Command line, and Microsoft Store.
These outdated programs may require previous versions of the .NET Framework, a set of software libraries developers use to construct Windows apps and services. In many circumstances, your program will install but not run. You may receive a notice informing you that the .NET Framework 2.0 is required (for example).
Other times, the app will not launch at all, and you will have no idea why. Kindly refer to this guide for how to enable or disable DotNet Framework (NetFx3) via PowerShell, Control Panel, and DISM in Windows.
Even if you run the program in Compatibility Mode, you may still require the latest version of the .NET Framework. Microsoft has added .NET Framework installation as an optional Windows feature in Windows 11. Here’s how to activate the .NET Framework 3.5, 3.0, and 2.0 on Windows 11.
In addition, there are other related articles you can read about How to install and Update Azure PowerShell on your Windows PC, and how to Enable Secure boot and TPM on HyperV: How to fix “This PC Can’t Run Windows 11” on Hyper V.
Using Framework 2.0 and 3.5 on Windows 11
There are several methods for enabling the .NET Framework on your Windows 11 PC, but we’ll start with the simplest. To begin, click the Start button in the Taskbar or use the Windows key on your keyboard to bring up the Start menu. Enter optionalfeatures in the Start menu and choose the first result to open Windows Features dialog box.
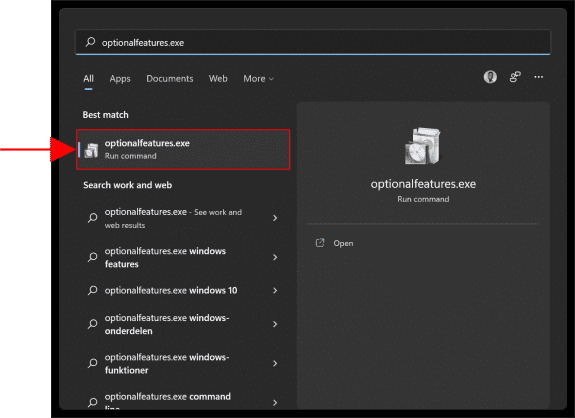
Make sure you type optionalfeatures as a single word with no spaces. Don’t select Optional Features (with spaces), as this is something entirely different.
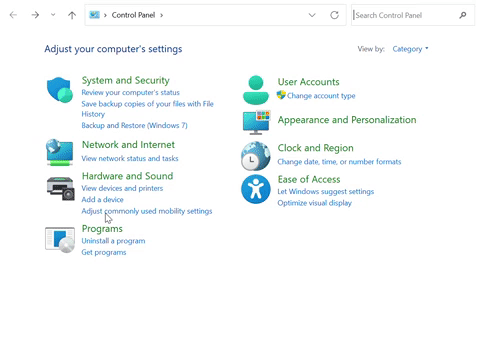
Alternatively, you can open the Windows Features by going to the control panel. Click the Start button in the Taskbar or use the Windows key on your keyboard to bring up the Start menu. Enter ‘cpl’ which opens the control panel.
In the Control Panel window, click Programs, then click the ‘Turn Windows features on or off’ under the Programs and Features.

Click Programs, then click the ‘Turn Windows features on or off’ under the Programs and Features.
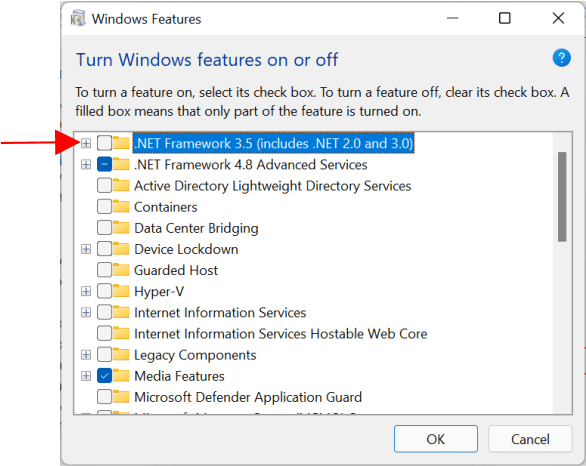
These two processes open up the Windows Features dialog box as shown below. On the Windows Features dialog box click ‘.NET Framework 3.5 (includes .NET 2.0 and 3.0)‘ from the list, and then click OK.
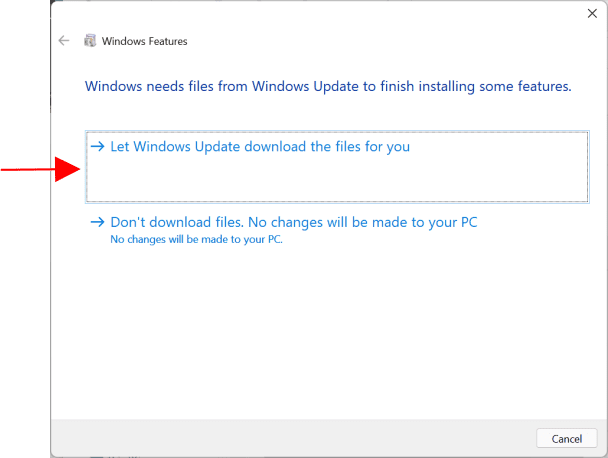
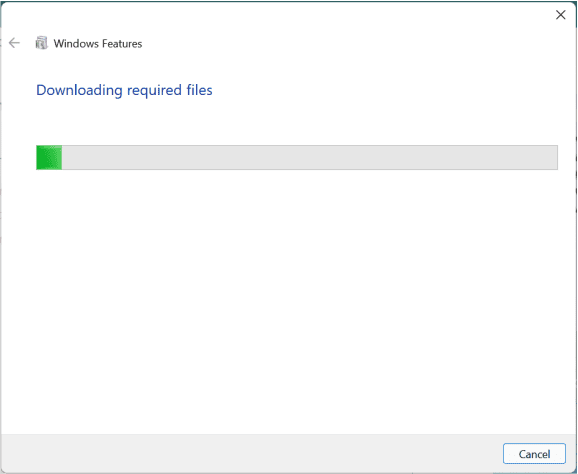
Following that, a box will appear informing you that Windows needs to download files from Windows Update in order to finish the operation. Click ‘Let Windows Update download the files for you’.
While the essential components are being downloaded and installed, a progress bar will show. Allow time for this to be completed.
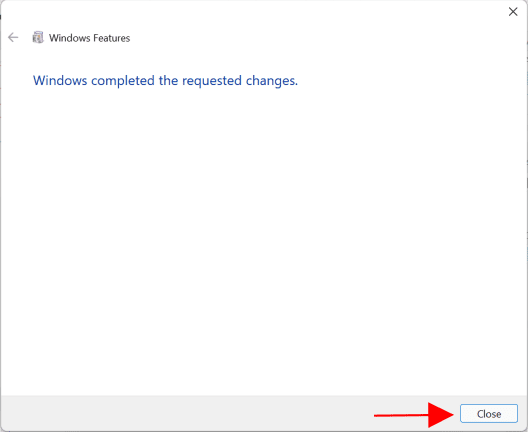
When Windows has finished installing the.NET Framework, you will get a confirmation message (as seen in the screenshot below). To conclude, click the Close button. You should not have to restart your computer, but you may want to do so just in case.
Using Command Prompt
Click the Windows key to open the start menu and enter ‘cmd‘ to run the Command Prompt as an administrator.

Execute the following command, substituting DriveLetter with the letter for the Windows 11 installation disk (usually drive letter C).
Dism /online /enable-feature /featurename:NetFx3 /All /Source:DriveLetter:\sources\sxs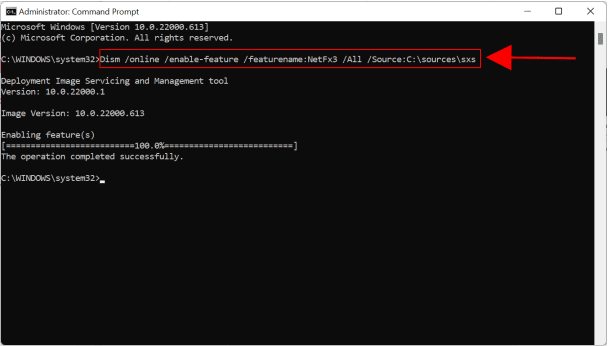
The .NET Framework 3.5 will now be enabled.
How to Install .NET Framework 3.5 using PowerShell
PowerShell may also be used to install .NET Framework 3.5. It functions similarly to Command Prompt. However, the installation commands are different.
- Search for ‘Windows PowerShell‘ in the start menu and run as administrator.

Enter the following command below.
Enable-WindowsOptionalFeature -Online -FeatureName "NetFx3"
This will download, install, and activate the.NET Framework 3.5 on your computer.
How to Download and install .NET Framework (using web installer)
You may also use an online installer to install.NET Framework 3.5. As a result, an internet connection will still be necessary. Download the web installer by clicking the link below.
When the web installer has been downloaded, right-click it and select Run as administrator. The installation wizard will now launch. Click ‘Download and install this feature.‘

The process will then download and install .NET 3.5 for you. When the wizard is finished, click the close button.
How to install 3.5 Offline
To enable DotNet Framework in Windows, you can also install .NET Framework 3.5 on devices without internet using Command Prompt, sourcing files directly from a Windows 11 ISO image, as described above.
Note: The ISO file must be for the same Windows version on which you are installing .NET; otherwise, mismatched source files might cause the installation to fail or install an incorrect .NET version.
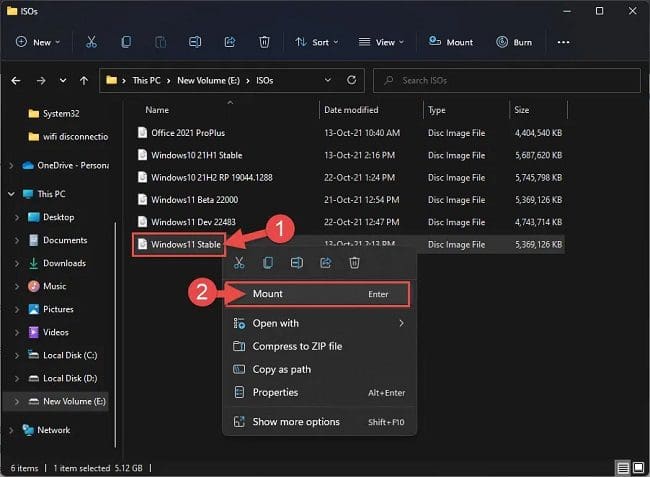
- First, you must mount the Windows 11 ISO file on your PC. If you don’t already have an ISO file, you can get one here. To mount an image, right-click it and select Mount from the menu bar.
To enable DotNet Framework in Windows, once the ISO image is mounted, utilize this command to install .NET Framework 3.5 from the source files, even without an internet connection. Replace “DriverLetter” with the corresponding drive letter of the mounted ISO file.
Dism /online /enable-feature /featurename:NetFx3 /All /Source:DriveLetter:\sources\sxs
If you’re looking to Various methods to Install .NET Framework in Windows, I trust you found this blog post useful. If you have any questions, feel free to ask in the comment session below.


