In this guide, we will look at using the Windows Registry and Group Policy editor to disable Bing search, so if the Registry method does not work, you can fall back on the Group Policy Editor method. Microsoft opted to combine Bing Search with the File Explorer search bar in Windows 10, which resulted in a poor experience with an extremely sluggish response. Similarly, the Start Menu search in Windows 11 displays Bing search results alongside local ones. To have a better understanding of what windows registries are, see what is Registry Editor and how to access the registry hives.
When you search for a program or a file, you are presented with “Search the Web” results, which take too long to load and needlessly interfere with the local search. So, if you want to disable Bing Search results from Windows 11 or Windows 10, simply follow the instructions below.
Note: Before editing the Windows registry and making changes, make a backup of the registry. This will allow you to undo any modifications you made in case something goes wrong.
Other related articles you can read about: How to display Windows system information via the Windows registry, What is Cortona: How to disable Cortana via the registry or GPO, if you are looking to upgrade to Windows 11, see the Windows 11 System Requirements and How to upgrade Windows 10 with an unsupported CPU and TPM 1.0 to Windows 11.
How to Disable Bing Search by Editing the Registry in Windows 11
First, press the Windows key and type in ‘regedit’and click run as administrator to open the registry. Alternatively, you can use the ‘Windows key + R’ to open the run dialog box, type in ‘regedit’ then hold down ‘ctrl + shift’ key and click the OK button to run as administrator.

Next, copy the below path and paste it into Regedit’s address bar. See the following article on how to search through the Windows registry.
Computer\HKEY_CURRENT_USER\Software\Policies\Microsoft\Windows
Now, right-click on “Windows” in the life sidebar and create a new ‘Key’, then rename the key to Explorer.

Next, right-click the Explorer key and select New > DWORD (32-Bit) Value. This DWORD value will help you remove Bing search from the Windows 11 Start Menu.

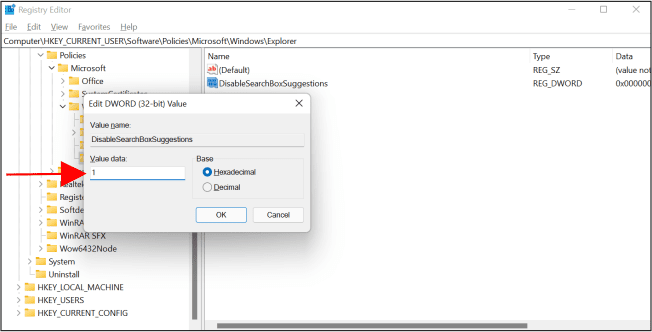
Rename the new entry to ‘DisableSearchBoxSuggestions’. Now, right-click the DisableSearchBoxSuggestions and click ‘Modify’, then change the “Value data” to 1.
Finally, restart your computer, and you will see that Bing search results no longer display in the Windows 11 Start menu.

How to Disable Bing Search from Windows 11 with Group Policy Editor
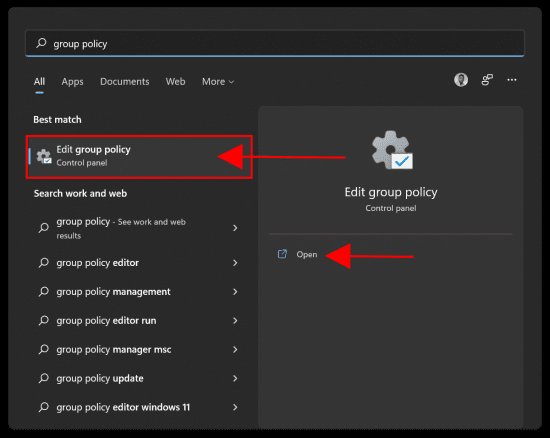
This group policy editing guide is applicable to both Windows 11 and Windows 10. Start by launching the group policy editor by clicking Start or press the windows key then enter ‘group policy’. Click the ‘Edit group policy’ shortcut that appears (or press Enter).
Next, open “Administrative templates” under “Computer Configuration” and move to Windows Components -> Search on the left pane.

Click Search and double-click ‘Allow Cortana’ and set to Disable. Press Ok when done.

Double-click ‘Do not allow web search’ and set to Enable. Press Ok when done.

Lastly, double-click ‘Don’t search the web or display web results in Search’ and set to Enable. Press Ok when done.

You will have to restart your computer for your changes to take effect.

How to Deactivate in the Start Menu in Windows 10
Begin by launching the Registry Editor by clicking Start and entering “regedit.” Click the “Registry Editor” shortcut that appears and double-click it (or press Enter).

Using the left pane, navigate to the following key. You may also put the following address into the address bar of the Registry Editor and hit Enter:
Computer\HKEY_CURRENT_USER\SOFTWARE\Policies\Microsoft\Windows\Explorer
Create a new DWORD value by right-clicking in the right pane and selecting New > DWORD (32-bit) Value.

Name the value “DisableSearchBoxSuggestions”. Double-click it and set its value data to “1”.

You can now exit the Registry Editor. Searching your start menu should now return only local results. If the changes do not take effect right away, restart your computer.
I hope you found this blog post helpful. If you have any questions, please let me know in the comment session.