
SSH works by authenticating based on a key pair, with a private key being on a remote server and the corresponding public key on a local machine. When the keys match, access is granted to the remote user. The word SSH stands for Secure Shell and is a method used to establish a secure connection between two computers. In this article, you will learn how to generate SSH keys in Windows 10. Please see how to SSH into a VM created using Azure CLI or GUI.
Generate SSH Keys in Windows 10 using PuTTY
Kindly follow the steps below to generate SSH Keys in Windows 10. See this guide on how to generate SHH Keys in Windows 11.
Step 1: Install PuTTY on Windows
Click to download the installer for PuTTY. Double-click the downloaded file and follow the installation wizard to finish the installation.
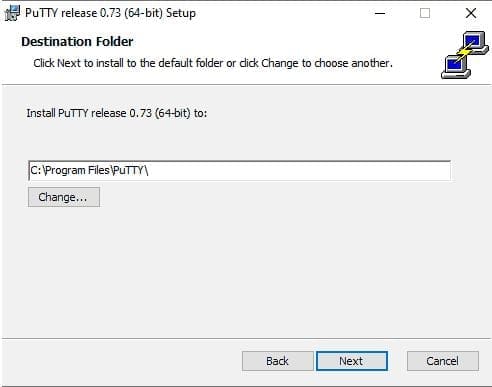
On the initial dialog of the installation wizard, click Next. Select the destination folder. Use the default installation configuration unless you have a specific need to change it. Click Next to move on to the next screen.
Select PuTTY product features to be installed. Stick to the defaults if you do not have any specific needs. Click Next to move on to the next screen.

Once the process completes, click Finish to exit the installation wizard.
Also, refer to some of the related guides: How to How to install ssh key based authentication in Linux, how to install and configure Ansible on Ubuntu, how to configure a remote server (windows) to Support Ansible, and how to install Kerberos packages in Windows via Cygwin.
Step 2: Run the PuTTY SSH Key Generator
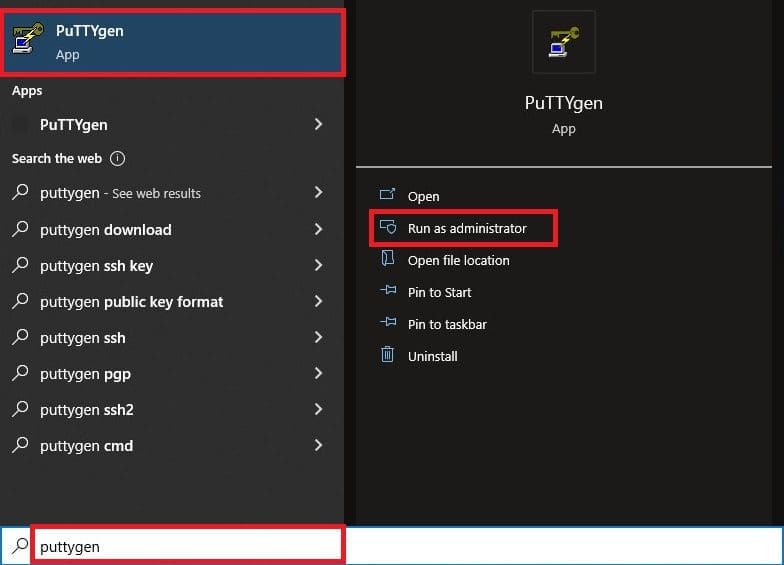
Press the Windows key, and then type puttygen.
Under Best Match, right-click PuTTYgen, and then click Run as administrator. If prompted, click Yes on the Do you want to allow this app to make changes to your device? pop-up.
Step 3: Use PuTTY to Generate a Pair of SSH Keys
The process outlined below will generate RSA keys, which is a classic and widely-used type of encryption algorithm. Whereas the PuTTY keygen tool offers several other algorithms – DSA, ECDSA, Ed25519, and SSH-1 (RSA).
If you require a different encryption algorithm, select the desired option under the Parameters heading before generating the key pair.
- In the PuTTY Key Generator window, click Generate.
- Move the cursor around in the gray box to fill up the green bar.

Save the public key:
- Click the button labeled Save public key.
- Choose a location to save the key.
- Give the key a name (e.g., putty_Genkey.pub)

Save the private key:
- Click the Conversions menu at the top.
- Click Export OpenSSH key.
- You’ll be asked if you want to save a key without a passphrase. Click Yes.
- Choose a location to save the key (usually the same folder as the public key).
- Give the key a name (e.g., putty_key).

Using Your SSH Keys
To use your SSH keys, copy your public SSH key to the system you want to connect to. Use your private SSH key on your own system. Your private key will match up with the public key, and grant access.
Please see how to Deploy MVC Application to AWS EC2 Using RDP Connection and Web Deploy, how to associate SSH Public key with Azure Linux VM, and how to configure OpenSSH Server.
Generate an SSH key in Windows 10 with OpenSSH Client
Step 1: Verify if OpenSSH Client is Installed
First, check to see if you have the OpenSSH client installed:
- Open the Settings panel, then click Apps.
- Under the Apps and Features heading, click Optional Features.

Scroll down the list to see if OpenSSH Client is listed.
- If it’s not, click the plus-sign next to Add a feature.
- Scroll through the list to find and select OpenSSH Client.
- Finally, click Install.

Open Command Prompt
Press the Windows key, and Type cmd. Under Best Match, right-click Command Prompt. Click Run as Administrator.

If prompted, click Yes in the Do you want to allow this app to make changes to your device? pop-up.
Please see how to Generate SSH keys in Windows 11, How to use Azure Command-line Interface, and What is SAML–Security Assertion Markup Language.
Step 2: Use OpenSSH to Generate an SSH Key Pair
In the command prompt, type the following:
ssh-keygen
By default, the system will save the keys to C:\Users\your_username/.ssh/id_rsa. You can use the default name, or you can choose more descriptive names.
This can help distinguish between keys, if you are using multiple key pairs. To stick to the default option, press Enter.
Note: If a file with the same name already exists in the same folder location, you will be asked whether you want to overwrite the file.You’ll be asked to enter a passphrase. Hit Enter to skip this step. The system will generate the key pair, and display the key fingerprint and a randomart image.

Open your file browser. Navigate to C:\Users\your_username/.ssh.
You should see two files. The identification is saved in the id_rsa file and the public key is labeled id_rsa.pub. This is your SSH key pair.

Note: Normally, the public key is identified with the .pub extension. You can use Notepad to see the contents of both the private and public key.I hope you found this blog post helpful on how to Generate SSH Keys in Windows 10. Please let me know in the comment session if you have any questions.


