Skip to content

TechDirectArchive

Hands-on IT, Cloud, Security, Veeam & DevOps

  • Home
  • About
  • Advertise With US
  • Contact
  • Reviews
  • Toggle search form

Azure Storage: How to create Blob Storage and upload files

Posted on 24/11/202117/05/2026 Dickson Victor By Dickson Victor No Comments on Azure Storage: How to create Blob Storage and upload files
  1. Home
  2. AWS/Azure/OpenShift
  3. Azure Storage: How to create Blob Storage and upload files
aks-1

The Azure storage account contains all of your Azure Storage data objects which include: blobs, files, queues, and tables. In this guide, you will learn about Azure Storage: How to create Blob Storage and upload files. Please see how to install Kerberos packages in Windows via Cygwin, how to configure a remote server (windows) to Support Ansible, and how to deploy Azure VMware solution private cloud, how to create a Traffic Manager profile in Azure, and how to improve website response using Traffic Manager.

The storage account provides a unique namespace for your Azure Storage data that is accessible from anywhere in the world over HTTP or HTTPS.

Also here are some of my related guides: How to manage azure resource manager resource groups by using Azure CLI, and how to configure Azure resources with tools, how to install and configure Ansible on Ubuntu.

Create a storage account

A storage account provides access to Azure Storage services. The storage account constitutes the highest level of the name-space for accessing every of the Azure Storage service components like Azure Blob, Queue, etc. To create a storage account, you should be either the service administrator or a co-administrator for the associated subscription.

Go to the Azure Portal. In the search bar, type and then select Storage account. In the virtual network, click the + Create button then create a Storage account. Type the following below

- Choose your subscription.
- Create a new Resource Group name (rg-cdn).
Instant details
- Storage account name – Enter a name for the account using (storagecdn2)
- Region – East US
- Performance – Standard
- Redundancy- Locally-redundant storage (LRS)
Click Next : Advance >
Advance tab
Security – Secure transfer required and blob public access select enabled.
Select Review + create
Capture-72

Storage account successfully created.
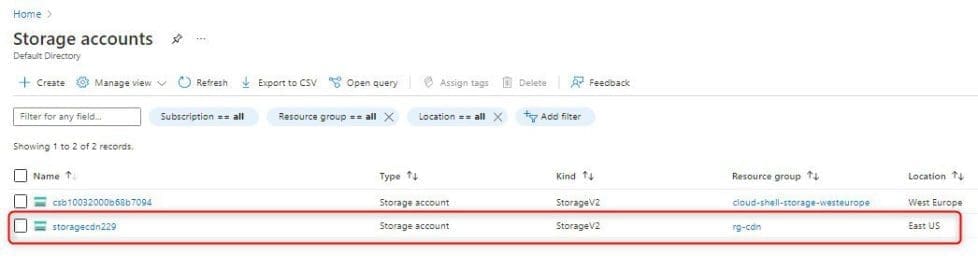
Capture-73

Please see how to install Ansible on Windows with Cygwin, and how to automate infrastructure deployments in the cloud with ansible and azure pipelines.

How to create a blob container

Click on the new created storage account, under data storage select containers and then click on + Container. And do the following below

New container wizard
- Enter a container name (containercdn)
- Public access level – container (anonymous read access for containers and blob)
- Click create.
Capture-74

The container was successfully created.
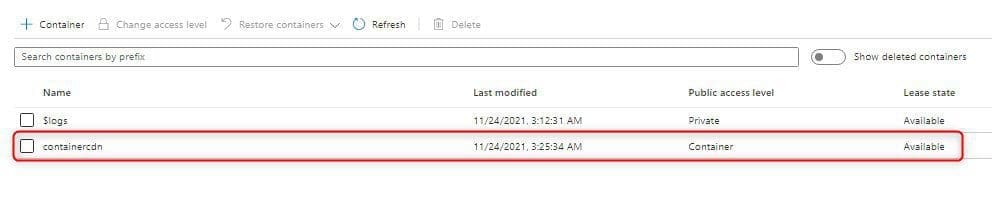
Capture-75

Here are some exciting guides: How to Install a Windows Server Container Host, and how to Upload Batch Files to Azure Storage Account Using Azure CLI. Also, see how to determine What is taking up by Synology NAS Volume Space.

Upload Images to Container

Click on the newly created containdercdn inside the storage account, choose the Upload tab, and then click on the folder icon next to the file, to select a file from your local computer.

Go to Advanced Under upload to folder type a folder name (images) and then click upload.

Capture-76

Below is the file and folder you just created. Click on the folder and select the file name, then click on the URL to copy the link of the file, paste it on the web browser to preview the file

Capture-77

Below is the preview link of the file uploaded on the web browser

Capture-78

The above articles show how to create Azure storage, blob storage & Upload Files. Please see Running PowerShell remotely on Azure VMs, Running PowerShell remotely on Azure VMs, Hosting Static Website and Versioning on AWS S3, and how to Change the default Save and Download Location in Windows.

I hope you found this article useful on Azure Storage: How to create Blob Storage and upload files. Please let me know in the comment section if you have any questions.

5/5 - (1 vote)

Thank you for reading this post. Kindly share it with others.

  • Share on X (Opens in new window) X
  • Share on Reddit (Opens in new window) Reddit
  • Share on LinkedIn (Opens in new window) LinkedIn
  • Share on Facebook (Opens in new window) Facebook
  • Share on Pinterest (Opens in new window) Pinterest
  • Share on Tumblr (Opens in new window) Tumblr
  • Share on Telegram (Opens in new window) Telegram
  • Share on WhatsApp (Opens in new window) WhatsApp
  • Share on Mastodon (Opens in new window) Mastodon
  • Share on Bluesky (Opens in new window) Bluesky
  • Share on Threads (Opens in new window) Threads
  • Share on Nextdoor (Opens in new window) Nextdoor
AWS/Azure/OpenShift Tags:Azure, Azure Blob container setup, Azure Blob Storage tutorial, Azure Storage configuration steps, Azure Storage file upload guide, Azure Storage how to create Blob Storage and upload files, create a blob container, create Azure Blob Storage, how to use Azure Blob Storage, upload data to Azure Blob, upload files to Azure Blob

Post navigation

Previous Post: Linux Boot Process Explained Step by Step for Beginners
Next Post: How to install NFS Server on Windows Server

Related Posts

  • mfa
    Microsoft Azure Multi-Factor Authentication (MFA) AWS/Azure/OpenShift
  • Azure Backup Copy 1
    How to Delete Backup Job in Recovery Services Vault AWS/Azure/OpenShift
  • Slide2 1
    How to deploy WordPress on Azure App Service AWS/Azure/OpenShift
  • sonarcloud
    How to Integrate SonarCloud with Azure DevOps Pipeline AWS/Azure/OpenShift
  • computefeature
    How to use Azure Compute Gallery AWS/Azure/OpenShift
  • AzureCloudShell
    Provisioning Azure Resources using Azure Az PowerShell Cmdlet from Cloud Shell AWS/Azure/OpenShift

More Related Articles

mfa Microsoft Azure Multi-Factor Authentication (MFA) AWS/Azure/OpenShift
Azure Backup Copy 1 How to Delete Backup Job in Recovery Services Vault AWS/Azure/OpenShift
Slide2 1 How to deploy WordPress on Azure App Service AWS/Azure/OpenShift
sonarcloud How to Integrate SonarCloud with Azure DevOps Pipeline AWS/Azure/OpenShift
computefeature How to use Azure Compute Gallery AWS/Azure/OpenShift
AzureCloudShell Provisioning Azure Resources using Azure Az PowerShell Cmdlet from Cloud Shell AWS/Azure/OpenShift

Leave a Reply Cancel reply

You must be logged in to post a comment.

Microsoft MVP

VEEAMLEGEND

vexpert-badge-stars-5

Virtual Background

GoogleNews

Categories

veeaam100

Veeam Vanguard

  • redirects3endpoint
    How to redirect requests for your bucket’s website endpoint to another bucket or domain AWS/Azure/OpenShift
  • Retieve BitLocker Recovery Keys from microsoft sql
    Get MBAM BitLocker Recovery Keys from Microsoft SQL Server Windows
  • Webp.net resizeimage 7
    Create a new Azure Disk: How to create and attach an extra Disk to Azure Virtual Machine AWS/Azure/OpenShift
  • AzureMonitor
    Configure Azure Monitor for VMs on Azure Stack Hub AWS/Azure/OpenShift
  • sdf
    What is GPO and how can it be launched in Windows Windows Server
  • image 29
    How to force your website to redirect from HTTP to HTTPS using a web.config file Network | Monitoring
  • wacxx
    How to set up System Insights on Windows Admin Center Windows Server
  • Dellupdate 1
    Fix for security vulnerabilities in the BIOS firmware for some Intel Processors Windows

Subscribe to Blog via Email

Enter your email address to subscribe to this blog and receive notifications of new posts by email.

Join 1,801 other subscribers
  • RSS - Posts
  • RSS - Comments
  • About
  • Authors
  • Write for us
  • Advertise with us
  • General Terms and Conditions
  • Privacy policy
  • Feedly
  • Telegram
  • Youtube
  • Facebook
  • Instagram
  • LinkedIn
  • Tumblr
  • Pinterest
  • Twitter
  • mastodon

Tags

AWS Azure Bitlocker Microsoft Windows PowerShell WDS Windows 10 Windows 11 Windows Deployment Services Windows Server 2016

Copyright © 2025 TechDirectArchive

Loading Comments...

You must be logged in to post a comment.