
In this post, I will show you how to add and remove RDS Collection in Windows Server. I will be doing this demonstration using Windows Server 2019. The same steps in this article apply to other versions of Windows Server such as Windows 2016, and 2022 when adding and removing RDS collection. To stay informed with the knowledge of RDS Collection, it is important to discuss what RDS collection is about in detail. An RDS Collection is a dynamic pool of RDS session hosts. Depending on the load, RDS host servers are added to and deleted or removed from the pool. Kindly refer to these related guides: How to install RDS via Quick Start Deployment: Install, Publish, Update and Uninstall Remote Desktop Web Client, and How to fix the issue “The remote session was disconnected because there are no Remote Desktop License Servers available to provide a license”.
By examining the average CPU consumption across all active hosts in the Collection, the system calculates the load. If you need to "Shadow" users' sessions or give them messages while serving as a terminal server administrator, having RDS collections might be quite helpful. Additionally, this aids in controlling access to the terminal servers. With the RDS collection, the administrator has direct control over which users have access to which collections. This way, you can create one group. You can read more about RDS in the following related articles: RDS client access licenses: How to install a new Per User Remote Desktop Services license, and Remote Desktop Services: How to Remove and Manage Terminal Server licenses from an RDP client with PowerShell.
RDS Capabilities
Remote Desktop Services (RDS) allows you to manage user access in a Remote Desktop Services (RDS) deployment. With RDS, you can create users and groups in Active Directory and also assign users and groups to collections.
These users can remotely access graphical desktops and Windows applications from various types of client applications and devices, including non-Windows devices, via Microsoft’s Remote Desktop Protocol (RDP). In the next section below, the steps to add and remove RDS Collection will be discussed.
Adding one Server to Another Server
To enable two servers to easily communicate and share information, they must be in the same network and sometimes added to an existing DC.
To add two servers together, let’s say in my case here I have a server name prod-vm-01 and app-vm-01. Both servers must be in the same network.

From the Server Manager screen, click on add other servers to the manage. Make sure you select the domain to which you want to add other servers. Under the operating system option, you can choose to select based on your preference or leave it at all and click on Ok to add the server.

Add RDS Collection
To add RDS Collection use the below steps:
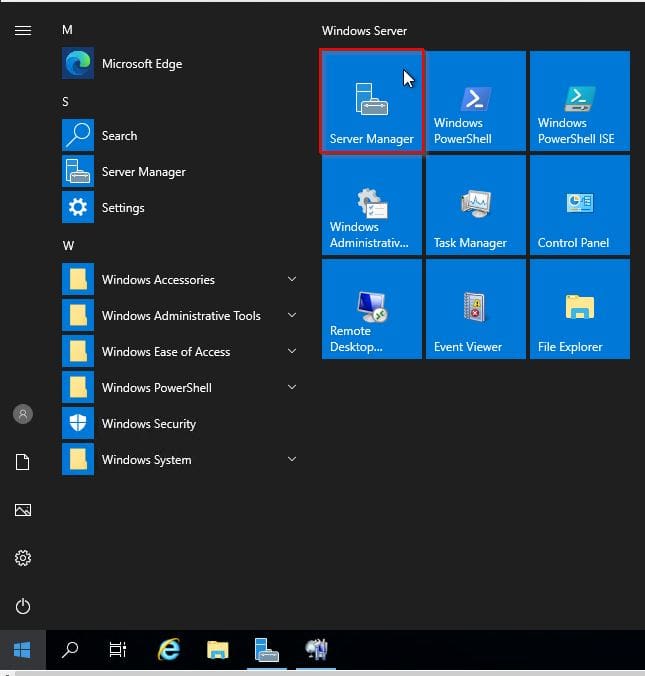
Step 1: Press the Windows logo on your key and locate Server Manager in the start-up menu to access the collection.
Step 2: Once the server manager has opened, "Remote Desktop Services" tab , navigate to it. Once you’re there, double-check that the servers you want to add to your collection are listed in the “Servers” section. If they aren’t already there, add the Server accordingly.


Step 3: Create RDS Session Collection
Next proceed to the Collections tab, go to the top right corner of the screen and click on Tasks- > Create Session Collection as shown in the below screenshot:

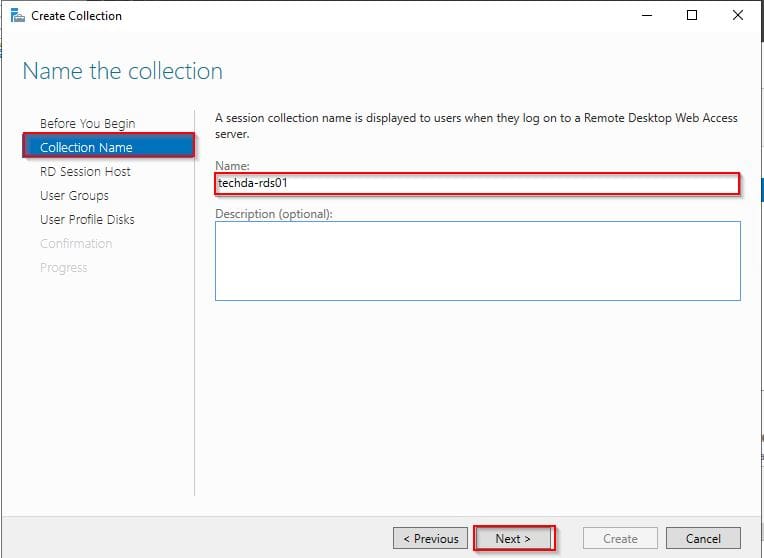
Step 4: Navigate to the next screen, which will present you with the "Before you Begin" screen. Click on Next to follow the prompt and proceed to the wizard. While in the wizard screen type in a suitable collection name as shown in the screenshot below:

Step 5: Specify the RD Session Host Server
Please select the relevant servers from the server pool listed that you like to become part of the collection. For example, you may have multiple terminal servers that you may want to load balance between. This is where you would add them.
Once you have added the servers, please press next. In our case, we don’t currently have a list of servers since it’s for demo purposes. In reality, the image below is where you find a list of other servers you can add to your servers.

Step 6: Add the Domain Group
In this next screen, you will be asked to select the user groups. This is the group that will be granted access to the collection’s servers. If all domain users must have access, then add the group “Domain Users” to this list. On the following screen, you will be asked if you want to create user profile disks.
This section is entirely up to the domain administrator. If they have already configured redirected folders, there is no need to use user profile disks. This option is usually left unchecked, and folder redirection is used. But if the administrator wants to use user profile disks, this is the time to enable them.
Step 7: The next screen will confirm all of the settings you’ve chosen and ask you to confirm you’re ready to proceed. Once you are satisfied, continue with the setup, and it will be completed.
In Server Manager, the collection will now be listed under the "Collections" tab.
Remove RDS Collections
The process of removing a collection for any reason is quite simple. Please follow the steps discussed below.
Navigate to the collections tab. In the top area of the tab, you should see the collections that you have added.
– Right-click on the collection you want to remove and select "remove collection."
A window will be prompted to confirm that you want to remove it, once you confirm it, the collection will be deleted.I hope you found this blog post helpful. Now you have learned how to add and remove the RDS collection. If you have any questions, please let me know in the comment session.


