In this article, you will learn how to Fix SmartScreen can’t be reached right now on Windows 10 and 11. When it comes to Microsoft products, security is crucial, which is why Windows 10 and 11 have the built-in security feature SmartScreen. It’s an anti-malware feature that runs in the cloud and stops computers from going to harmful sites or installing malware. Please see these exciting guides: Enable Microsoft Defender SmartScreen: How to prevent Exe files from getting deleted randomly in Windows 10 and 11, how to Add Dynamic Wallpaper controlled by time on Windows 10 and 11, and how to use the Widgets feature on Windows 11.
The process involves connecting to Microsoft’s servers whenever an application installation is attempted. Therefore, it can check whether the app you want to install is free of harmful code before you do so.
For more on Windows security features, read: How to restore quarantined files in Microsoft Defender Antivirus, How to find and remove Malware with Microsoft Defender Offline, how to remove Microsoft Defender update on Windows 10 and Windows Server image.
Windows SmartScreen
It’s an extra safeguard that Microsoft provides to its users. Since SmartScreen connects to Microsoft’s servers every time it scans, it can tell you about new threats even if you already have an antivirus program installed.
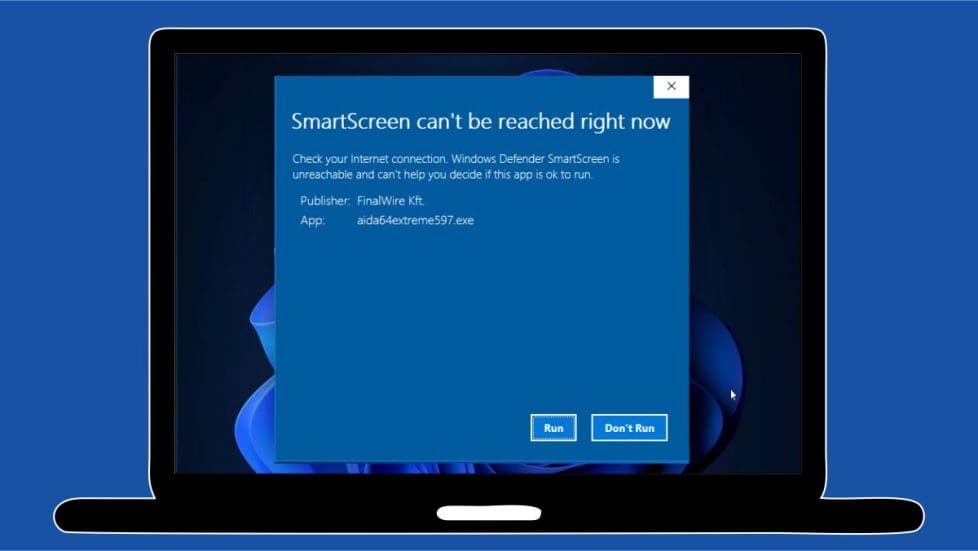
However, if SmartScreen is unable to establish a connection with Microsoft, an error notice reading “SmartScreen can’t be reached right now” will be shown. It will also reveal the app’s developer and name, and you will be provided with the option to “Run” or “Don’t run” the app.
So, what should you do if you see this error when trying to install an application? You can fix the SmartScreen issue by following the steps below.
Please, see how to view Microsoft Defender Antivirus update details on Windows 10 image (install.wim), and how new Windows 11 encryption features and security enhancements will help protect hybrid work.
Troubleshoot and fix SmartScreen Issue
Possible causes of the “SmartScreen can’t be reached right now” error include:
- Bad Internet Connection.
- SmartScreen may be disabled.
- Use of a Proxy Server.
- Corrupted User profile.
Method 1: Check Your Internet Connection to fix SmartScreen can’t be reached right now
For SmartScreen to run, you need to be connected to the internet, since the service uses Microsoft’s servers to determine an app’s security status.
The simplest way to test this is to use Speedtest.net to verify your internet speed. If your download or upload speed is inconsistent or 0 Mbps, the problem might be with your service provider.
Note: You can set up your own self-hosted speed test server on Ubuntu Linux.If this is the case, you should first attempt to reset your modem and router. You can also try detaching and rejoining the LAN cable if you’re using a wired LAN connection. Finally, if the above methods do not work, try launching the Windows Network Troubleshooter.
Please see Microsoft Edge: All available Policies for the latest version of Microsoft Edge, and how to change the default start page for File Explorer on Windows 11.
Method 2. Turn on Windows SmartScreen in settings
Another reason SmartScreen is not working is because it has been deactivated by something or someone. If this is the case, you can check its status in the Windows Security Center. To do so, follow the steps below.
Press the Start icon and type Windows security on the search bar, then select Open or click Enter to launch the app.

Click the App and browser control on the left side and select Reputation-based protection settings on the right side.

In the Reputation-based protection settings, ensure that the following settings are turned On:
- Check apps and files.
- SmartScreen for Microsoft Edge.
- Potentially unwanted app blocking.
- SmartScreen for Microsoft Store apps.

After completing the above steps, check to see if the error has been fixed.
Method 3: Enable SmartScreen in Group Policy to resolve SmartScreen can’t be reached right now
If you’re using Windows 10 Pro or Windows Pro edition, follow the steps below to enable Windows SmartScreen in Group Policy.
Please keep in mind that these instructions only apply to Windows 10/11 Pro editions. Windows Home versions do not support group policy. If you’re running the Home edition of Windows 10/11, proceed to the next method.
1. Press the Windows + R keys simultaneously to launch the Run utility, then enter gpedit.msc and click OK to launch the Group Policy Editor.

2. Navigate to the following path in the Group Policy Editor:
Computer Configuration >> Administrative Templates >> Windows Components >> File Explorer
3. On the right pane, double-click at Configure Windows Defender SmartScreen.

4. Select Enabled, then click OK.

Close the Group Policy editor, reboot the PC and check if the error has been fixed.
Please see how to Fix Windows Admin Center cannot be reached, Understand the different types of Proxy Servers, How to fix “Hub transport failed to reach status ‘running on this server”, and Microsoft Edge: All available Policies for the latest version of Microsoft Edge.
Method 4: Fix SmartScreen can’t be reached right now on Windows
To fIX SmartScreen Can’t Be Reached by Disabling Proxy Server. Conflicting proxy servers are another common cause of SmartScreen not working. In such a situation, turning this option off will allow the security program to function properly.
You can check the proxy server settings in the configuration menu to see if this is causing any issues.
Press the Windows + I button together to open Settings, select Network and Internet on the left and then click Proxy.

Under Manual proxy setup, if “Use a proxy server” is On, then click the Edit button.

Toggle OFF the button Use a proxy server and hit Save.

Once completed, check if the issue is resolved.
Method 5: Create a new user profile
For one reason or another, a Windows user account may have issues that bind to it during the creation process. If this is the case, you will need to create a new account.
However, before you do so, be sure that none of the options listed above will fix your issue. This method takes longer than the other options. As a result, this should be your final resort.
Press the Windows + I button together to open Settings, select Accounts and then choose Family and other users.

Under Other users select Add account

At the next screen, click I don’t have this person’s sign-in information

Now select Add a user without Microsoft account.

In Who’s going to use this PC section, enter a preferred username and password in the blank fields and click Next.

The account should be created, you have the option to change the account type from standard to administrator account. You also have the option to delete the account.

Close all open programs and restart the computer. At the Sign-in screen select the new account to log in and then check if the SmartScreen error appears. If not, transfer your files and settings from the old account, and you’re done!
I hope you find this guide helpful on how to Fix SmartScreen can’t be reached right now on Windows 10 and 11. If you have any questions, feel free to leave them in the comment section below.


