Windows Defender Credential Guard can be enabled either by using Group Policy (GPO), Windows registry, the Hypervisor-Protected Code Integrity (HVCI), or the Windows Defender Credential Guard hardware readiness tool. Credential Guard can also protect secrets in a Hyper-V virtual machine, just as it would on a physical machine. In this article, we shall discuss how to Enable or disable Windows Defender Credential Guard. Please see how to Integrate TestRail with Cypress, and how To Add Google Drive To File Explorer in Windows.
Virtualization-Based Security (VBS) must be enabled to run Windows Defender Credential Guard. Starting with Windows 11 Enterprise 22H2 and Windows 11 Education 22H2. Devices that meet the requirements to run Windows Defender Credential Guard as well as the minimum requirements to enable VBS will have both Windows Defender Credential Guard and VBS enabled by default.
Features of Windows Defender Credential Guard
By enabling Windows Defender Credential Guard, the following features and solutions are provided:
- Hardware security: NTLM, Kerberos, and Credential Manager take advantage of platform security features, including Secure Boot and virtualization, to protect credentials.
- Virtualization-based security: Windows NTLM and Kerberos-derived credentials and other secrets run in a protected environment that is isolated from the running operating system.
- Better protection against advanced persistent threats: When Credential Manager domain credentials,
NTLM, and Kerberos-derived credentialsare protected using virtualization-based security. The credential theft attack techniques and tools used in many targeted attacks will be blocked.Malware running in the operating system with administrative privileges will not be able to extract secrets that are protected by virtualization-based security.
While Windows Defender Credential Guard is a powerful mitigation, persistent threat attacks will likely shift to new attack techniques. You should also incorporate other security strategies and architectures.
Here are some related guides: How to turn on Windows 10 Tamper Protection for Microsoft Defender, how to find and remove Malware with Microsoft Defender Offline, and how to restore quarantined files in Microsoft Defender Antivirus. In this article, you will learn how to enable or disable Windows Defender Credential Guard
How does Windows Defender Credential Guard works?
Kerberos, NTLM, and Credential managers isolate secrets by using virtualization-based security. Previous versions of Windows stored secrets in the Local Security Authority (LSA). Prior to Windows 10, the LSA stored secrets used by the operating system in its process memory.
With Windows Defender Credential Guard enabled the LSA process in the operating system communicates to a new component called the isolated LSA process. This stores and protects those secrets. Data stored by the isolated LSA process is protected using Virtualization-based security.
And this isn’t accessible to the rest of the operating system. LSA uses remote procedure calls to communicate with the isolated LSA process.
For security reasons, the isolated LSA process doesn’t host any device drivers. Instead, it only hosts a small subset of operating system binaries that are needed for security and nothing else.
All of these binaries are signed with a certificate that is trusted by virtualization-based security. And these signatures are validated before launching the file in the protected environment.
When Windows Defender Credential Guard is enabled, NTLMv1, MS-CHAPv2, Digest, and CredSSP can’t use the signed-in credentials. Thus, single sign-on doesn’t work with these protocols. However, applications can prompt for credentials or use credentials stored in the Windows Vault, which aren’t protected by Windows Defender Credential Guard with any of these protocols.
It is recommended that valuable credentials, such as the sign-in credentials, aren’t to be used with any of these protocols. If these protocols must be used by domain or Azure AD users, secondary credentials should be provisioned for these use cases.
When Windows Defender Credential Guard is enabled, Kerberos doesn’t allow unconstrained Kerberos delegation or DES encryption. Not only for signed-in credentials but also prompted or saved credentials.
The image below shows a high-level overview of how the LSA is isolated by using Virtualization-based security.

Note: Windows Defender Credential Guard can also protect secrets in a Hyper-V virtual machine. Just as it would on a physical machine. The same set of procedures used to enable Windows Defender Credential Guard on physical machines applies also to virtual machines.
Please see How to configure additional LSA Protection, What is Pass the Hash Attack and how to mitigate the attack, and how to Protect Remote Desktop credentials with Windows Defender Remote Credential Guard or Restricted Admin Mode.
Enable Windows Defender Credential Guard by using Group Policy
You can use Group Policy to enable Windows Defender Credential Guard. When enabled, it will add and enable the virtualization-based security features for you if needed.
To launch the group policy editor, search for group policy from the search window, or open the run command, and run the following command ‘gpedit.msc’

From the Group Policy Management Console, go to the following location below.
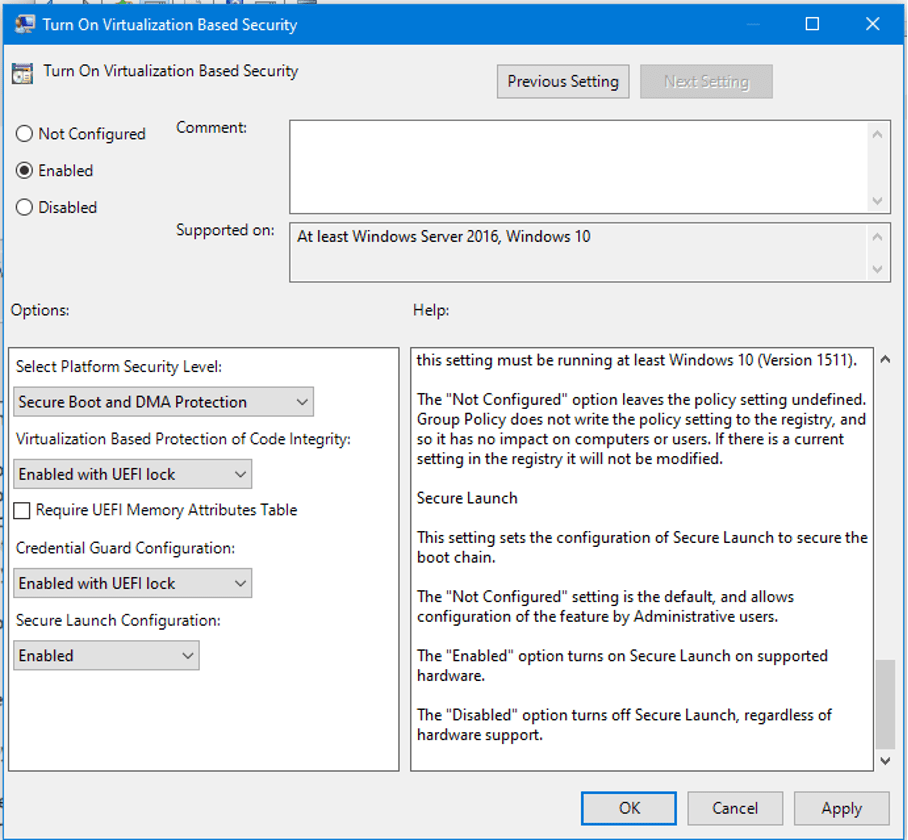
Computer Configuration > Administrative Templates > System > Device Guard.
Select Turn On Virtualization Based Security, and then select the Enabled option.

In the Select Platform Security Level box, choose Secure Boot or Secure Boot and DMA Protection.
- In the Credential Guard Configuration box, select Enabled with UEFI lock. If you want to be able to turn off Windows Defender Credential Guard remotely, choose
Enabled without lock. - In the Secure Launch Configuration box, choose Not Configured, Enabled or Disabled.

Also, see how to allow saved credentials for RDP connection, and Disable credential Prompts for Remote Desktop Connections.
Enable Windows Defender Credential Guard by using the Windows Registry
If you don’t use Group Policy, you can enable Windows Defender Credential Guard by using the registry. Windows Defender Credential Guard uses virtualization-based security features that need to be enabled first on some operating systems.
Note: Starting with Windows 10, version 1607, and Windows Server 2016. Enabling Windows features to use virtualization-based security isn’t necessary. This step can be skipped. If you’re using Windows 10, version 1507 (RTM) or Windows 10, version 1511, Windows features have to be enabled to use virtualization-based security.
You may want to see how to update your device. See how to get the Windows 10 Version 22H2 Update. With this, you will not be required to add the virtualization-based security features by using Programs and Features.
Open Registry Editor by searching or running the command regedit.exe from the run dialogue box

Navigate to the following location. As you can see, the DWORD value named LsaCfgFlags is missing. We have to create it.
HKEY_LOCAL_MACHINE\SYSTEM\CurrentControlSet\Control\Lsa.
Add a new DWORD value named LsaCfgFlags. Set the value of this registry setting to “1" to enable Windows Defender Credential Guard with UEFI lock, set it to “2” to enable Windows Defender Credential Guard without lock, and set it to 0 to disable it, and then close Registry Editor.
Disable Via the Group Policy
Windows Defender Credential Guard can be disabled via several methods explained below. Depending on how the feature was enabled.
For devices that had Windows Defender Credential Guard automatically enabled. In 22H2 update and didn’t have it enabled prior to the update, it’s sufficient to disable it via Group Policy.
Note: If windows Defender Credential Guard was enabled via Group Policy and without UEFI Lock, disabling the same Group Policy setting will disable Windows Defender Credential Guard.Disable the Group Policy setting that governs Windows Defender Credential Guard. Navigate to
Computer Configuration > Administrative Templates > System > Device Guard > Turn on Virtualization-Based SecurityIn the “Credential Guard Configuration” section, set the dropdown value to “Disabled”.

Disable via the Registry Keys
If Windows Defender Credential Guard was enabled with UEFI Lock. The procedure described in Disabling Windows Defender Credential Guard with UEFI Lock must be followed. The default enablement change in eligible 22H2 devices does not use a UEFI Lock.
If Windows Defender Credential Guard was enabled without UEFI Lock and without Group Policy. It’s sufficient to edit the registry keys as described below to disable Windows Defender Credential Guard.
Note: Deleting these registry settings may not disable Windows Defender Credential Guard. They must be set to a value of "0".
HKEY_LOCAL_MACHINE\SYSTEM\CurrentControlSet\Control\Lsa\LsaCfgFlagsHKEY_LOCAL_MACHINE\SOFTWARE\Policies\Microsoft\Windows\DeviceGuard\LsaCfgFlagsFAQs
Disabling Credential Guard does not automatically disable Hyper-V, but they are closely related. Credential Guard relies on Virtualization-Based Security (VBS), which in turn depends on Hyper-V. If you disable Credential Guard, Hyper-V will still be enabled unless you explicitly turn it off separately
Yes, enabling Credential Guard requires Virtualization-Based Security (VBS), which in turn relies on Hyper-V. So when you enable Credential Guard, Hyper-V will also be enabled automatically. You can enable Credential Guard, you can do so using Group Policy, Registry settings, or Microsoft Intune.
When Credential Guard is enabled on a VM where VirtualBox is running, you may encounter compatibility issues. Credential Guard relies on Virtualization-Based Security (VBS), which uses hardware virtualization features. Since VirtualBox also requires access to these virtualization features, conflicts can arise. Some possible behaviors include:
– Performance degradation: VirtualBox may run in a slower mode (known as NEM – Native Execution Mode) instead of using hardware virtualization.
– Errors or failures: VirtualBox may fail to start VMs or display errors related to VT-x/AMD-V being unavailable.
– Workarounds required: Disable Hyper-V or specific features of Credential Guard to allow VirtualBox to function properly
I hope you found this blog post helpful. Now, you have learned how to enable or disable Windows Defender Credential Guard. If you have any questions, please let me know in the comment session.