Setup a Site-to-Site VPN Connection on AWS

In this article, we shall discuss “Setup a Site-to-Site VPN Connection on AWS”. Most organizations prefer to have direct connectivity from AWS to their on-premises network. Here are some related guides: Microsoft Direct Access: Now Always On VPN, Windows 10 Always On VPN (AOVPN) Overview, features and Requirements, and how to configure AnyConnect SSL VPN Client Connections.This is necessary when regulatory and compliance policies are in place to maintain private connectivity between the AWS Cloud and data available at the company’s on-premises network.
AWS Site-to-Site VPN connection is one way to establish this kind of direct connection. In some organizations, accessing private information from other offices requires a VPN connection.
What is Virtual Private Network (VPN)
VPN enables you to connect to another network and behave as though you are actually on that network. You could gain access to resources that were previously only available to local users because, from the perspective of the network, there is no distinction between you and a user physically present on that network.
Site-to-site and remote access VPNs are the two main varieties. Learn how to configure VPN on Windows Server 2016, 2019, and 2022: How to allow remote VPN Access for Domain or Local Users.
A computer is linked to a network using remote access VPN. When you want to browse the web anonymously, for instance, you can hide your real IP address. When you need to connect to your company’s network and access the confidential information on it, a VPN of this type can also be used.
Conversely, Site-to-Site VPN connects multiple networks, and each member of those networks connects automatically and without additional work. When connecting multiple offices in various geographical locations, this type of VPN is typically used.
In this post, I provide a comprehensive, step-by-step guide on how to setup a Site-to-Site network connectivity VPN Connection on AWS. A typical use case for site-to-site VPN in AWS is when you have an on-premise infrastructure and you’re moving to the cloud.
Since it can be difficult to replicate on-premise infrastructure, I'll use two distinct AWS networks that are located in various VPCs in this post. Since they are in different VPCs, they cannot see or speak to one another. The objective is to establish a VPN link between the two networks so they can communicate with one another using their private IP addresses without formally establishing a VPN connection.
You may want to see how a VPN-related error can be fixed. Fix Error 853: The remote access connection completed, but authentication failed because the certificate that authenticates the client to the server is not valid
Creating VPN-Required Resources
We’ll create two EC2 instances in two different networks in this section. A Virtual Private Cloud (VPC) is the first resource that is required. We will create two VPCs and name them as “customer-site-vpc“ and “aws-cloud-vpc“.
In addition, we’ll create two security groups with inbound access to SSH and ICMP. Create two EC2 instances, one for each. To grant access to the EC2 instances, be sure to place each EC2 instance on a different VPC and choose the security group you created.
Create a VPC (Virtual Private Cloud)
We will create the two VPCs using the AWS Management Console. To do so, you must an active AWS Account.
Step 1: To create the VPCs, navigate to the VPC console

There is always a default VPC in your AWS Account. Here, we're not going to use the default VPC. We will create two new ones. Step 2: Click on Create VPC as shown in the screenshot above. Create Customer VPC with the following details
CIDR range - 10.0.0.0/16Create the AWS cloud VPC with the following CIDR range
CIDR range - 10.0.0.0/24
Launch an EC2 Instance
We will create two EC2 instances. One will be in the customer-site-vpc while the other will be in the aws-cloud-vpc.
To create the EC2, browse the EC2 console by clicking here. Here are some related EEC2 articles: How to launch an EC2 instance, and how to add a new Virtual Disk to an EC2 Instance and Format the Drive.
Creating On-Prem EC2 Instance
We created an EC2 instance named on-prem-server which will serve as the server on the customer’s site.
To learn how to create an EC2 instance using the console the down part of this post shows you how to do that


Creating AWS Cloud Server
Follow the guide in the steps above to create an EC2 Instance that will serve as a cloud server under the aws-cloud-vpc

Ensure you place the cloud server in the aws-cloud-vpc and allow access to the ICMP protocol shown below:

Connecting to the Instances
SSH into both instances using their respective public IP Addresses
ssh -i <private_key.pem> server_name@<instance_public_ip>
Setup a Site-to-Site VPN Connection on AWS
Before setting up the site-to-site VPN in AWS, you must create a few dependent resources.
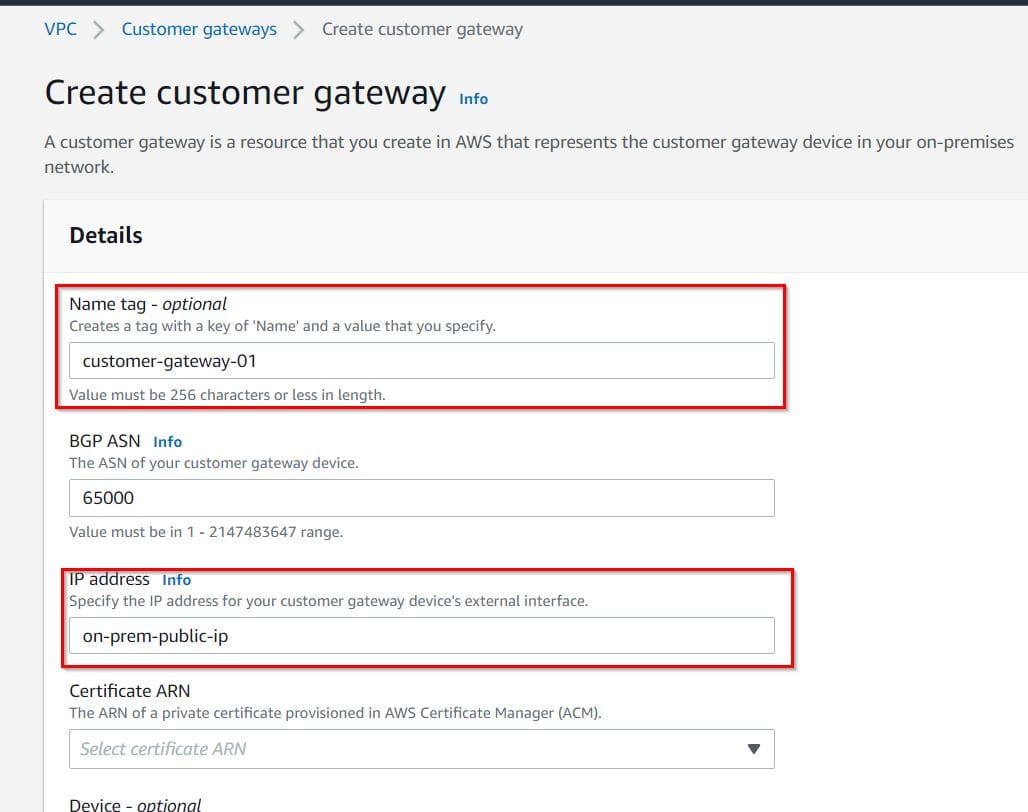
A customer gateway is the first resource to create. A customer gateway in AWS represents your on-premise network’s customer gateway resource. It is essential to know that the customer gateway is associated with the on-premise side of this connection. When creating the customer gateway, you must enter the public IP address of your on-premise instance.
To create this resource, go to the VPC’s page in your AWS console, then select “Customer Gateway” from the sidebar and create a new customer gateway.

Specify the name of the customer gateway and the public IP address of the On-prem Server
Creating a Virtual Private Gateway
The next resource to create is the Virtual Private Gateway. A Virtual Private Gateway is related to the AWS side of the connection, as opposed to the Customer Gateway which is related to the on-premise side.
You must first create a virtual private gateway and then connect it to your AWS VPC (cloud-vpc). It is worth noting that these two AWS resources are needed for our VPN connection.
To create the Virtual Private Gateway, you can navigate to Virtual Private Gateways ->Create New Virtual Private Gateway.

Create a Site-to-Site Connection (S2S)
Now you can navigate to the Site-to-Site VPN connections tab and click on create a new VPN.

Next, specify the name and then select the newly created virtual private gateway and customer gateway.

In the routing options, change the routing to static and enter the CIDR block of both customer-site-vpc and aws-cloud-vpc.

For Local IPv4 CIDR use customer-site-vpc CIDR and for Remote IPv4 CIDR select aws-cloud-vpc CIDR range.

The VPN connection usually takes some time to create. In the meantime, you can navigate to the route table on the sidebar to enable propagation for the public route table associated with your aws-cloud-vpc. Make sure that the propagation of the public route table associated with aws-cloud-vpc is enabled.
Note: Route propagation allows a virtual private gateway to automatically propagate routes to the route tables so that you don't need to manually enter VPN routes to your route tables. You can enable or disable route propagation.
Installing VPN Server on On-prem-Server Instance
The final step is to install VPN on the on-premise VPN server. Here, I am using OpenVPN, please feel to use any VPN that meets your needs. Strongswan is a multiplatform IPsec implementation that must be installed on your on-prem server.
Run the below commands on the on-premises server instance to update and upgrade and then install the strongswan :
Update and upgrade system packages - $sudo apt -y update && sudo apt -y upgrade
Install Openswan - $sudo apt insall strongswan
Download the Strongswan VPN configuration file
Head back `to the AWS management console, select your VPN, and then download the Strongswan VPN configuration file.

Select the appropriate fields and click on download.

Open the configurations at /etc/sysctl.conf with your favourite editor and then uncomment the following line to enable IP packet forwarding: net.ipv4.ip_forward = 1

Run sudo sysctl -p to apply the changes after making the above changes.

Next, create a new file /etc/ipsec.d/aws.conf and copy the following configuration to the file:
conn Tunnel1
	auto=start
	left=%defaultroute
	leftid=3.90.25.152
	right=3.232.215.65
	type=tunnel
	leftauth=psk
	rightauth=psk
	keyexchange=ikev1
	ike=aes128-sha1-modp1024
	ikelifetime=8h
	esp=aes128-sha1-modp1024
	lifetime=1h
	keyingtries=%forever
	leftsubnet=10.0.0.0/16
	rightsubnet=10.0.1.0/24
	dpddelay=10s
	dpdtimeout=30s
	dpdaction=restart
The leftsubnet value represents your customer-site-vpc CIDR, while the rightsubnet value represents your aws-cloud-vpc CIDR.Now start the IPSec service and verify it’s up:
systemctl start ipsec
systemctl status ipsec
Create a file with the below name and copy your secret included in your downloaded config file and add to it in the on-premise instance:
/etc/ipsec.d/aws.secretsNext, head back to your AWS console and select your VPN and navigate to “Tunnel Details”. If you’ve done all the steps correctly, then Tunnel 1 should be up.
Verify the VPN Connection
To test your VPN connection, ping instances are connected through the VPN using their private IP addresses. SSH into one of the instances and use its private IP address to ping the other:
ping <private-ip-address-of-aws-cloud-ec2-server>
Any device on this network can communicate with any device on the other network without a direct VPN connection if you are able to ping the machine in the other network using its private IP address. Now you have learned how to setup a Site-to-Site VPN Connection on AWS.
I hope you found this blog post helpful. If you have any questions, please let me know in the comment session.


