In this guide, we’ll explore different ways to create and Retrieve Recent Windows Update: How to create batch script files on Windows 11. Please see How to use Command-Line on Git Bash and GitHub Desktop to PUSH local code to GitHub, and How to Upload Batch Files to Azure Storage Account Using Azure CLI. Batch files, which typically end with a “.bat” extension, are text files containing multiple commands that can be executed in sequence from the Command Prompt.
They are handy on Windows 11 for making system changes, querying system information, automating routines, and launching apps.
Using batch files can save you time, reduce errors, and simplify the process of executing commands or performing specific actions. While PowerShell allows for more comprehensive scripts, batch files executed on the Command Prompt are still valuable for a wide range of tasks due to their simplicity and ease of creation.
Here are other related guides that you will find interesting: Batch rename multiple files on Windows, How to Rename or Move a File or Directory in Linux – Bash Terminal Command, Linux Shell Scripting: How to write a Shell Script that Counts Lines and Words in a File,
How to Create Batch Files on Windows 11
Creating batch files is a straightforward process that only requires basic Command Prompt skills and any text editor like Notepad or Visual Studio Code. Let’s look at some examples to illustrate this. Here is a detailed guide on how to Batch rename multiple files on Windows.
Compose a Basic Batch File
To create a basic batch file on Windows 11, follow these steps. Open the Start menu, search for Notepad and click on the top result to open the text editor.

Type the following lines of code in the text file:
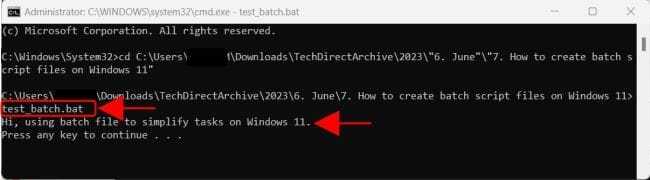
@ECHO OFF
ECHO Hi, using batch file to simplify tasks on Windows 11.
PAUSE
Click the “File” menu and select the “Save as” option.

Choose a name for the script, such as “test_batch.bat” then save the file.

After completing these steps, double-click the file to run the script. It will automatically display a command prompt with the message “Hi, using batch file to simplify tasks on Windows 11.” on the screen.

Batch files are typically saved with the “.bat” extension, but you can also use “.cmd” or “.btm”.
Compose an Advanced Batch File:
For a more advanced batch script, follow these steps:
Open the Start menu, search for Notepad and open the text editor.
Retrieve Recent Windows Update
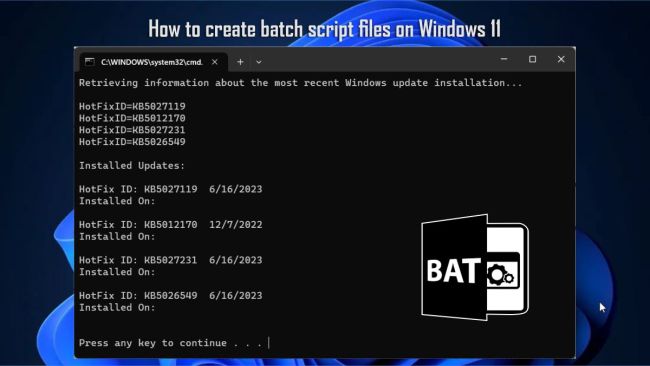
Type the following lines in the text file to retrieve information about the most recent Windows update installation.
@echo off

REM Retrieve information about the most recent Windows update installation

echo Retrieving information about the most recent Windows update installation...

echo.

REM Query the Windows Update history using WMIC (Windows Management Instrumentation Command-line)

wmic qfe get HotFixID, InstalledOn /format:list | findstr /i /c:"KB"

REM Display the installation date of the updates

echo.

echo Installed Updates:

echo.

REM Iterate through the output and display the HotFix ID and installation date

for /f "skip=1 tokens=1,2 delims=|" %%G in ('wmic qfe get HotFixID^,InstalledOn /format:table') do (

    echo %%G | findstr /i /c:"KB" >nul

    if not errorlevel 1 (

        echo HotFix ID: %%G

        echo Installed On: %%H

        echo.

    )

)

echo.

pause
Click the File menu and select the Save as option.

Choose a name for the script, such as “update_info.bat.” Then save the file.

Running this batch file will display both the HotFix ID and the installation date of the Windows updates.

The output will list the installed updates along with their respective installation dates.
How to Run Batch Files on Windows 11
You can run batch files in three different ways on Windows 11: from Command Prompt, File Explorer, or automatically during startup.
Run Script from Command Prompt:
To run a batch file from Command Prompt, follow these steps:
Open the Start menu, search for Command Prompt, right-click the top result, and select the Run as administrator option.

Navigate to the path where the batch file is saved and press Enter:
E.g. cd C:\Users\Account\Folder\test_batch.batAfter executing these steps, the batch file will run, and the results will be displayed in the console.
Since you opened Command Prompt manually, the window won’t close automatically unless the script includes the “Pause” option.
Run Script from File Explorer:
To run a script file from File Explorer, follow these steps:Open File Explorer, browse to the folder containing the batch file. Right-click the file and select the Open option.

If elevation is required, right-click the file and select the “Run as administrator” option.
After running the script, the window will either remain open or close automatically, depending on whether you included the “Pause” option.
Run Script at Startup:
To run a batch file automatically at startup, follow these steps:
Navigate to the folder containing the batch file, right-click the file and select the Copy option or simply use the shortcut key “Ctrl + C“.

Type “shell:startup” in the address bar and press Enter.

Press “Ctrl + V” shortcut key to paste the batch file in the Startup folder.

After completing these steps, Windows 11 will run the batch file every time the computer starts, and the user logs into the account.
Conclusion
By following these instructions, you can easily create and run batch files on Windows 11, enabling you to perform various tasks efficiently, automate routines, and customize system settings to suit your needs.
I hope you found this article on how to Retrieve Recent Windows Update: How to create batch script files on Windows 11 helpful. In case you have any questions do not hesitate to ask in the comment section.