Install Windows Server 2025 via iDRAC Virtual Media or PXE

In this article, we shall discuss the steps to install Windows Server 2025 via iDRAC Virtual Media or PXE. Windows Server 2025 delivers advanced security, enhanced performance, and greater cloud agility. Designed to meet diverse customer needs, it provides a secure, high-performance platform for deploying applications across on-premises, hybrid, and cloud environments. Wish to learn about the new features, capabilities and how to install Windows Server 2025 on a bare-mental or VM, please take a look at “What’s New? Install Windows Server 2025 on Beelink EQ12 PC“, and What is the difference between iDRAC, IPMI, and ILO.
Since I will deploy Windows Server 2025 remotely using the Integrated Dell Remote Access Controller (iDRAC), I’ll begin with a brief overview. iDRAC boosts administrator productivity and maximizes server availability by providing powerful remote management capabilities. See how to perform In-place upgrade of Windows Server 2022 to 2025
It proactively alerts administrators to hardware issues, streamlines server monitoring and troubleshooting, and eliminates the need for physical access. With iDRAC, administrators can deploy, manage, configure, update, and troubleshoot Dell servers from any location without installing any agent on the host system.
Also, see How to deploy images to computers using PXE Boot, how to fix “MDT deployment failed and Stuck at Command Prompt: Windows installation does not proceed via PXE boot, and how to “Run Hype-V on Windows 11 and Install Windows OS via PXE Boot“.
Deploying Windows Server 2025 Remotely via virtual CD/DVD/ISO
iDRAC enables out-of-band server management (independently of the host operating system), firmware updates, system backup and restore, and OS deployment. In this section, I will demonstrate these tasks using the iDRAC graphical user interface (GUI), though you can also use the iDRAC RESTful API or the RACADM CLI for advanced management.
While OMSA offers many of the same management functions as iDRAC, it has limited capabilities. OMSA supports only the legacy OpenManage CLI (OMCLI) for scripting and does not support newer automation standards like Redfish. Moreover, OMSA is EOL. For in-band management and modern automation on Dell EMC PowerEdge servers, you should use iSM (Integrated Systems Management) agents instead.
To do this, launch a web browser and access to the iDRAC interface and log in with your iDRAC credentials. Note that this is not the same as the OS credentials.

From the Dashboard, you can attach the ISO on the fly by clicking on the “Virtual Media” as shown below. But, I will click the “Virtual Console”, and start the Virtual Console as shown below.

Now, you can click on Virtual media in order to map the ISO from the iDRAC HTML viewer.

Please, see How to Install Winget on Windows Server, how to Fix Windows Server frequent disconnects and shutdown, and how to fix Windows PE working for Windows 11 and Windows Server 2022.
Map CD/DVD
Click “Virtual Media” and connect the Virtual Media. As you can see, the status shows connected. Next, click on “Map CD/DVD” and browse to your ISO from your local machine.

As you can see below, we have successfully mapped the ISO and can now proceed with the installation of Windows Server 2025.

To streamline the process, instead of using keyboard hotkeys like F11 to access the boot manager or F12 to select the boot device, I will use the iDRAC HTML5 console’s Boot menu. From there, I will select “Virtual CD/DVD/ISO” as the boot source for this installation. The iDRAC Virtual Media lets you “pretend” that ISO is in a CD/DVD drive attached to the server.
Note: Upon the first reboot, it reverts back to “Normal Boot”. Therefore, you may have to change this back in case you are distracted during the setup process.

Kindly confirm the boot action by clicking on “Yes”.

Please, see How to set up a Print Server on Windows Servers, how to install Windows Deployment Services on Windows Server 2022, and how to install Windows Server unto ACEMAGICIAN Mini PC.
Perform Power Cycle System (Cold boot)
I will be selecting Power Cycle System (Cold boot). When installing a fresh operating system using an ISO mounted through iDRAC, always choose a cold boot. Therefore, select “Power Cycle System.” This method fully reinitialises the hardware by ensuring iDRAC properly detects the virtual ISO and all connected devices.
Note: While you can install an OS using either a warm or cold boot. A cold boot is more reliable and strongly recommended as all components such as the CPU, RAM, iDRAC virtual media controller, RAID, fans) are fully reset, and full POST (Power-On Self-Test) runs.

Click on Yes to confirm the Power Action for cold boot.

As already discussed above, the server will power off completely and then powers on again. The hardware components will undergo full POST. Thereafter, iDRAC releases control and the server BIOS/UEFI firmware starts initialising hardware and checking boot devices.

Since you previously selected the boot device directly from the iDRAC HTML viewer’s boot menu, you don’t need to press any BIOS hotkeys during startup. The server BIOS/UEFI will automatically read the boot order you set.

Because the ISO is mounted as a virtual CD/DVD through iDRAC virtual media, the server detects it as the bootable device and boots from it accordingly.

Now that the server has booted from the mounted ISO, it begins loading the Windows Server 2025 installation media into memory. The setup environment (WinPE) launches, and shortly after, the “Windows Setup” screen appears with language settings. Select your language to install.

Choose the keyboard settings as shown below.

Accept Applicable license

Please, proceed with the OS installation as usual.

When prompted. I will be installing Windows server 2025 Desktop Experience.

Product Key
Select a licensing method. If you do not have one, you can select “I don’t have a product key”.

Format and create new new partition if need be.

On the ready to install page, click on Install.

As you can see, the installation is on progress

Shortly, you will be prompted to enter the product key again

Enter

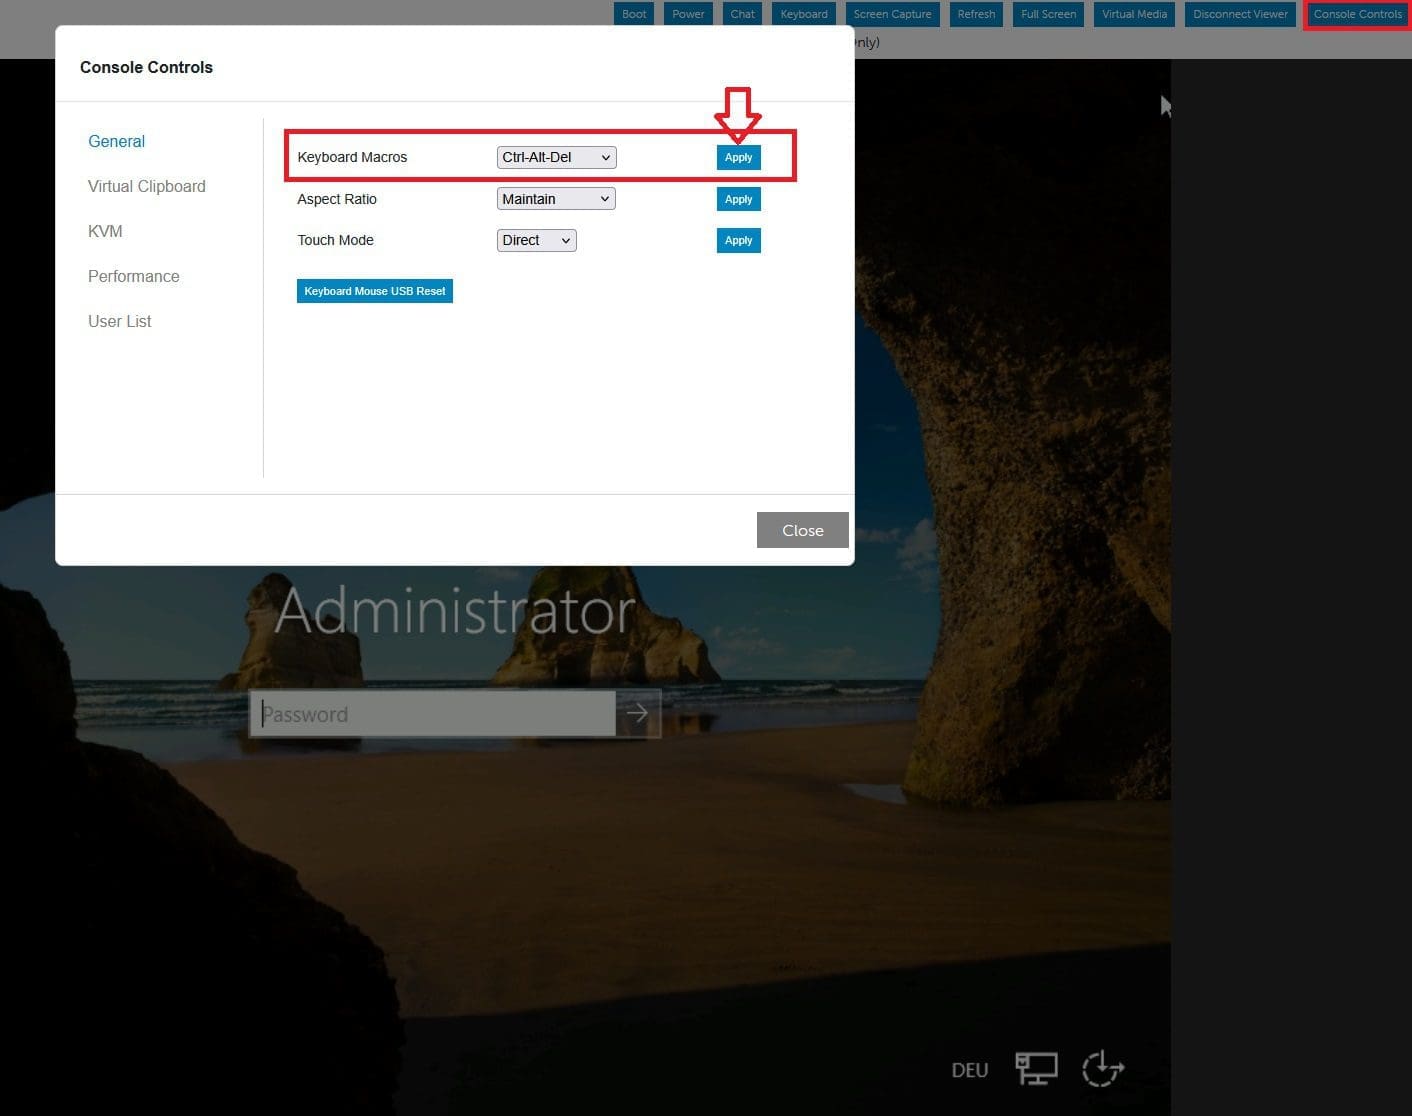
Now, you have been prompted to login to access your Server. To do this, click on the Console Control and apply the Macros keyboard in order to have the opportunity to enter your password. After this, you can perform the “Post OS installation: Configure the properties of Windows Server“.

Here are some guide on how to install Windows Server 2022 on VirtualBox, how to install Windows Server 2022 on VMware Workstation, and how to install Windows Server 2019 on Virtualbox.
Set up Windows Server via PXE
The PXE Boot (Preboot Execution Environment) is a standardised client-server environment that enables computers to boot an operating system over a network connection instead of a local storage device like a hard drive, Virtual Drive (CD/DVD) or ISO.
This assumes you have DHCP (Comprehensive Guide to Install DHCP Server on Windows Server), WDS and/or MDT setup in your environment. Here is how to install WSUS on Windows Server 2022.
Access iDRAC as discussed above by using the server’s IP address or FQDN depending on your set up. From the dashboard, click on Virtual Control and Start the Virtual Console. From the HTML5 Console, select the Boot Menu and select PXE.

Confirm the boot action by clicking on Yes. This will enable the server BIOS/UEFI to automatically read the boot order.

Next, select to Power Cycle System (Cold boot).
Here is how to uninstall and upgrade ADK, WinPE, and MDT, how to Map a Network Drive: How to mount a Network Drive, and how to migrate WDS and MDT to a new Windows Server.
Initialising Hardware
The server UEFI firmware starts initialising hardware and checking boot devices once again as shown below.

Since we previously selected the boot device directly from the iDRAC boot menu. You don’t need to press any BIOS hotkeys during startup. The server BIOS/UEFI will automatically read the boot sequence as shown below.

Please, see ADK|WinPE|MDT: Deploy Windows with WDS for the rest of these steps.
The system initiates PXE boot over IPv4. Contacts the DHCP server, and receives the network boot program (NBP) filename and TFTP server address. It then successfully downloads the NBP file and prepares to launch the OS deployment environment.

The Windows Deployment Services (WDS) Boot Manager appears, displaying the boot manager version, client IP address, server IP address, and server name.
As you can see from the prompt “Press ENTER for network boot service”. Hit the “Enter” button on your keyboard.

The device will start loading files via network as shown below.
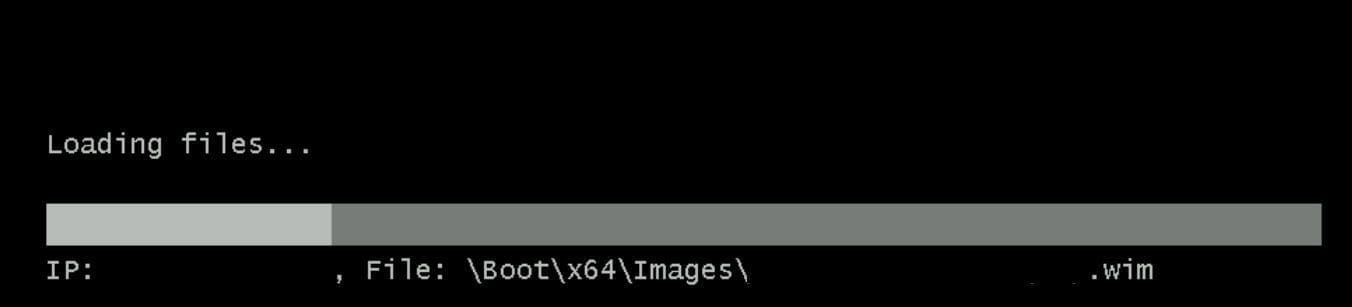
The boot manager loads the
boot.wimfile from the WDS server as shown in the image above. Shortly, the Windows Preinstallation Environment (WinPE) starts and launches the interactive Windows Server setup wizard. This depends on how your WDS deployment is configured though.
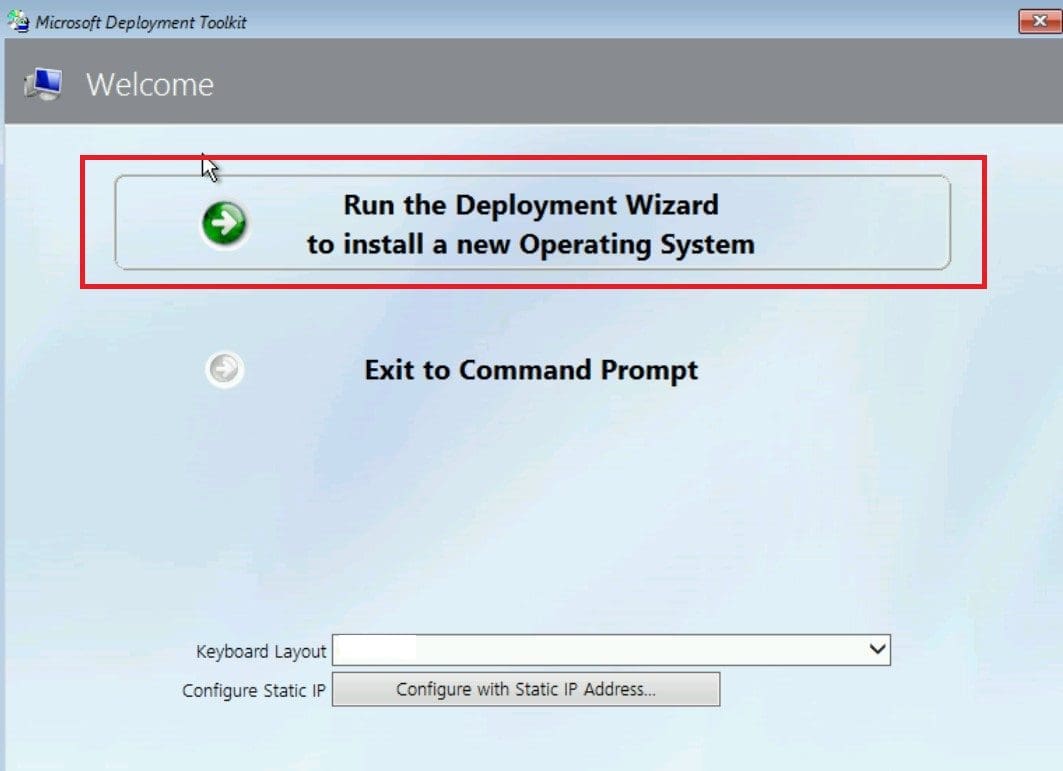
On the MDT Welcome screen as shown below. Click Run the Deployment Wizard to install a new Operating System, and select the Keyboard layout and on this page. You can also configure the started IP Address
Please, follow through the Windows Deployment Wizard depending on your set up. On the Ready to begin windows as shown below, I will click on “Begin”.

As you can see below, the system displays “Getting devices ready” as it loads and initialises hardware drivers. Followed by “Getting ready” as it prepares system settings and finalises the setup environment before first boot.
Please, see how to install Endpoint Configuration Manager on HyperV VM. Also, see how to Fix the request to add or remove features failed 0x00400d.


The server will reboot several times during installation. Once setup is complete, you can launch the remote console and use keyboard macros to access and interact with the operating system.
Below is a YouTube video discussing this topic with iDRAC v6.
I hope you found this article on “how to install Windows Server 2025 via iDRAC Virtual Media or PXE”. Please, feel free to leave a comment below.


