How to install Trellix MVISON Endpoint

The “Trellix MVISION Endpoint” and Trellix Endpoint Security (ENS) are both Trellix Endpoint protection products. They are slightly different and offer different use cases. Trellix offers both to provide flexibility and broader coverage for varying customer needs and environments. In this article, I will show you how to install Trellix MVISON Endpoint. Please, see how to disable SQL Auto Close: Auto Close is enabled for both ePO and ePO Events Databases, and Why you should not Upgrade Windows on an ePO Server.
Note: There is a great difference between Trellix MVISON Endpoint and MVISION XDR. Basically, they are different products. Trellix now pushes towards XDR (Extended Detection & Response), and is positioned as the forward-looking platform for that, leveraging its cloud-native capabilities. Trellix MVISION is the modern brand evolution and broader product suite that includes MVISION XDR among other solutions.
Trellix MVISION Endpoint allows you to configure Microsoft Defender and other security features. It provides advanced threat protection (ATP) capabilities similar to those offered by Trellix ENS for endpoint
MVISION XDR is Trellix’s specific extended detection and response platform for unified cyber threat management. XDR provides a comprehensive view of the threat landscape by breaking down silos between security products. Thereby, reducing the the time needed to detect and resolve security issues.
Also, see Trellix ePolicy Orchestrator Installation on Windows Server, how to upgrade Trellix ePolicy Orchestrator, and Trellix ePO On-prem 5.10.0 Service pack 1 Update 3 upgrade.
Workloads and Management Complexity and Improvement
The Security Operations Center (SOC) is a core function in an organization’s cybersecurity charter. Its key focus is to quickly find and resolve threats to avoid damage to assets and data. If the SOC is struggling, it is likely security outcomes are dubious and organizations are at risk.
SOC teams are often under-resourced, overwhelmed with too many disconnected tools, and suffer from alert fatigue, making it harder to detect and respond to threats quickly.
Trellix MVISION XDR helps by integrating visibility and control across all cyber assets, automating threat detection and analysis, and streamlining responses to improve SOC efficiency and reduce costs.
Please, see How to Install ROOT CA Enterprise and NPS Wifi Certificate, the Review of the Synology CC400W Installation and Configuration, and how to Enable Secure Boot: Fix Secure Boot certificates expiration.
Why is the Central Management of MVISION Vital
Centralized management of Trellix MVISION (via MVISION ePO or MVISION EDR/XDR) is critical as it enables organizations to unify visibility, streamline response, and reduce complexity across distributed environments
- Unified Security Configuration: Whether endpoints are on-premise, remote, or hybrid, central management provides a single pane of glass to monitor threats and activity. Security teams gain full telemetry and behavioral insight from all devices.
- Consistent Policy Enforcement: Central management allows administrators to enforce consistent security policies across all devices in the network. Administrators can centrally define and enforce EDR/telemetry policies, response actions, exclusions, and update configurations. This avoids misconfigurations or inconsistent agent behavior, and ensures there are no gaps or vulnerabilities caused by inconsistent or misconfigured settings.
- Faster Incident Detection and Response: MVISION centralizes threat intelligence and uses cloud analytics to automatically correlate events. Security analysts can investigate and respond in minutes via a guided console even if endpoints are offline from ePO.
Central MVISION management is the anchor point for extended detection and response (XDR) as it integrates with email, cloud, and network telemetry. Without it, siloed tools reduce detection accuracy and response efficiency.
Lastly, centralized management simplifies agent deployment, version management, and logging. This is ideal for a growing or distributed environments. You can read more here.
Please, see Review of the Synology CC400W Installation and Configuration, how to Enable Secure Boot: Fix Secure Boot certificates expiration, and how to Fix Windows defender blocked incoming connection on Windows.
Why Employ Trellix MVISION
It is worth noting that attackers maneuver in covert ways, camouflaging their actions within the most trusted components of your environment. They no longer need to install known malware, but they always leave behind a behavioral trail.
For example, German infosec services company Nextron Threat Researchers spotted malware that creates a highly-persistent Linux backdoor and said that antivirus engines did not initially flag the code as malicious.
This is where Endpoint Detection and Response (EDR) plays a critical role by continuously monitoring and collecting data to provide the visibility and context needed to detect and respond to threats as traditional approaches often overwhelm security teams with excessive alerts.
However, Trellix MVISION helps manage this high volume of data, empowering analysts of all skill levels to work more efficiently and investigate threats more effectively.
Steps to Deploy Trellix MVISION Agent
There are different ways to go about this. One of which is the “Master Repository”. To do this, ensure the package is uploaded to the Master Repository, and policies are assigned correctly. Alternatively, we could use the Software Catalogue for easy package management and download.
Note: In Trellix ePO, there are often multiple ways to accomplish the same task, similar to how tasks can be performed in different ways on Windows systems.
Please, see “Service Principal Name: How to add, reset and delete SPNs‘, and What are the Differences between UEFI and BIOS.
Add the MVISION Agent Package to the Master Repository
Download the MVISION Agent (also known as the Trellix XDR Sensor) from the Trellix Product Downloads Portal. This involves using the Main Repository. But you can use the Software Catalogue for easy package management or download and upload via the Main Repository or extension.
To do this, from the ePO Main Menu sometimes referred to as the Hamburger Menu. Then, click on Software and then on Master Repository

Also, see How to deploy images to computers using PXE Boot, how to fix “MDT deployment failed and Stuck at Command Prompt: Windows installation does not proceed via PXE boot, and how to “Run Hype-V on Windows 11 and Install Windows OS via PXE Boot“.
Download the MVISION Package
If not already downloaded, visit the Trellix Portal with a licensed account and download the MVISION package (likely a .ZIP or installer file). Upon download, upload the MVISION Package. To do this, return to the ePO console. In the Master Repository, select Check in Package.
Browse and select the downloaded MVISION Endpoint Agent File, and upload it. This will therefore make it available for deployment via client tasks.

Note: The Software Catalog is a separate online directory, and not a reflection of what’s already in your Master Repository. This is synced online from Trellix’s product servers, and Trellix controls what’s listed in the Software Catalog.

Add Trellix MVISION via Software Catalog
Alternatively, For Trellix Agent check-in, you can also add MVISION packages from the Software Catalog if your ePO account has entitlements and is connected to the internet.
To do this, access ePO Console, and navigate to the Software Manager as shown below. Search for the MVISION package to see if it’s already added. You can also update it from here.

Please, see how to enable FIPS mode on Windows Server, how to shrink and create new partition on Windows Server, and how to fix long path names to files on SQL Server installation media error
Via Product Deployment
Note: Product packages must be checked in before deploying them. By now, you should be familiar with the process of deploying a package.
In this step, we will be installing the actual software package (MVISION Agent or XDR Sensor) on the target endpoints. Since, this is a lab environment, I will start off with a single PC. This steps involves:
- Configuring deployment settings such as the installation type, target devices.
- Assigning tasks or schedules to ensure the package reaches endpoints and is installed correctly.
To do this, click on “New Deployment” as shown below.

As mentioned above, here you have to populate the different fields as shown below.

Very importantly, ensure that the right package is selected. This will be Mvision Endpoint 23.11.1 in this case as shown below.

Do not forget to select the Action. Also, select individual PCs or by groups or Tags as shown below. When done, click on “Run immediately”. Please, see ePO Server Settings: Trellix ePO AD integration and ENS Agents Installation as this step is very vital for deployment.

You can also specify an individual account as shown below and click on Ok. Do not forget to save when done. This step can be performed at anytime.

As you can see, below is the deployment status.
Note: If you wish to use the Product Deployment method in ePO, make sure not to reuse an existing deployment name. If a client task with the same name already exists, you’ll encounter the following error: “Deployment name cannot be the same as an existing client task. Delete the client task or change the deployment name.” To resolve this, either delete the existing client task or assign a new unique name to your deployment.
Note: You can see the AD group Sync is in progress.

Please, see How to Install Winget on Windows Server, how to Fix Windows Server frequent disconnects and shutdown, and how to fix Windows PE working for Windows 11 and Windows Server 2022.
Setup Push Settings
Do not forget to configure the Push settings under the synchronization settings for your organization.

When deploying the agent, always specify valid credentials with local admin rights. If the system was previously managed by a different ePO server, enable the “Force installation over existing agent” option to overwrite the old agent and reassign the system to the new ePO environment.

Note: The Assigned Client Task is set to run immediately.

Assign the Service Account to the Computer Administrator Group
Depending on your AD setup/permission, you may have to set up a service account and assign it to the PCs in order to be able to push the agents. You can do this directly from the Computer Management on the Client PC or roll it out centrally via GPO.
Expand local Users and Groups and right click or double click on Administrators to add the service account. Now that we have configured the permission, let’s proceed with the agent deployment.

MVION Installation Status
You can view the status of the installation directly from the product deployment window as shown below. Hover over the Current or Duration link as shown below to display installation success, failed or running as shown below.

Shortly, the MVISION agent deployment should be completed.

Please, see the Full Integration Guide on how to Add Nutanix AHV to Veeam, BitLocker behavior when MBAM agent is removed: No Uninstall Option in Control Panel, and Fix MSIEXEC returned 1602: Trellix Setup cannot use this account.
Manual Trellix Agent Deployment
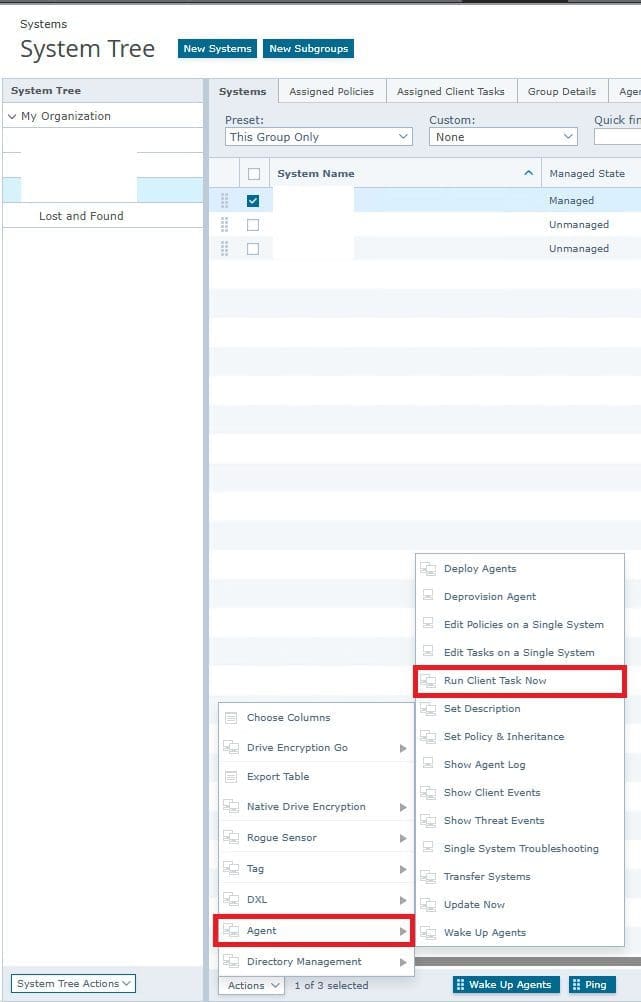
This steps require the manual deployment of agents. Click on the PC under Systems. from Actions, select Agent and then Deploy agents.
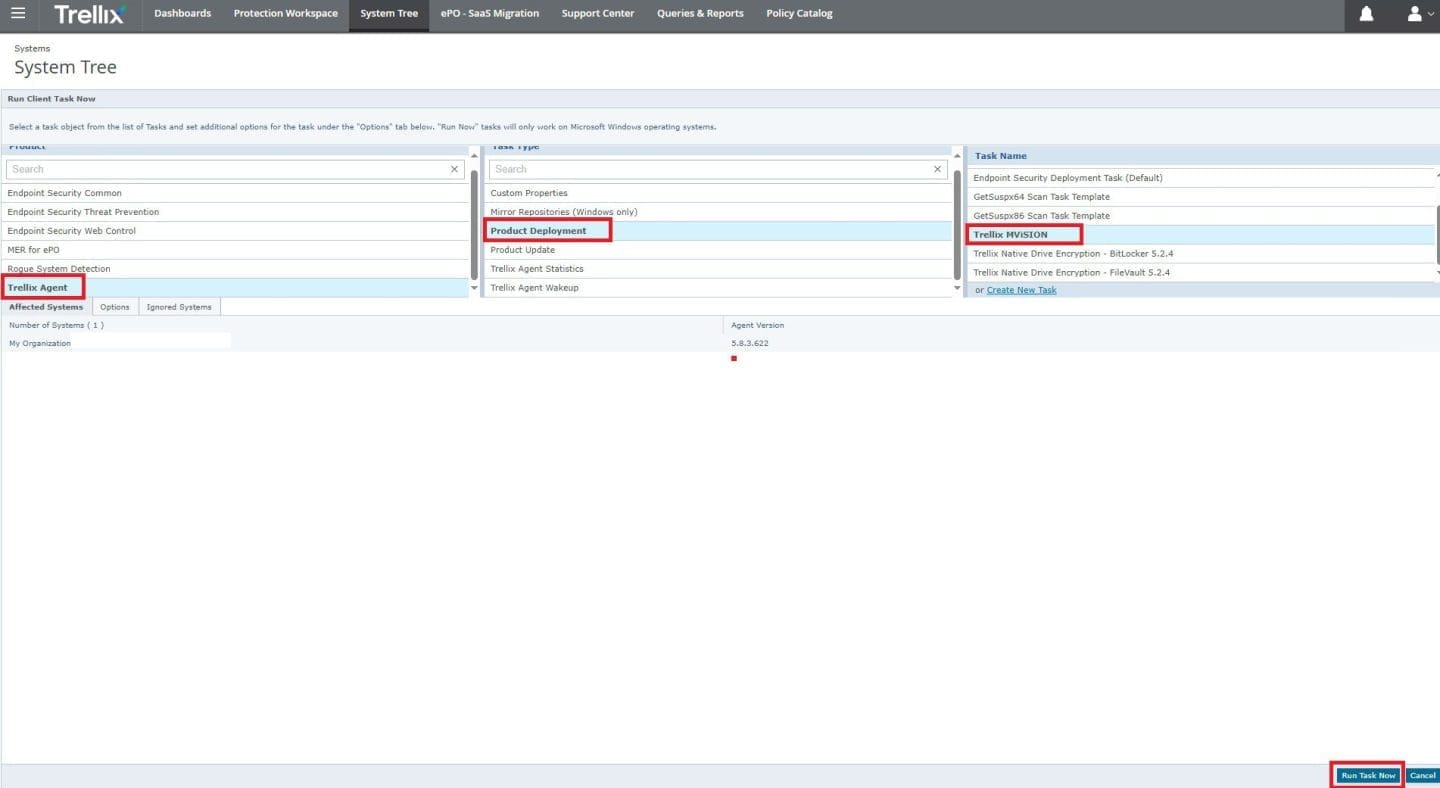
Select “Trellix Agent”, and then click on “Product Deployment” and under the Task Name, select “Trellix MVISION”.
Note: If you run into errors, do not forget to check the Assigned Client Task by editing assignment under system tree. Under the Client Task Catalog, ensure that the task is assigned to the right OU or group.
Let’s review the Server task to see the progress of the Agent Deployment. As you can se, it is in progress

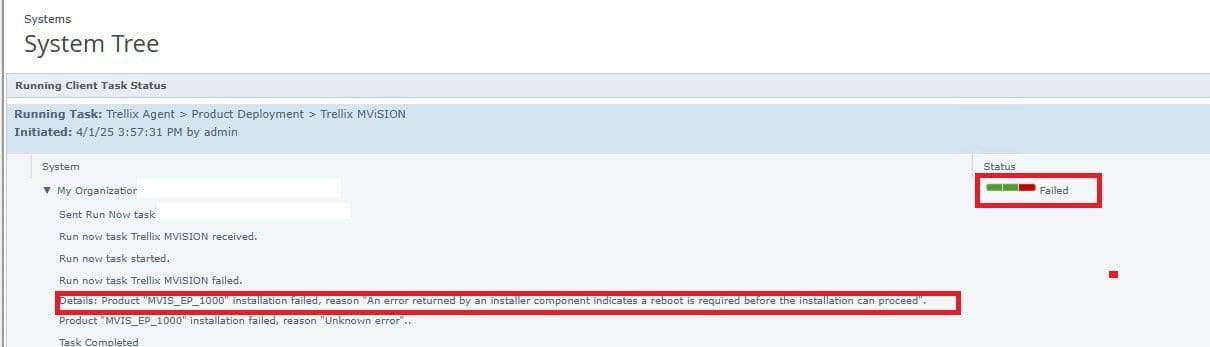
If there is a failure such as as shown below, please take a look at the running client task status for failure reason. I will reboot and proceed with the deployment.
As you can see below, the deployment has succeeded after rebooting.

Deployment tasks and the Client Task Catalog are both used in ePolicy Orchestrator (ePO) for managing endpoint security, but they serve different purposes. Here’s when you would use each:
Please, see how to Install SQL Server Management Studio 21 on Windows Server, and how to Install Windows Server 2025 via iDRAC Virtual Media or PXE.
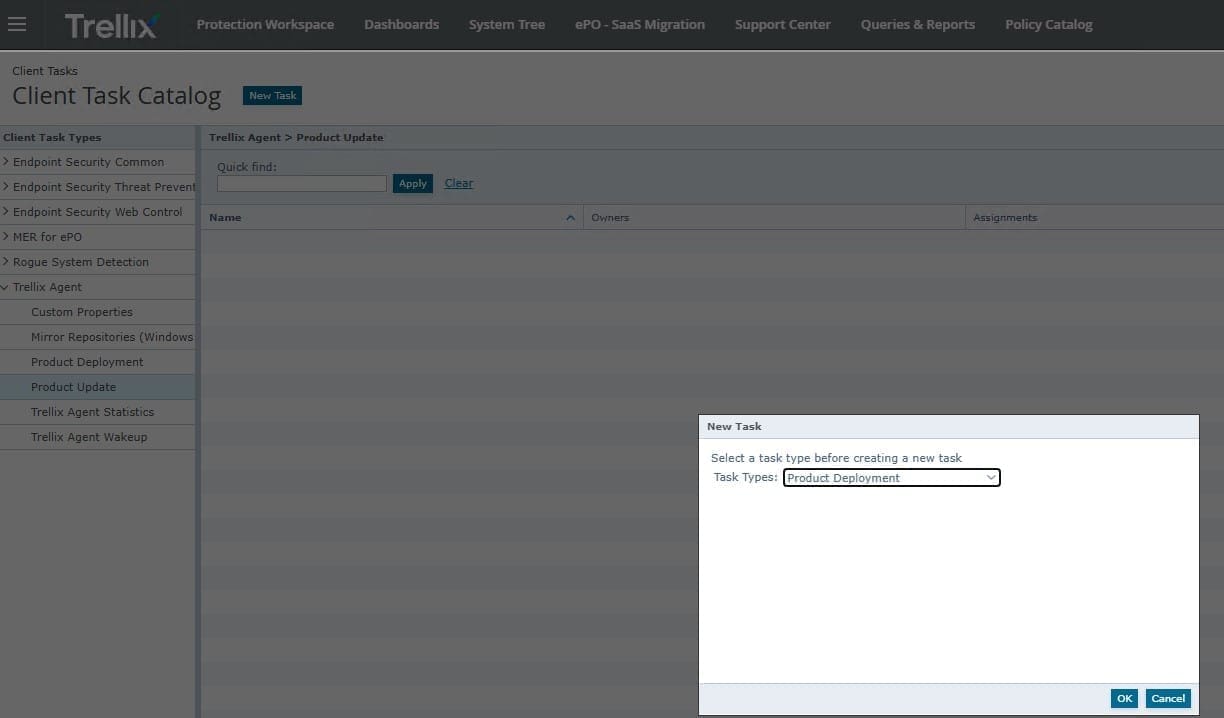
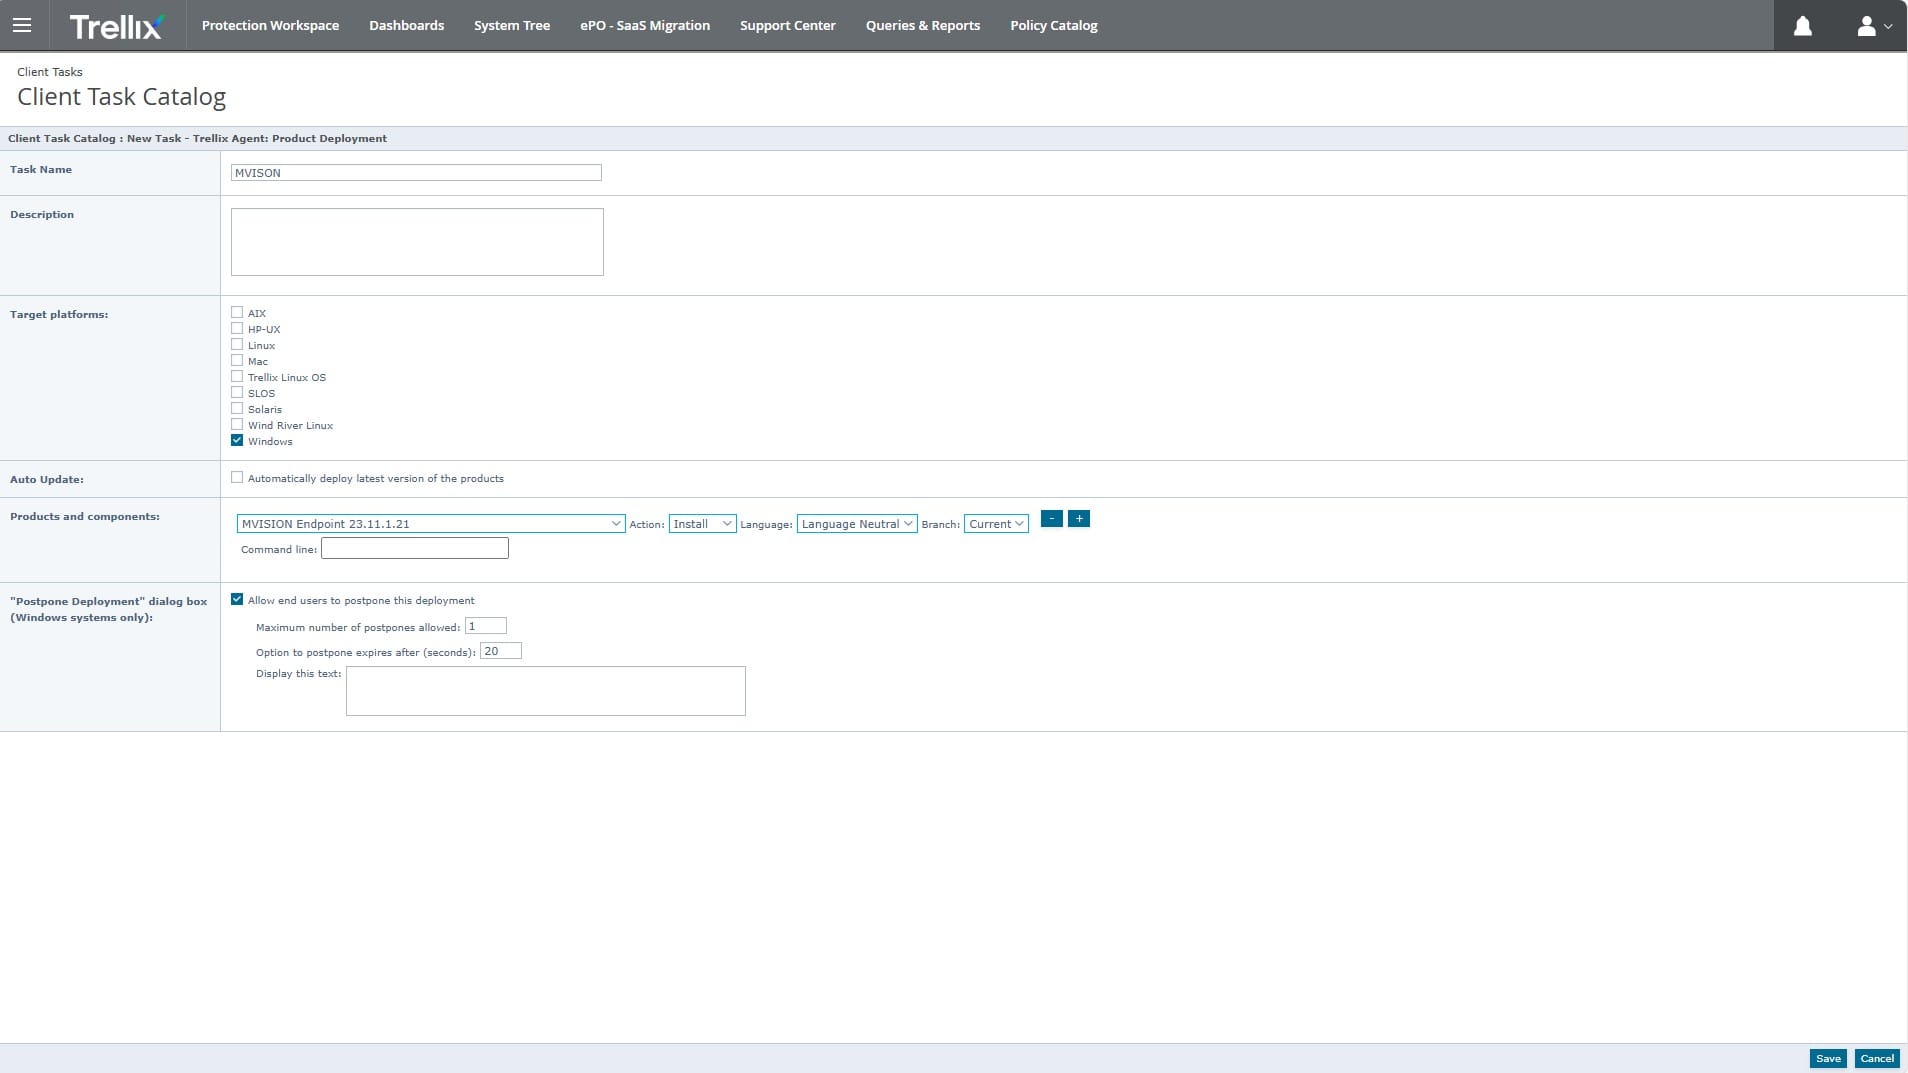
Trellix MVISON Deployment via the Client Task Catalog
This can be achieved by using the Client Tasks Catalog. Simply follow the prompts to select the appropriate Organizational Unit (OU) or device group. Once successfully assigned, the Assignment column will reflect “1 Assignment.” This method is highly recommended, as it ensures consistent and automated task deployment to targeted systems.
Note that Product Deployment in Trellix ePO can be automated, but whether it acts automatically depends on how you configure it. You can achieve this via Scheduled deployment Tasks, System Tree based Automation just as I have done above and lastly, via the Agent Wake-up calls.
Both Product Deployment and Client Task deployment are valid methods to deliver software and updates much like Windows as discussed above.
Trellix ePO enables you to achieve the same outcome via multiple paths, each offering different levels of control and use cases. Please, see the images below on how to achieve this via the Client Task catalog.
Here are some guide on how to install Windows Server 2022 on VirtualBox, how to install Windows Server 2022 on VMware Workstation, and how to install Windows Server 2019 on Virtualbox.
Trellix Product Deployment vs Client Task Catalog
Product Deployment is great for initial rollouts or pushing a new version of an agent or module (like MVISION). These are specific instructions created to distribute and install software packages on endpoints. Use deployment tasks when:
- You need to install new software or updates on endpoint devices.
- You are assigning tasks to specific devices or groups in the network.
- You want to control when and how the software is deployed such as immediately or scheduled deployment at a later time.
While the The Client Task Catalog acts as a repository for predefined tasks. It is more suited to ongoing management, maintenance, and reusability. Use it when:
- You want to streamline task management by organizing and deploying tasks efficiently from a central location.
- When you need to access, customize, or reuse existing task templates, and
- lastly, when setting up recurring activities, such as scheduled scans or regular updates for antivirus definitions.
Key Differences Between Trellix Product Deployment and Client Task Deployment
The Table below shows the key Differences Between Trellix Product Deployment and Client Task Deployment.
| Feature | Product Deployment | Client Task (via Client Task Catalog) |
|---|---|---|
| Purpose | One-time software install (e.g., deploying MVISION Endpoint or Trellix Agent). | Scheduled, reusable actions (e.g., recurring scans, updates, or agent reinstalls). |
| Scope | Designed for streamlined deployment of specific software from the Software Catalog. | Broader use for managing any type of task (deployment, scan, update, etc.). |
| Configuration | Automatically includes install commands and related components. You just select the product/version. | More manual setup required; define the command, schedule, and conditions. |
| Execution | Ideal for quick, guided deployment of a product version. | Better for recurring or customized tasks applied to specific OUs or systems. |
| Reusability | Typically used per deployment event. Not designed for reuse. | Tasks are stored in the Client Task Catalog and can be assigned to multiple systems. |
| Policy Link | Usually paired with software being installed. | Can be assigned independently of the software, e.g., agent wakeup or scan. |
Please, see Veeam Agent Vulnerability: Fix Veeam Agent vulnerability for Microsoft Windows, “Service Principal Name: How to add, reset and delete SPNs‘, and What are the Differences between UEFI and BIOS.
Deploy MVISION Agent without having Trellix Endpoint Agent installed on a PC
It is also possible to install MVISION Endpoint without having the Trellix Agent installed on a PC. However, this depends on the deployment method and the specific requirements of your environment. Here are some key points to consider:
1: Standalone Installation: MVISION Endpoint can be installed as a standalone client without requiring the Trellix Agent.
This is done by downloading the installation package and running it directly on the endpoint. You may need to configure policies manually or use a policy file during installation.

Install the MVISION Agent unto your PC.

2: Without ePO Management: If you’re not using Trellix ePolicy Orchestrator (ePO) for centralized management, you can still install MVISION Endpoint manually. However, you lose the benefits of centralized policy enforcement and monitoring.
Use the appropriate installation command as shown below to deploy the software without the Trellix Agent.
mfsesetu.exe /install /quiet /norestartPlease take a look at “What’s New? Install Windows Server 2025 on Beelink EQ12 PC“, and What is the difference between iDRAC, IPMI, and ILO.
Below is a YouTube video of Trellix EDR Client Installation by Brian Alderson, a Senior Technical Designer at Trellix.
FAQ
How can you find the Organizational Unit (OU) or container a specific PC belong to in Active Directory (AD)?
The first option is via Active Directory Users and Computers (ADUC). Once you find the PC in the search results, right-click it and select Properties. In the General tab, note the Location field. This indicates the OU or container path where the PC resides.
Alternatively, you can use PowerShell for a more automated approach. Open PowerShell with administrative privileges, and run the command below;Get-ADComputer -Identity "PCName" | Select-Object DistinguishedName Replace "PCName"
With the name of the PC you’re searching for. The DistinguishedName property in the output will reveal the full path, including the OU
How do I forcefully remove the Trellix Agent from a Windows system via the command line?
To uninstall the Trellix Agent from a Windows machine, since normal removal will not work, use the commands below. Here is a similar link discussing this topic: BitLocker behavior when MBAM agent is removed: No Uninstall Option in Control Panel.
Navigate to the Agent’s Installation Folder via the command cd “C:\Program Files\McAfee\Agent” and run FrmInst.exe /forceuninstall. The FrmInst.exe is the agent’s built-in uninstallation utility.
Or “C:\Program Files\McAfee\Agent\x86\FrmInst.exe” /REMOVE=AGENT or “C:\Program Files\McAfee\Agent\x86\FrmInst.exe” /FORCEUNINSTALL on the fly.
Since I prefer WMIC, wmic product where “name like ‘Trellix Agent%'” call uninstall /nointeractive – This works if product is visible via MSI.
I hope you found this article very useful on how to install Trellix MVISON Endpoint. Please, feel free to leave a comment below.


