OOTBI Security Best Practices: Enable Honeypot on Object First

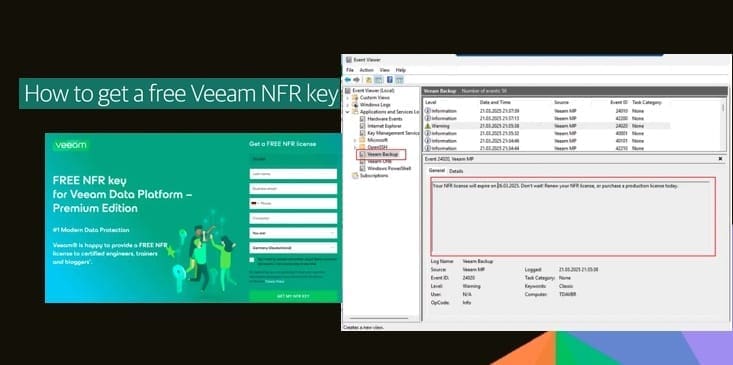
In this guide, we shall discuss “OOTBI Security Best Practices: Enable Honeypot on Object First”. To use Honeypot, a new feature available in OOTBI 1.7. You will have to ensure that you have upgraded to this version. See the release Notes, and you will be redirected to the Request form. Please, see how to Configure Object First OOTBI Appliance, and how to update Object First OOTBI Cluster.
Object First Support is exceptional. Their responsiveness and efficiency in addressing issues are second to none. If you require immediate assistance or approval. Reaching out to their support team is highly recommended. See Understanding User Roles & Access Control in Object First OOTBI.
According to Object First, customers running OOTBI versions earlier than 1.5.55.10660 should complete the update using the intermediate patch (ONLY for offline updates and if the customer hasn’t installed version 1.5.55.10660).
- Update Ootbi to version 1.5.54.10596
- Update Ootbi to version 1.7.79.12311
Also, see Object First OOTBI Appliance Unboxing and Quick Setup, how to integrate Object First OOTBI Appliance with VBR, and how to download and update Synology DiskStation NAS to DSM 7.3.
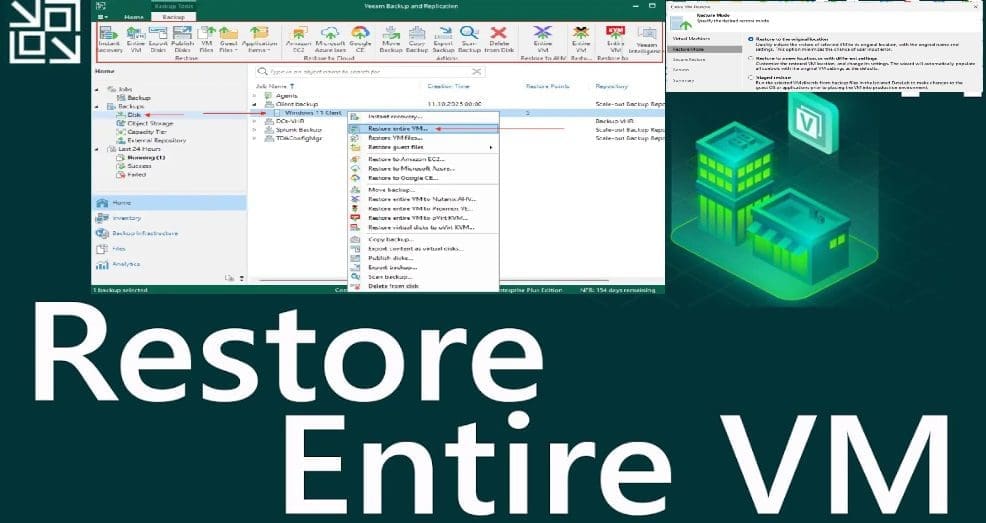
Early detection of Threats Targeting VBR with Object First
Object First has introduced a significant enhancement in version 1.7: the Honeypot feature. This feature enables the deployment of a decoy Veeam Backup & Replication (VBR) environment with just a few clicks. This serves as an early-warning system to detect potential cyber threats targeting your backup infrastructure. Below are some Key Benefits:
- Seamless Deployment: Activate the Honeypot feature with minimal configuration, integrating effortlessly into your existing setup.
- Early Threat Detection: The decoy environment attracts malicious actors, allowing for early identification of suspicious activities before they impact your production systems.
- Real-Time Alerts: Upon detecting any interaction with the Honeypot. Immediate alerts are sent through your preferred communication channels. Thereby, enabling swift response.
- Enhanced Security Posture: By isolating the Honeypot within a securely segmented part of the Ootbi appliance, the feature acts as a tripwire without increasing the attack surface.
This addition underscores Object First’s commitment to providing secure, simple, and powerful backup solutions optimized specifically for Veeam users.
Note: The Honeypot feature is available at no additional cost to existing Ootbi customers using version 1.7.
Please, see how to resolve “Unknown Error occurred when installing Veeam Software Appliance“, and how to Resize or Expand Proxmox Hard Drive.
Perform Offline Upgrade of Object First (OOTBI)
Therefore, this section discusses how to perform an office upgrade of OOTBI to v1.7 as this is not made to all customers as of yet. To do this, logon to the Object First Web UI.

These steps are similar to how to perform Offline and Online Update for Object First Out-of-the-Box Cluster. On the release note as attached in the first paragraph, click on Download Offline Bundle.

In the Request Your Offline Bundle, populate the form with your information. If you want the approval with the speed of light, contact Object First Support.
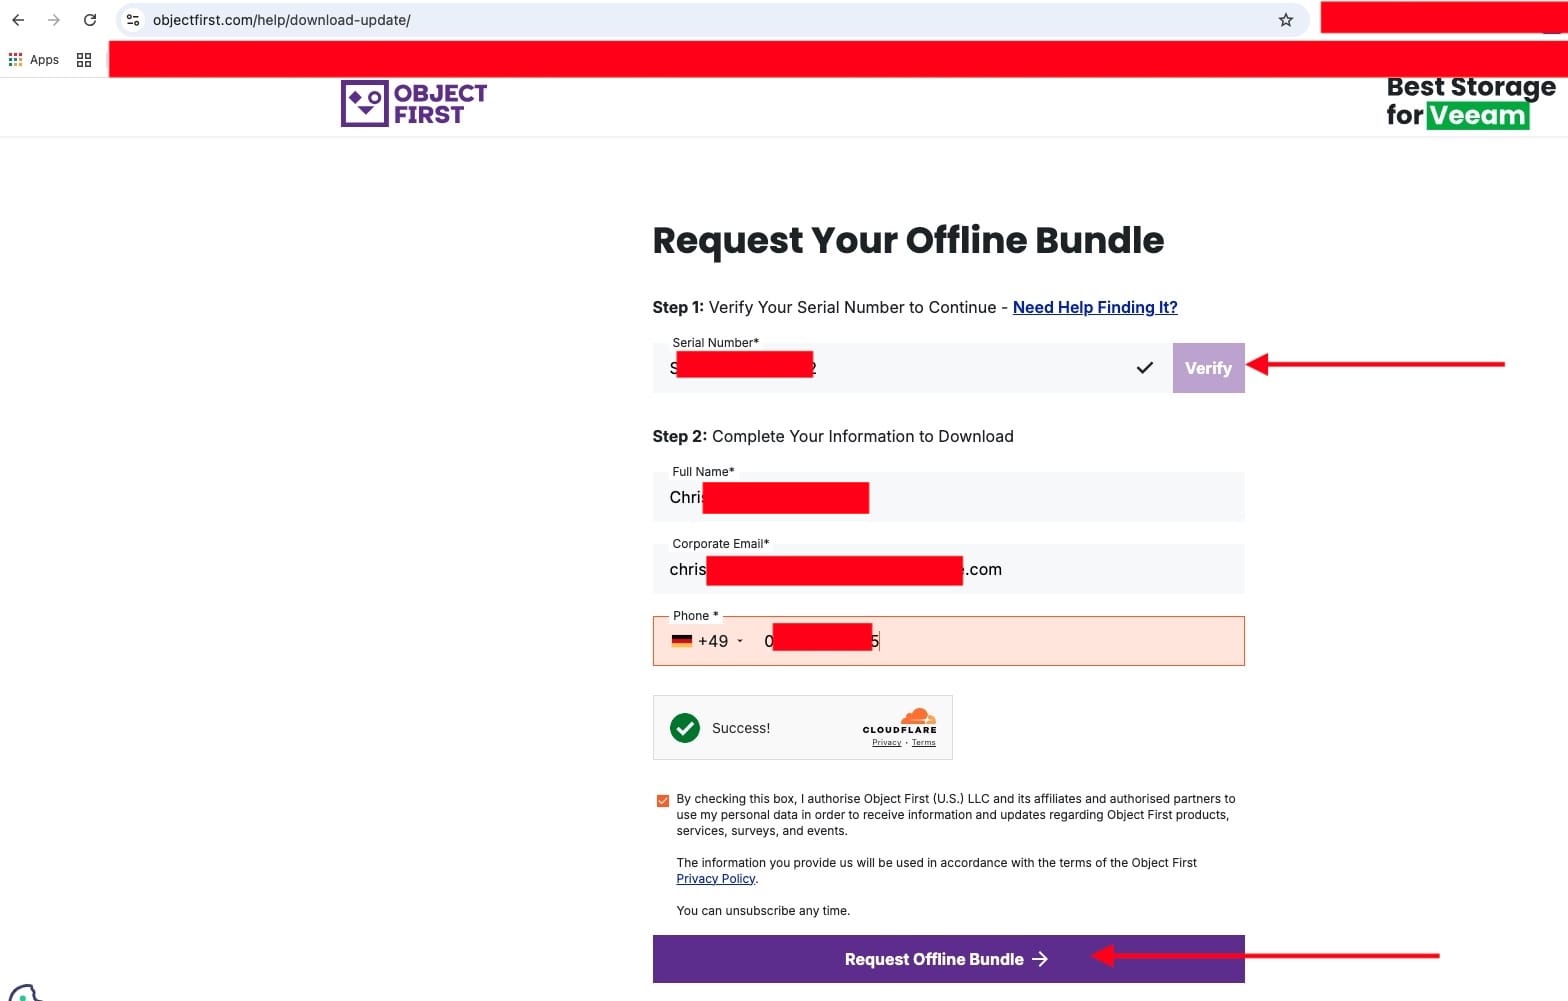
As you can see, we have successfully submitted the form.

Here is a guide on Troubleshooting WinRM and Kerberos Delegation for WAC, and how to Setup Windows Admin Center Modern Gateway for Single Sign-On.
Upload Offline Bundle
The prerequisite is to ensure that you are running Object First OOTBI (1.5.54.10596). As you can see below, we are already above that and on v1.6. To perform the update, click on “Upload Offline Bundle”.

Upload is in progress

Shortly, you will be prompted to install as shown below.

Cluster installation is on progress

As shown below, the cluster update has completed. Please, reboot the cluster.

Please, see how to add Synology NFS Storage to Proxmox VE for VMs and Backups, and how to setup Veeam Software Appliance v13.
Enable Honeypot on OOTBI
To enable Honeypot as discussed above, it requires only a few clicks. Navigate to the Settings and then click on the Security tab and select Honeypot.

I am fine using DHCP. You can set the IP statically if you want. Do not forget to save when complete.

Changes are applying

As you can see below, the honeypot status is heathy and running. Here, you can also restart the Honeypot.

Please, see What is taking up by Synology NAS Volume Space, and how to Patch Veeam Backup and replication 12.3.2.3617 to 12.3.2.4165.
OOTBI House Keeping: Enable 2FA for Object first
In this new version of OOTBI 1.7, security and management have been enhanced. Password policies now enforce a minimum length of 15 characters, prevent reuse of the last five passwords, and automatically log users out of management interfaces following a password reset.
Also, if you have not enabled 2FA, enabling Two-Factor Authentication (2FA) for your Object First OOTBI appliance is highly recommended for several critical security reason.
Passwords alone can be compromised through phishing, brute-force attacks, or credential leaks. 2FA adds an additional layer: even if someone steals your password, they cannot log in without the second factor (e.g., a code from an authenticator app etc).
Since OOTBI stores immutable backups and sensitive organizational data. Unauthorized access could lead to deletion, ransomware encryption, or data exfiltration. 2FA helps ensure that only authorized personnel can access the appliance. Please, see how to Set Two-Factor Authentication for SSH in Linux.
Lastly, Many regulations (GDPR, ISO 27001, SOC 2, etc.) recommend or require multi-factor authentication for critical systems. Enabling 2FA demonstrates adherence to cybersecurity best practices and audit readiness. You can also do this by clicking on enable 2FA from the dashboard as shown below.

Enter the 6 digit code after scanning the QR Code or manually entering the security code. When this is done, click on Enable as shown below.

2FA has now being enabled.

If you wish to disable it, you can from this window below. But why would you?

Please, see how to update Veeam Backup and Replication [VBR], and how to Configure Active Directory-Based Activation (ADBA) for Windows.
Enable Email Notification
Enabling Email Notification on your Object First OOTBI appliance (or any backup appliance) is important for real-time visibility and proactive management. Instant alerts allow you to resolve problems before they impact production systems or cause data loss.
To do this, under General, ensure your email address is entered. Else, the email notification field will be greyed out.

Now, click “Enable Email Notification” and select your preferred event severity level. You can also send a test email to verify that notifications are functioning correctly.

lso, see what is the difference between iDRAC, IPMI, and ILO, and how to Generate CSR and Request a Certificate from Herica CA. Here is how to configure WebLAPS to manage Microsoft LAPS.
Disable SSH Access
If for whatsoever reason you enabled SSH, please disable it. SSH provides remote shell access, which can be exploited if credentials are compromised or vulnerabilities exist.
Disabling SSH reduces potential entry points and ensures that only authorized management interfaces are used, lowering the risk of accidental or malicious changes.
This approach aligns with security best practices and regulatory frameworks (e.g., ISO 27001, NIST, SOC 2) that recommend limiting administrative access to critical systems.
Additionally, OOTBI offers web-based management interfaces and APIs for configuration and monitoring, ensuring that all operations occur through controlled, auditable channels

If you have 2FA enabled, you will be prompted to enter it.

As you can see, SSH has been disabled

Disable IPMI
While OOTBI ensures software-level immutability, IPMI can be a backdoor for attackers to physically disrupt, reconfigure, or compromise storage at the hardware level. Securing IPMI access is critical to maintaining true immutability and preventing attacks that could undermine data integrity. To learn more, see “Best Storage for Veeam: Comparing OOTBI by Object First to VHR“
You can unplug the IPMI network cable from the appliance to disable remote IPMI access. This alone does not change the warning message in this image.
To disable IPMI, please login to the ObjectFirst Management Console, click on Settings and select Network. Under the “Network interfaces”, please select the checkbox “Disable” and click on “Apply Changes”.

I hope you found this article on OOTBI Security Best Practices: Enable Honeypot on Object First very useful. Please, feel free to leave a comment below.