Integrate Active Directory with IPMI for Out-of-Band Management

In this guide, we shall discuss how to Integrate Active Directory with IPMI for OOTBI Out-of-Band Management. Please, see how to update Object First OOTBI Cluster. Out-of-band management revolutionised server administration by allowing IT teams to remotely monitor, power cycle, and recover systems through dedicated hardware controllers. This eliminates the need for physical, hands-on intervention when servers became unresponsive. You may want to learn the difference between (Dell iDRAC, Supermicro IPMI, IBM IMM, and HP iLO.
For Object First customer, I highly recommend you to disable IPMI after the initial setup of your cluster. Therefore, this article is not recommended for your consumption.
Table of contents
Note: Object First recommends that after setting up your appliance, you should disable IPMI. This helps further protect your organizations from unforeseen disruptions and ensures their backups remain safe, secure, and always available without interruption. Please take a look at this article on why you must disable IPMI today! Also, see “OOTBI Security Best Practices: Enable Honeypot on Object First“.

The OOTBI application is designed to protect against any data breach or malware infestation of an Object First customer. Even if all of the customer’s secrets, including administrator credentials and bucket credentials, are known to the attacker, the attacker still cannot modify data stored within an OOTBI appliance.
Please, see how to Import PST file into Exchange Server 2016, the trust relationship between this workstation and the primary domain failed, and Outlook Data File: Fix PST Error – Exceeded Maximum Large Items.
Physical Security
We have often emphasized the importance of OOTBI physical security. This ensures that the appliance is installed in a secure environment such as a dedicated server room or equipment closet. With access restricted to authorized personnel only.
However, physical security alone is not sufficient. Unsecured IPMI (Intelligent Platform Management Interface) access can pose a serious risk. Therefore, disable the Intelligent Platform Management Interface if you have not done so already.
When you access the IPMI interface, you are prompted to log in using a default username such as ADMIN and password Admin. But if you are using OOTBI, there is a hardware-associated password that can be used used. If you do not disable the IPMI, this password can be changed by an attacker. Please, disable IPMI for security best practice.
But what if you decide not to disable the IPMI because you have it in the management domain or have coconut head by not adhering to best practices? Can we reliably track and audit who accessed the appliance using this shared account?
Without proper integration and identity controls, accounting and accountability become nearly impossible, leaving the system vulnerable to unauthorized access and undetected configuration changes.
Also, see how to Configure Object First OOTBI Appliance, and Object First OOTBI Appliance Unboxing and Quick Setup.
Understanding IPMI and why AD integration Matters
The IPMI (Intelligent Platform Management Interface) manages power, monitoring, and remote console access. As discussed above, unmanaged IPMI interfaces pose significant security risks. In many environments, default credentials remain unchanged. This creates an easy entry point for attackers.
Each device often maintains its own local user accounts, leading to fragmented login silos and poor identity hygiene. Moreover, without centralized logging or audit trails. It becomes nearly impossible to trace who accessed the system or what changes were made, leaving organizations exposed to unauthorized actions and accountability gaps.
Integrating IPMI with Active Directory strengthens security and simplifies management. It enables unified authentication and authorization, ensuring consistent access control across systems.
Administrators can enforce policy-based password rotation and map user roles directly to AD groups for clearer privilege management. Most importantly, deprovisioning becomes effortless. Disabling a single AD account automatically revokes access across all linked IPMI interfaces. Thereby, reducing the risk of orphaned credentials and improving overall compliance.
Please, see “Best Storage for Veeam: Comparing OOTBI by ObjectFirst to VHR“, how to Migrate Microsoft Enterprise Root Certification Authority and Forest Domain to Azure, and Unveiling OOTBI Mini and New Features for v1.7 from Object First.
Integrate Active Directory (AD) with IPMI
This steps assumes you have created an IPMI AD group (e.g.,
IPMI_Admins) whose members will be allowed BMC access. Lastly, ensure that the domain controller(s) are reachable from the IPMI management network. Please, see how to install Windows Server 2025 via iDRAC Virtual Media or PXE, and Upgrade Windows Server 2019 to 2022 via iDRAC.
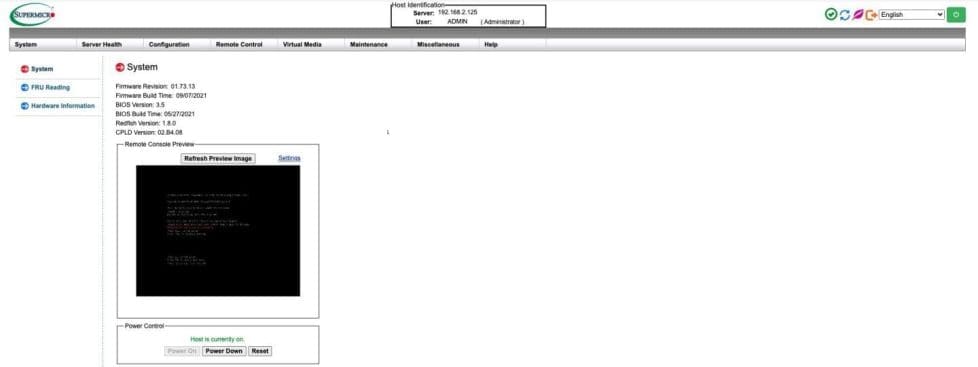
Next, from the BMC (Baseboard Management Controller)/IPMI web interface. Ideally, the manufacturer default username and password are ADMIN/ADMIN. But for OOTBI for example, this is not the case as it is secure by default. There is a password bound to the Hardware you can use for login. Login as ADMIN with the password associated to the hardware.
This password can be changed by an attacker if he gets hold of the hardware bound password. Therefore, I recommend you to disable IPMI.

Once the login is successful, the IPMI main screen is available as shown below.
You can further read how to Import Data from a Git Repository to Postman, how to use Postman for your POST Request, how to Use Postman with the Amazon Pinpoint API, and how to use Command-Line on Git Bash and GitHub Desktop to PUSH local code to GitHub.
Active directory integration
You have several integration methods available such as RADIUS or LDAP (This feature allows the user to configure the Light-Weight Directory Access Protocol (LDAP) settings) as shown below. But in this case I will use Active Directory.
If you wish to use LDAP, check the enable box to enable LDAP Authentication and LDAP Authentication over SSL support.
- Enter a port number for the LDAP server.
- Enter an IP Address for the LDAP server.
- Enter a Bind Password for the LDAP server.
- Enter a Bind DN value in the field. (The bind DN is the user or the LDAP
server that is permitted to do search in the LDAP directory within a defined
search base.)
- Enter a SearchBase value in the field. (The SearchBase is the directory that
allows the external user to search data.)
- Click on <Save> to save the settings.
Navigate to Configuration and then Active Directory settings. This page lists role groups along with their Group IDs, Group Names, Domains, and Network Privilege settings.

Note: Click on the link as shown in the image above to enable or configure the Active Directory server. When you do this, the below page for enabling or configuring Active Directory will be launched. Check the <Enable> box to enable Active Directory authentication support. Then, Enter the values in the fields below.
- Enter <User Domain Name>.
- Enter Time Out value in the field to set the time limit for a user to stay
logging-in.
- Enter <Controller Server Address1>.
- Enter <Controller Server Address2>.
- Enter <Controller Server Address3>.
- Click on <Save> to save the settings.
As you can see below, new Active directory advanced parameters have been saved.

Please, see Unable to bind to LDAP or AD in Pleasant Password Server, how to Configure Synology DS923+ NAS for File Sharing [Part 2], and how to Manage User Permission on Synology with Active Directory [Part 1].
Select Active Directory group
Select a group and click “Add Role Group”.
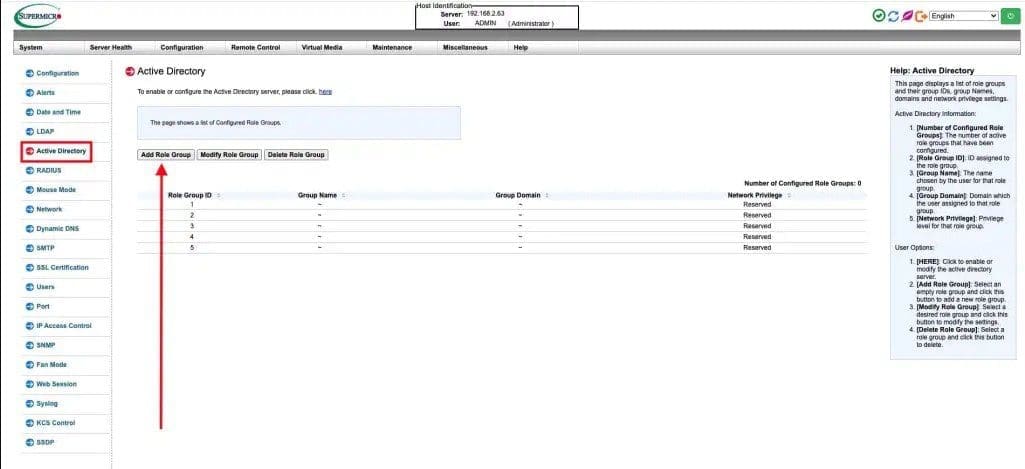
Note: If a role group number is not selected as shown below, the “Add Role Group” will not be executed.

Therefore, select an empty group as shown below and click on Add Role Group again.

Here, you can define the Role Group Name, assign its Domain, and set the privileges that members of the group will have and save.

As mentioned above, it is possible to use RADIUS as well. This feature allows the user to configure Radius option settings. When you click on Radius in the Options Window, check the box to enable Radius support. Enter the information in the fields below to configure Radius settings.
- Enter the port number for the Radius server.
- Enter the IP address of the Radius server.
- Enter a secret (password) for the user to access the Radius server.
- Click on <Save> to save the settings
Please, see 802.1x and EAP Authentication Types, and Out–of–Band Security Update for PrintNightmare: Patch released for Windows Print Spooler Remote Code Execution Vulnerability. If you wish to take a look at the “IPMI_Users_Guide“
I hope you found this article very useful on how to Integrate Active Directory with IPMI for Out-of-Band Management. Please, feel free to leave a comment below.


