Skip to content

TechDirectArchive

Hands-on IT, Cloud, Security & DevOps Insights

  • Home
  • About
  • Advertise With US
  • Contact
  • Reviews
  • Toggle search form
Home » AWS/Azure/OpenShift » How to Use Postman with the Amazon Pinpoint API

How to Use Postman with the Amazon Pinpoint API

Posted on 01/01/202229/09/2023 Temitope Odemo By Temitope Odemo No Comments on How to Use Postman with the Amazon Pinpoint API
Use Postman

Amazon Pinpoint is an AWS service that you can use to interact and engage with your customers across different messaging platforms. In addition, this AWS service can be used to send push notifications, emails, SMS text messages, or voice messages. These are very good messaging features that application developers can use with their applications. Postman is another popular tool for testing APIs. Postman can be used to send API requests to any REST API, and also can be used to receive responses to your requests. Furthermore, Postman is a very good tool that can be used to test and troubleshoot the calls that you make to the Amazon Pinpoint API.

For more guides on AWS services you can read these: How to enable Amazon S3 default bucket encryption using S3 Console, How to deploy a .NET application to AWS Elastic Beanstalk using AWS Tool Kit, How to Deploy MVC Application to AWS EC2 Using RDP Connection and Web Deploy, How to Deploy Dynamic Website to AWS EC2, Hosting Static Website and Versioning on AWS S3, Creating IAM Users, Adding MFA and Policies on AWS, How to manage cost with AWS Budgets, How to deploy an Angular App to AWS S3.

In this guide we will be setting up Amazon Pinpoint with Postman. Before we start, make sure you have the below already setup:

  • You must have an AWS account. So, to create one for yourself, go to https://console.aws.amazon.com/.
  • The account that you created and use to sign into the AWS Management Console must be able to create new IAM policies and roles.
  • Therefore, you must have downloaded and install Postman on your computer. You can download Postman from here Postman website.
  • After installing Postman on your computer then create a Postman account that you will be using to login and carrying out your task.

In other to use Postman to test the Amazon Pinpoint API, you need to create an IAM user. Meanwhile, you can read this guide Creating IAM Users, Adding MFA and Policies on AWS

After you created the IAM user then you need to login to it and create an IAM Policy.

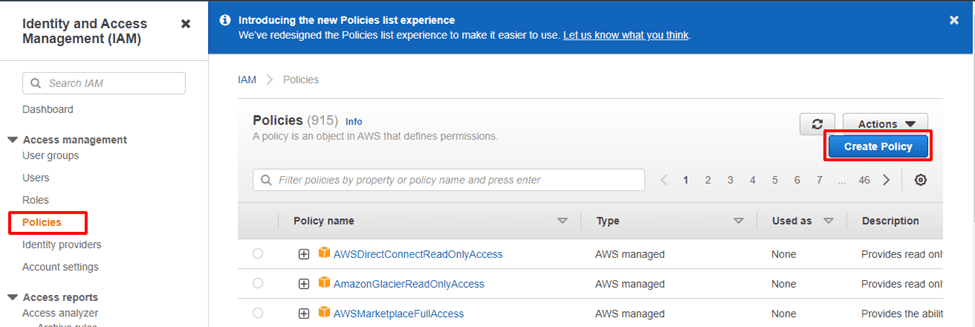
The next step now is to create an IAM Policy:

  • Login to the AWS Management Console and open the IAM console at https://console.aws.amazon.com/iam/.
  • Thus, in the navigation section, click Policies >> Create policy.
Amazon Pinpoint API
Identity and Access Management
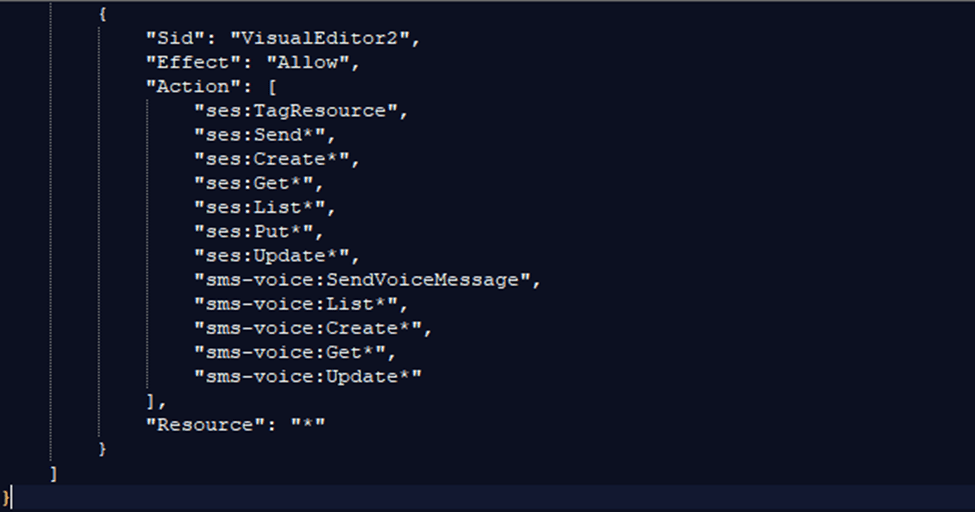
  • On the JSON tab, paste the following code. Note that 963016309182 is the unique ID for my AWS account so you can paste yours.
Postman tutorial
Policy in JSON

Continue……..

Amazon Pinpoint integration
Policy in JSON
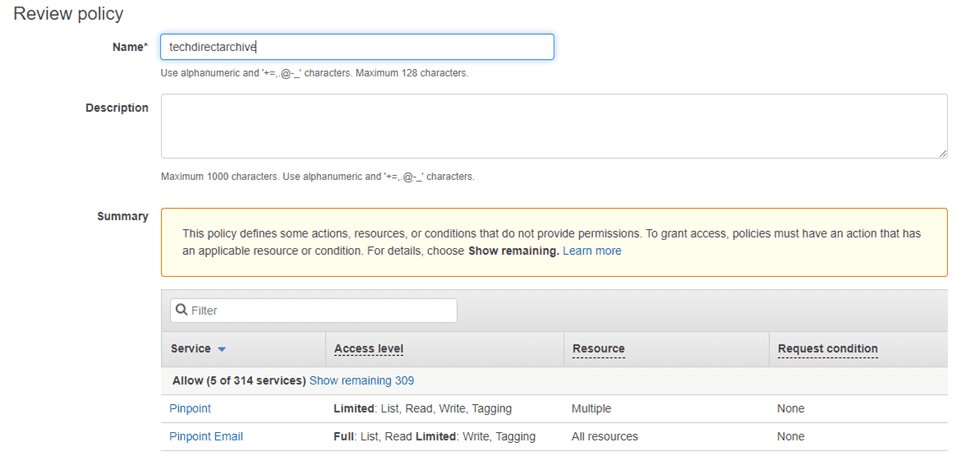
  • Click on Next:Review.
  • Thus, on the Review Policy section, enter a name for the policy and click on Create policy.
Amazon Pinpoint integration
Review Policy

Policy created

Use Postman
Policy Created

Please note that you must provide both the access key ID and the secret access generated while creating the IAM user. It is recommended that you should copy it and save it.

The IAM user account that can access the Amazon Pinpoint API is ready, what is next is to setup the Postman.

Creating Postman environments

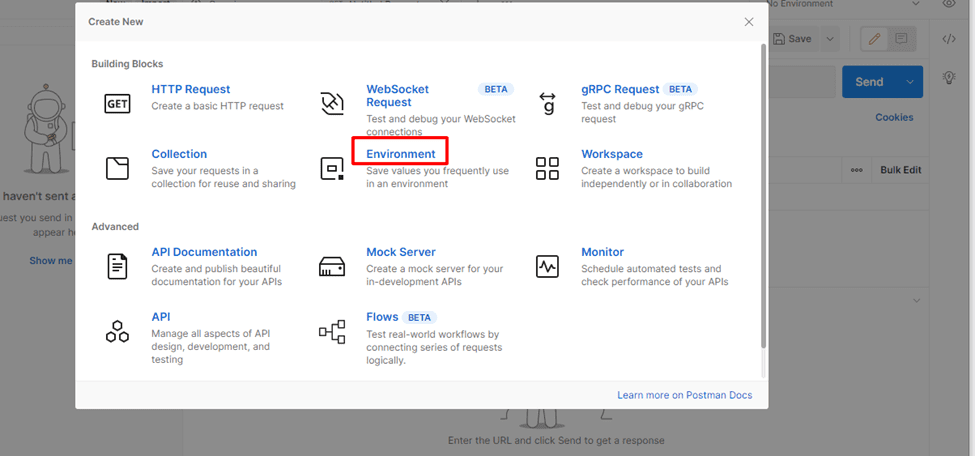
  • So, in Postman, on the File menu, choose New.
  • Afterward, on the Create New window, click on Environment.
Amazon Pinpoint integration
Postman Environment
  • On the MANAGE ENVIRONMENTS window, enter the Environment Name, please enter Amazon Pinpoint - Region Name. Furthermore, you can replace the Region Name with US West (Oregon)
  • On the Postman create six new variables: 
  • Endpoint
  • Region
  • serviceName
  • accountId
  • accessKey
  • secretAccessKey
image-6
Postman Workspace

Please note: Never share your IAM access keys with others. Do not share your access key ID and secret access key with anybody.

When you finish creating the Postman environment, proceed to the next step of creating Amazon Pinpoint collection. A collection is a group of API requests.

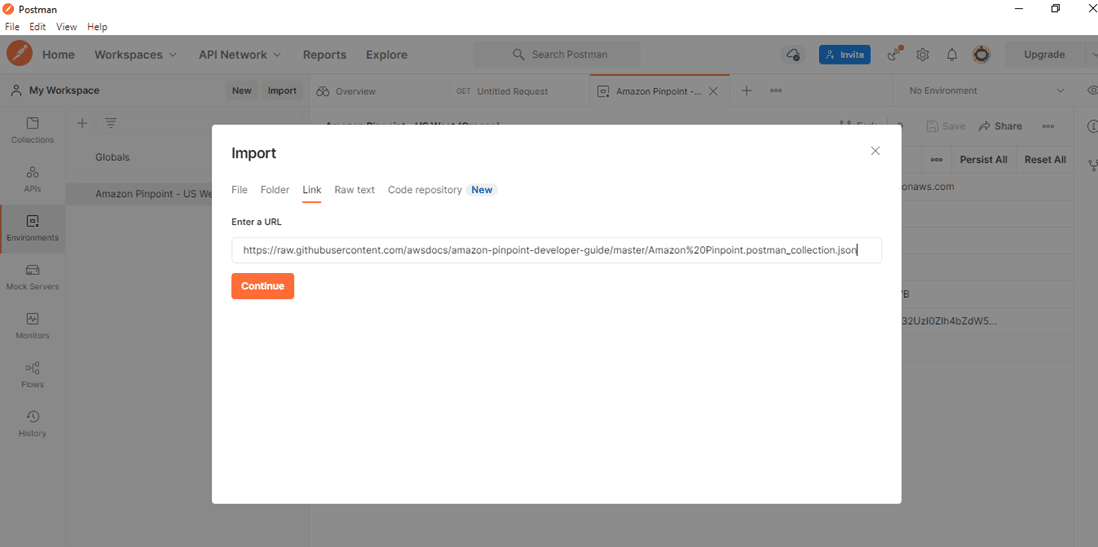
In Postman, click File >> Import menu.

On the Import window, Select Link, and then enter the following in the URL: https://raw.githubusercontent.com/awsdocs/amazon-pinpoint-developer-guide/master/Amazon%20Pinpoint.postman_collection.json.

Then, click Continue to import

image-7
Importing Amazon Pinpoint Collections

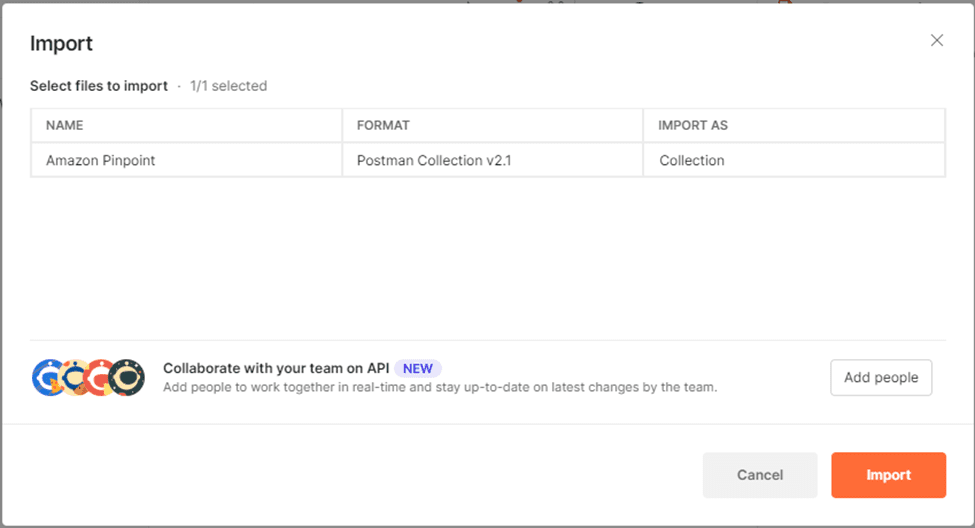
All the Amazon Pinpoint collections will be imported immediately you click on Import.

image-8
Importing

After importing the Amazon Pinpoint collection successfully, you can then perform a test to confirm that everything is properly configured. You can test the configuration by submitting a GetApps request which will return list of all projects in your Amazon Pinpoint account.

Let’s test our configuration of the Amazon Pinpoint collection

  • from the navigation section, expand the Amazon Pinpoint collection and the the Apps folder.
  • from the list of requests, select GetApps and make sure you select the environment you created earlier.
image-9
Sending your API request to AWS

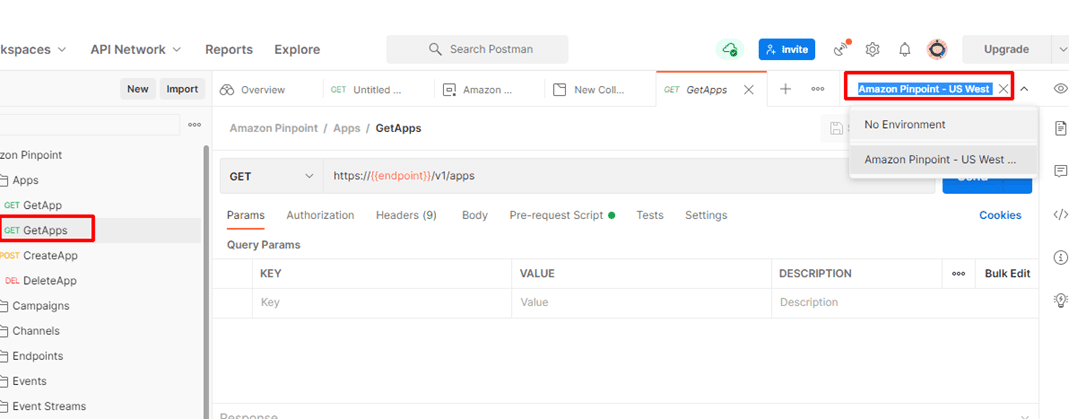
Click Send and If the request is sent successfully you should get a response with status of 200 OK.

image-10
Request sent Successfully

I hope you found this blog post on How to Use Postman with the Amazon Pinpoint API very interesting and helpful. In case you have any questions do not hesitate to ask in the comment section.

Rate this post

Thank you for reading this post. Kindly share it with others.

  • Share on X (Opens in new window) X
  • Share on Reddit (Opens in new window) Reddit
  • Share on LinkedIn (Opens in new window) LinkedIn
  • Share on Facebook (Opens in new window) Facebook
  • Share on Pinterest (Opens in new window) Pinterest
  • Share on Tumblr (Opens in new window) Tumblr
  • Share on Telegram (Opens in new window) Telegram
  • Share on WhatsApp (Opens in new window) WhatsApp
  • Share on Mastodon (Opens in new window) Mastodon
  • Share on Bluesky (Opens in new window) Bluesky
  • Share on Threads (Opens in new window) Threads
  • Share on Nextdoor (Opens in new window) Nextdoor
AWS/Azure/OpenShift Tags:AWS, postman

Post navigation

Previous Post: Bang and Olufsen Bluetooth connection: How to connect and remove Beoplay E8 3rd Generation to Mac
Next Post: How to Generate SSH Keys in Windows 10

Related Posts

  • Screenshot 2024 02 09 at 7.34.18 PM
    How to create a Logic App for monitoring tweets AWS/Azure/OpenShift
  • How to configure Azure container register with secured connection with container apps
    Configure Azure Container Registry for a secure connection with Azure Container Apps AWS/Azure/OpenShift
  • image 73
    How to manage and use Amazon S3 access points using the AWS Management Console AWS/Azure/OpenShift
  • S3 Bucket Replication
    Set up Cross-Region Replication for S3 Buckets AWS/Azure/OpenShift
  • featuredimage
    Create App Service Resource with Azure CLI AWS/Azure/OpenShift
  • Deploy static website to azure blog storage
    Deploy a Static Website to Azure Storage from VSCode AWS/Azure/OpenShift

More Related Articles

Screenshot 2024 02 09 at 7.34.18 PM How to create a Logic App for monitoring tweets AWS/Azure/OpenShift
How to configure Azure container register with secured connection with container apps Configure Azure Container Registry for a secure connection with Azure Container Apps AWS/Azure/OpenShift
image 73 How to manage and use Amazon S3 access points using the AWS Management Console AWS/Azure/OpenShift
S3 Bucket Replication Set up Cross-Region Replication for S3 Buckets AWS/Azure/OpenShift
featuredimage Create App Service Resource with Azure CLI AWS/Azure/OpenShift
Deploy static website to azure blog storage Deploy a Static Website to Azure Storage from VSCode AWS/Azure/OpenShift

Leave a Reply Cancel reply

You must be logged in to post a comment.

Microsoft MVP

VEEAMLEGEND

vexpert-badge-stars-5

Virtual Background

GoogleNews

Categories

veeaam100

Veeam Vanguard

  • Angular Azure
    How to deploy your Angular App to Azure from Visual Studio Code AWS/Azure/OpenShift
  • microsoft azure new logo 2017 e1572843284943
    Pass-Through Authentication: Azure AD Connect Tool status displays inactive AWS/Azure/OpenShift
  • changepsswd
    How to change your Windows Computer login Password Windows
  • download9
    Change the default Save and Download Location in Windows Windows
  • Screenshot 2020 06 25 at 23.38.40
    What is Registry Editor and how to access the registry hives Windows
  • RecomveRDSlicense
    How to remove RDS Client Access Licenses from RDS Server Windows
  • jhgfx
    How to make Cortana use your default web browser such as Google Chrome Windows
  • images 8
    Microsoft Direct Access: Now Always On VPN Windows Server

Subscribe to Blog via Email

Enter your email address to subscribe to this blog and receive notifications of new posts by email.

Join 1,808 other subscribers
  • RSS - Posts
  • RSS - Comments
  • About
  • Authors
  • Write for us
  • Advertise with us
  • General Terms and Conditions
  • Privacy policy
  • Feedly
  • Telegram
  • Youtube
  • Facebook
  • Instagram
  • LinkedIn
  • Tumblr
  • Pinterest
  • Twitter
  • mastodon

Tags

AWS Azure Bitlocker Microsoft Windows PowerShell WDS Windows 10 Windows 11 Windows Deployment Services Windows Server 2016

Copyright © 2025 TechDirectArchive


Loading Comments...
 

You must be logged in to post a comment.