Skip to content

TechDirectArchive

Hands-on IT, Cloud, Security & DevOps Insights

  • Home
  • About
  • Advertise With US
  • Reviews
  • Contact
  • Toggle search form
Home » Storage » Inbound connection Error: Failed to Perform Scheduled Replication [Part 2]

Inbound connection Error: Failed to Perform Scheduled Replication [Part 2]

Posted on 03/03/202603/03/2026 Christian By Christian No Comments on Inbound connection Error: Failed to Perform Scheduled Replication [Part 2]
Snapshot Replication Failed

Snapshot Replication on Synology delivers fast, reliable data protection by creating schedulable, near-instantaneous backups of your critical business data. It safeguards shared folders and virtual machines stored on LUNs. This ensures your data remains secure, consistent, and readily available in the event of hardware failure, accidental deletion, ransomware, or disaster. In this article, we shall discuss “Inbound connection Error: Failed to Perform Scheduled Replication”. Please, see how to license Veeam Enterprise Manager and Add VBR Servers, and how to fix Failed to create scheduled task due to Windows Server.

With Snapshot Replication, you create point-in-time copies of shared folders and LUNs and replicate them to another Synology NAS. This process preserves data integrity while minimizing downtime, allowing you to restore individual files, entire folders, or full LUNs quickly and efficiently.

By automating snapshots and replication schedules, you maintain continuous protection without interrupting daily operations.

Also, see How to Create a Snapshot on vSphere Web Client, how to uninstall Veeam Backup and Replication from your server, and “how to create Synology Snapshot Replication”

Why was the error “The Replication Task Failed to Perform Scheduled Replication”?

In the past, we had a different issue and here is how we solved it how to fix Task failed to perform Scheduled Snapshot Replication [Part 1]. For this specific error below, it was due to Synology credential change. As such, the replication could not succeed.

More specifically, when the password on the target NAS changes. The source NAS continues to authenticate using the previously stored credentials configured in DSM’s Snapshot Replication task.

Because the stored password no longer matches the updated credentials on the target DSM, authentication fails immediately when the scheduled replication job initiates. As a result, the replication task cannot establish a secure connection and terminates with an authentication error as shown in the email notifcation below and from the snapshot replication job..

Replication Task Failed To Perform Scheduled Replication From DS9

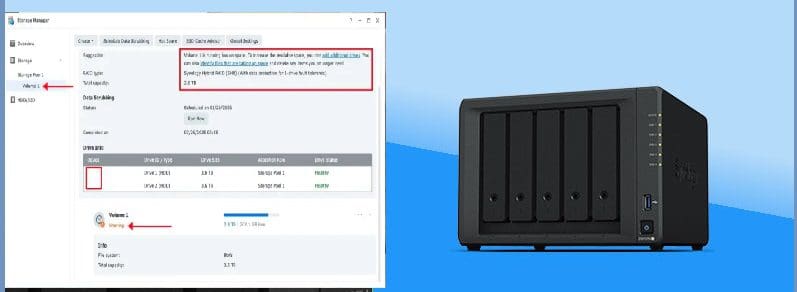
As you can see also from the Replication tab of Synology Snapshot Replication. We can see “Permission error for inbound connection”.

DSM Error

Please, see “Mitigating ‘PrintNightmare’ Vulnerability: Print Spooler Solutions, How to create and configure a Shared Folder on Windows Server, and Unable to Ping an EC2 Instance.

Fix Permission error for inbound connection

To fix this issues, please navigate to the Snapshot Replication console and click on Replication. Select the Task and click on Edit under Actions as shown below.

Edit Task

Click on Authenticate

Authentcate

You will be requested to enter your new password via any of the options below. I will choose the “Password login” in this case.

Password Login

I will enter the new password and click on Submit.

Enter Password

When prompted, enter the 6 digit code and will click on Submit again.

Enter Code

As you can see, we have correctly entered our new credential for this specific replication task. I will click ok Ok to complete it.

Account Connected

As you can see, the replication is in progress and will completed successfully very shortly.

Replication In Progress

Please, see How to upgrade Windows Admin Center from v2411 to v2511, how to Deploy Veeam Recovery Orchestrator and Agents to VBR and VEM, and How to link an iPhone with Windows PC with Phone Link App.

Using the browser login for New Credential

This process is similar to the password login. But in this method, you will be redirected our of the Snapshot Replication console t a new browser window. You will be prompted to authenticate by entering your new password.

Authenicate Via Browser

Upon completing the login via the browser login, you can start the replication as shown below. As you can see already, the first replication job we initiated has completed successfully.

Replication In Progress For The Second Folder

The image below confirms the credential fix worked and the replication is now running successfully. “Replication in Progress” with the progress dialog open, showing real-time transfer from Source Server to the destination source server.

Synology Replication Progress

Below is the Topology tab of the replication task. It confirms everything is configured correctly and operational post-credential fix

Synology Typology

As you can see now, the notifications are no longer failing as well.

Job Completed

I hope you found this article on “Inbound connection Error: Failed to Perform Scheduled Replication” very useful. Please, feel free to leave a comment below.

5/5 - (1 vote)

Thank you for reading this post. Kindly share it with others.

  • Share on X (Opens in new window) X
  • Share on Reddit (Opens in new window) Reddit
  • Share on LinkedIn (Opens in new window) LinkedIn
  • Share on Facebook (Opens in new window) Facebook
  • Share on Pinterest (Opens in new window) Pinterest
  • Share on Tumblr (Opens in new window) Tumblr
  • Share on Telegram (Opens in new window) Telegram
  • Share on WhatsApp (Opens in new window) WhatsApp
  • Share on Mastodon (Opens in new window) Mastodon
  • Share on Bluesky (Opens in new window) Bluesky
  • Share on Threads (Opens in new window) Threads
  • Share on Nextdoor (Opens in new window) Nextdoor
Storage Tags:Failed to Perform Scheduled Replication, Inbound connection Error, Snapshot, Snapshot Replication, Snapshot replication failed, Snapshot replication fix on synology, Synology, Synology NAS, Synology Snapshot Replication, Synology Storage

Post navigation

Previous Post: How to license Veeam Enterprise Manager and Add VBR Servers
Next Post: How to reset Microsoft 365 User Password

Related Posts

  • Troubleshooting Synology NAS Domain Join 2
    Synology NAS Domain Join: The Importance of DNS Configuration Reviews
  • CloudFrontAWS
    Serve Private S3 Bucket Contents Via CloudFront AWS/Azure/OpenShift
  • Time machine
    How to Backup MacOS to Synology NAS via Time Machine Backup
  • Protech Synology NAS
    Cybersecurity Tips to Secure Synology NAS against Ransomware Reviews
  • Distributed File System DFS
    How to find Dfs Referral Path and clear Dfs referral Cache Storage
  • how to Install SQL Server Management Studio on Windows Server
    Install SQL Server Management Studio 20 on Windows Server Oracle/MSSQL/MySQL

More Related Articles

Troubleshooting Synology NAS Domain Join 2 Synology NAS Domain Join: The Importance of DNS Configuration Reviews
CloudFrontAWS Serve Private S3 Bucket Contents Via CloudFront AWS/Azure/OpenShift
Time machine How to Backup MacOS to Synology NAS via Time Machine Backup
Protech Synology NAS Cybersecurity Tips to Secure Synology NAS against Ransomware Reviews
Distributed File System DFS How to find Dfs Referral Path and clear Dfs referral Cache Storage
how to Install SQL Server Management Studio on Windows Server Install SQL Server Management Studio 20 on Windows Server Oracle/MSSQL/MySQL

Leave a Reply Cancel reply

You must be logged in to post a comment.

Microsoft MVP

VEEAMLEGEND

vexpert-badge-stars-5

Virtual Background

GoogleNews

Categories

veeaam100

Veeam Vanguard

  • Feature image 1
    Configure and validate Exclusions for Microsoft Defender Antivirus scans Anti-Virus Solution
  • article 1280x720.192a2586
    Windows Deployment Services: How to setup and install WDS role Windows Server
  • ext
    The DriveLock server returned an invalid or unrecognized response Security | Vulnerability Scans and Assessment
  • mountedimagenotaccessible
    Unable to access the image: Make sure that the image path exist Windows
  • banner
    How to Import Data from a GitHub Repository to Postman Backup
  • a Multiple SPF Records  Issues and Examples@2x
    How to setup SPF and TXT Records in AWS AWS/Azure/OpenShift
  • BitLocker beviour when MBAM Agent is removed   No uninstall options in control panel to remove app
    BitLocker behavior when MBAM agent is removed: No Uninstall Option in Control Panel Windows
  • sdfg
    How to Upgrade Windows Admin Center Manually Windows Server

Subscribe to Blog via Email

Enter your email address to subscribe to this blog and receive notifications of new posts by email.

Join 1,819 other subscribers
  • RSS - Posts
  • RSS - Comments
  • About
  • Authors
  • Write for us
  • Advertise with us
  • General Terms and Conditions
  • Privacy policy
  • Feedly
  • Telegram
  • Youtube
  • Facebook
  • Instagram
  • LinkedIn
  • Tumblr
  • Pinterest
  • Twitter
  • mastodon

Tags

Active Directory Azure Bitlocker Microsoft Windows PowerShell WDS Windows 10 Windows 11 Windows Deployment Services Windows Server 2016

Copyright © 2025 TechDirectArchive


Loading Comments...
 

You must be logged in to post a comment.